background image

Installation

We strongly recommend that you install the unit in an easily accessible location, so you can later upgrade
the unit or re-program it in case of incorrect programming.

IMPORTANT

i

@

@

@
@

@

@

@

@

@

Gain access to the back of you vehicle’s Head Unit.
Find the same port as our Audio Harness (see

)

Disconnect the existing connector and plug in our Audio connector into this port, then plug female end of Audio

Harness to  the plug in for your factory connector. Audio harness female connector is not used In some vehicles.

Plug the other end of Audio cable into designated port on MultiMediaLinQ.
Setup proper Emulation Mode for this unit (see

)

Turn the car on and check MultiMediaLinQ functionality (especially Text capability) before the final assembly.
Make sure your USB Storage device has at least two Folders/playlists, in order for this unit to operate properly.
Please mount this unit in an easy accessible location for upgrading and re-programming purposes.
Secure the Head Unit in its original position.

“Connecting MultiMediaLinQ to head unit”

“Emulation Mode Selection”

Installation

3

i

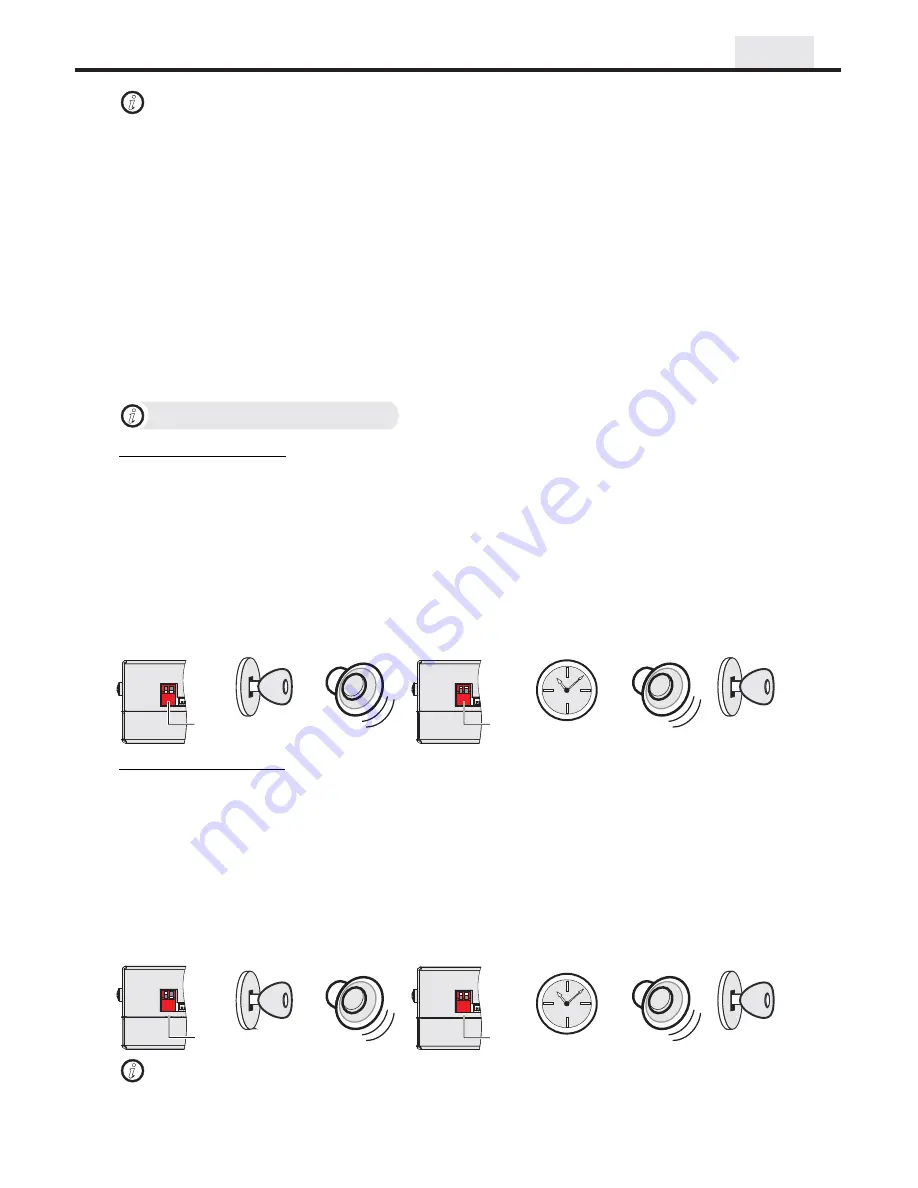
Emulation Mode Selection

MD Changer Emulation Mode programming steps:

Properly install VML player.
Put both programming switches in “DOWN” position.
Put ignition switch into the “ACC” position.
Wait for a long beep followed by a few short beeps. This may take up to one minute.
Return programming switches to their default position (both switches “UP”).

Wait up to 30 seconds for a confirmation beep.

Put ignition switch into the “OFF” position.
Wait at least 10 seconds.
Put ignition switch into the “ACC” or “ON” position.
Check MultiMediaLinQ for functionality, especially TEXT capabilities.

@

@

@

@

@
@

@

@

@

CD Changer Emulation Mode programming steps:

Properly install VML player.
Put “Right” programming switch in the “DOWN” position.
Put ignition switch into the “ACC” position.
Wait for a long beep followed by a few short beeps. This may take up to one minute.
Return programming switches to their default position (both switches “UP”).

Wait up to 30 seconds for a confirmation beep.

Put ignition switch into the“OFF” position.
Wait at least 10 seconds.
Put ignition switch into the “ACC” or “ON” position.
Check MultiMediaLinQ for functionality, especially TEXT capabilities.

@

@

@

@

@
@

@

@

@

!

!

Improper Emulation Mode setting may cause this unit to be unrecognized by the head unit.
CD or MD Changer Emulation Mode Programming MUST BE DONE in order for the unit to find the proper address

location in the vehicle Audio/Video network.

IMPORTANT

i

Both

switches
“DOWN”

Ignition into

“ACC” or “ON”

position

Both

switches

“UP”

Ignition into

“OFF” position

up to 30 sec

Confirmation beep

Ignition into

“ACC” or “ON”

position

Both

switches

“UP”

Ignition into

“OFF” position

up to 30 sec

Confirmation beep

Right

switch

“DOWN”

Summary of Contents for MultiMedia LinQ VML

Page 1: ...Y www vaistech com Model VML TOYOTA LEXUS SCION Quick Start Copyright C 2003 2009 VAIS Technology Automotive Audio Player with USB 2 0 Host and optional HDD Now with iPod USB Audio and Controls Published July 27 2008 ...

Page 2: ...5mm included CAUTION ELECTROSTATIC SENSITIVE DEVICES Flat ribbon cable Pin 1 is marked Do not cover ventilation holes if you have hard drive installed WARNING Connecting MultiMediaLinQ i Hard Drive Installation Removal i WARNING Hard Drive is unformatted by default Please make sure to format your newly received hard drive as FAT32 We also recommend to set up your hard drive with one of the scenari...

Page 3: ...ACC position Wait for a long beep followed by a few short beeps This may take up to one minute Return programming switches to their default position both switches UP Wait up to 30 seconds for a confirmation beep Put ignition switch into the OFF position Wait at least 10 seconds Put ignition switch into the ACC or ON position Check MultiMediaLinQ for functionality especially TEXT capabilities CD Ch...

Page 4: ...ation beep Put ignition switch into the OFF position Wait at least 10 seconds Put ignition switch into ACC or ON position Check SoundLinQ for functionality especially TEXT capabilities Ignition into OFF position Velcro Fasteners are not included VAIS Technology strongly recommends grounding the unit to the car chassis for best results Do not use any screws longer than 5mm Using screws larger then ...

Page 5: ...playlists files SCENARIO 1 PRIORITY 1 VAIS Technology recommends setting up files on your mass storage device according to one of the three scenarios listed below Depending on complexity of your files setup and your needs please choose one of the scenarios below to utilize VML player For more detailed information about scenarios please refer to the Owner s Manual manual m3u Artist cache music Fold...

Page 6: ...igation system Please note all Toyota vehicles except for Prius do not have a list of files and folders display available on the screen due to Radio limitation Please also see Activate Deactivate Disc Switching Fix Function How to Eject a USB device i Simply push the SCAN button twice in one second and then immediately push the PWR button on your radio On some radios the PWR button is combined wit...

Page 7: ... cause the current playlist to start over with the first track after the last track has been played instead of moving on to the next playlist NOTE Repeats all songs in active playlist SCROLL UP SCROLL DOWN and Fast Forward Rewind the song For vehicle not equipped with DISC and DISC buttons if SCAN function is active use SCROLL UP and SCROLL DOWN as DISC and DISC to select the desired playlist in t...

Page 8: ...this function does not use the same button as a FOLDER RANDOM were active before you select FOLDER RANDOM VML will remember status of all these buttons deactivate all of them for the time when FOLDER RANDOM is active After FOLDER RANDOM is deactivated all these functions will be restored automatically NOTE FLD RAND DISC DISC and FLD RAND OR For your convenience VML will automatically deactivate FO...

Page 9: ...NOT look operate or be available on different year and model Song Title Artist Name or Album Name see DISC SCAN function MD changer emulation For Radio Receiver with LCD For Radio Integrated into Navigation System Playlist Title Head Unit DISC CD To switch between the unit sources you need to use or button on the radio Diagram below assumes factory CD changer is present Steering Wheel control To s...

Page 10: ...f SCAN function is active use SCROLL UP and SCROLL DOWN as DISC and DISC to select the desired playlist NOTE DISC if SCAN function is active use SCROLL UP and SCROLL DOWN as TRACK 10 and TRACK 10 to select the desired song NOTE DISC SCAN SCAN NOTE Due to the radio limitation in CD changer emulation VML will only displays two digits of the track number Track 100 200 300 900 will be displayed as tra...

Page 11: ...M is deactivated all these functions will be restored automatically NOTE DISC DISC and DISC RAND For your convenience VML will automatically deactivate DISC RANDOM 15 seconds after you make selection for desired category You can make selection for next available category during this 15 seconds and timeout timer will be reset to new 15 seconds NOTE Category Playlist Artist Album Selection SCROLL UP...

Page 12: ...USB hub unless otherwise specified Partitioned USB memory is compatible with this unit Can not be managed by Windows XP and Windows Vista USB memory or USB Portable Audio Player must be formatted as FAT16 or FAT32 Unit can playback up to 999 playlists and up to 999 files in each playlist per partition Large amount of playlists and files can result in slow navigation and playback You must maintain ...

Reviews: