


6
9
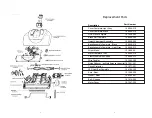
L6138
Locking Pivot / Swivel Neck
Handle Release Pedal
LED Headlight
4 Soft Rubber Wheels
4 Soft Rubber Wheels
Vacuum Intake
Chevron Brushroll
Brush Roller/Brush
Roller Slot for cutting
string/hair
Dry Squeegee for
Hard Floor Cleaning
Neck Area
Identify Parts
NRH-630
Gas Pump Style
4-Wire Swivel Electric
Crush-Proof Hose*
*WSP1-Direct connect wall-end--Must be used with
an electric inlet valve such as the Electravalve.
To insert hose cuff into valve: Lift valve door, insert
cuff into hole.
The gas pump style handle has
360° rotation to minimize kinks,
effort, and in-hand weight. This
handle also contains a three-po-
sition switch to allow the vac-
uum and electric brush to be
controlled from the handle.
*WSP2-Pigtail cord wall-end--Use with standard pin-
jack valve.
To insert hose cuff into valve: Lift valve door, insert
cuff into hole, and plug cord into 110 electrical outlet.
IMPORTANT: Make sure power is turned off before removing the hose
and handle from the wand. Arcing or damage to the electrical contacts
can occur if the wand is removed while brush power is on.
Hose Handling: Hold the hose and handle in any way you find to be the
most comfortable. For an easy grip of the handle, put your index finger and
thumb on both sides of the switch on the gas pump handle. This gives all
the torque necessary to turn left or right with a gentle grip.
Also, for added ease while vacuuming, try keeping the hose behind you rath-
er than out in front of you. Use one hand to hold the handle and the other
hand to hold and guide the hose. Again, do what feels comfortable to you.
Another tip: Vacuum into a room, rather than out of one. This will keep your
hose from getting in your way.
Three-Position Switch:
Allows vacuum to be con-
trolled from the handle.
• Vacuum on, Brush off
• Vacuum off, Brush off
• Vacuum on, Brush on
5 Level Height Adjustment


