background image

5

ENG

Description of basic functions of the recorder:

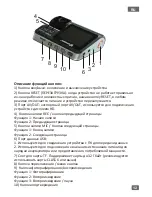
1. Power ON / OFF

When in the OFF mode, press the [ON/OFF] button and hold it for 3 seconds to turn 

the device ON. The recorder will start automatically.

When in the ON mode, press the [ON/OFF] button and hold it for 3 seconds to turn 

the device OFF. The recorder will automatically save the recorded files and turn OFF. 

At this point the blue LED indicator will also turn OFF. 

NOTE:

The recorder will display a reminder of low battery voltage (when the power is low) 

and then it will automatically Turn OFF

2.Photograph Mode

Briefly press [Photograph / Play / Playback] button to switch to the photograph 

mode. In the top left corner of the screen a photography icon will appear. Briefly 

press the [Photograph / Play / Playback] button again to take photos. The screen will 

flash once when photographing, meaning the picture has been taken.

3.Video / Photo Gallery

PPress and hold the [Photograph / Play / Playback] button to switch to playback 

mode. In the top left corner of the screen a playback icon will appear. Briefly press 

the [REC/Previous Page] button to select files upward. Briefly press the [MIC / Next 

page] button to select files downward. Briefly press the [Photograph / Play / 

Playback] button to play the selected video file.

4. Menu Configuration

Briefly press the [MENU] button to enter the video setup status. Briefly press the 

[MENU] button again to switch to configuration mode. Briefly press the [MENU] 

button again to exit the setup mode. While browsing through the configuration list, 

briefly press the [UP] and [DOWN] buttons to select and move between various 

functions, and briefly press the [CONFIRM] button to make a selection.

5. HOLD functionality: 

Press the [CONFIRM] button while recording, during this interval (when HOLD 

function is enabled) the recorded video file will NOT be automatically overwritten.

6. USB data copying: 

After pressing the [START] button, simply connect the DVR to a computer via USB.

7. Product power supply:

a)  Built-in battery

b)  External 5V power supply (mini USB port)

Note

1. When the device is not working properly due to unknown reasons, it is 

necessary to reset the product. In order to do so, use a thin and hard object 

and press the “RESET” button to restart the device.

2. If a Memory Card is inserted, and the screen displays a memory card error, 

than simply format the Memory Card.

Summary of Contents for VC-732

Page 1: ...2 6 10 Instruction Manual Instrukcja obsługi руководство по эксплуатации VC 732 Digital camera for car Cyfrowa kamera samochodowa Автомобильная видеокамера ...

Page 2: ...1 Vakomtek S A Vakomtek S A Vakomtek S A Vakomtek S A 2014 2014 ...

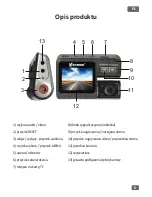
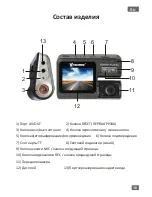
Page 3: ... button 4 Switch Menu button 5 Photograph Play Playback button 6 Confirmation button 7 Memory Card Slot 1 2 4 8 9 10 11 13 5 6 7 3 12 8 LED Power ON Indicator blue 9 MIC Next Page button 10 REC Previous Page button 11 Front Camera 12 Display Screen 13 Rear Camera ...

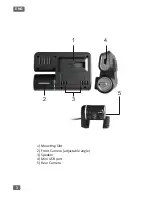
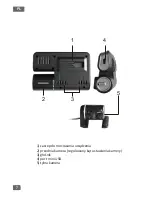
Page 4: ...3 ENG 1 Mounting Slot 2 Front Camera adjustable angle 3 Speaker 4 Mini USB port 5 Rear Camera 1 3 2 4 5 ...

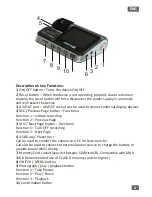
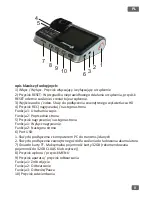
Page 5: ...rding Function 2 Previous Page 5 MIC Next Page button Functions Function 1 Turn OFF recording Function 2 Next Page 6 USB Data Power port Can be used to connect the camera to a PC for Data transfer Can also be used to connect to external power source to charge the battery or provide power while driving 7 Memory Card socket specify the type SD MicroSD Compatible with MAX 32GB recommended use of CLAS...

Page 6: ... REC Previous Page button to select files upward Briefly press the MIC Next page button to select files downward Briefly press the Photograph Play Playback button to play the selected video file 4 Menu Configuration Briefly press the MENU button to enter the video setup status Briefly press the MENU button again to switch to configuration mode Briefly press the MENU button again to exit the setup mode While...

Page 7: ...cz przycisk zasilania 4 rzycisk wyboru przycisk MENU 5 aparat odtwórz 6 przycisk zatwierdzania 7 miejsce na kartę TF 8 dioda sygnalizacyjna niebieska 9 przycisk nagrywania następna strona 10 przycisk nagrywania video poprzednia strona 11 przednia kamera 12 wyświetlacz 13 gniazdo podłączenia tylnej kamery ...

Page 8: ...7 7 PL 1 zaczep do mocowania urządzenia 2 przednia kamera regulowany kąt ustawienia kamery 3 głośnik 4 port mini USB 5 tylna kamera 1 3 2 4 5 ...

Page 9: ...unkcja 2 Poprzednia strona 5 Przycisk nagrywania następna strona Funkcja 1 Wyłącz nagrywanie Funkcja 2 Następna strona 6 Port USB 1 Służy do podłączenia z komputerem PC do transmisji danych 2 Służy do podłączenia zewnętrznego źródła zasilania do ładowania akumulatora 7 Gniazdo karty TF Maksymalna pojemność karty 32GB rekomendowana pojemność do 32GB CLAAS 6 lub wyższej 8 Przycisk wyboru przycisk ME...

Page 10: ...trony aby wybrać pliki poniżej Krótko naciśnij przycisk aparatu odtwarzania aby odtworzyć wybrany plik video 4 Konfiguracja menu krótko naciśnij przycisk menu aby wejść do ustawień video Krótko naciśnij przycisk menu ponownie aby wyjść z ustawień Pomiędzy opcjami konfiguracji krótko naciśnij klawisze góra dół aby wybrać i poruszać się pomiędzy różnymi funkcjami i któtko naciśnij przycisk potwierdzen...

Page 11: ...еню кнопка 5 Кнопка фотографирования воспроизведения 6 Кнопка подтверждения 7 Слот карты TF 8 Световой индикатор синий 9 Кнопка записи MIC кнопка следующей страницы 10 Кнопка видеозаписи REC кнопка предыдущей страницы 11 Передняя камера 12 Дисплей 13 Порт зеркалирования заднего вида 1 2 4 8 9 10 11 13 5 6 7 3 12 ...

Page 12: ...11 RU 1 3 2 4 5 1 Фиксатор 2 Передняя камера регулируемая вращением 3 Динамик 4 Порт Mini USB 5 Задняя камера ...

Page 13: ...я 2 Предыдущая страница 5 Кнопка записи MIC Кнопка следующей страницы Функция 1 Конец записи Функция 2 Следующая страница 6 Порт данных USB 1 Используется для соединения устройства с ПК для передачи данных 2 Используется для подключения к внешним источникам питания для зарядки аккумулятора или предоставления потребляемой мощности 7 Слот для карты TF Поддерживает карты до 32 Гбайт рекомендуется исп...

Page 14: ...кнопку фотографирования воспроизведения чтобы фотографировать Экран будет мигать один раз при съемке что означает что был сделан снимок 3 Воспроизведение видеозаписи изображенияНажать и удерживать кнопку фотографирования воспроизведения чтобы переключиться в режим воспроизведения В верхнем левом углу экрана появится значок воспроизведения Коротко нажать кнопку записи REC предыдущая страница для вы...

Page 15: ...aging your health and well being therefore proper utilization is very important Bateria litowo jonowa Nie wyrzucać ze zwykłymi nieposortowanymi odpadami komunalnymi W celu uzyskania informacji o dostępnych na Państwa terenie metodach utylizacji należy skontaktować się z władzami lokalnymi Złomując we właściwy sposób ograniczają Państwo ryzyko wystąpienia negatywnego wpływu na środowisko i ludzi kt...

Reviews: