Vacmaster DVTB2010 Operator'S Manual Download Page 12

12

GB

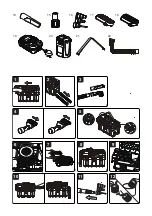
3)  The utility nozzle comes with two different adapters. With the nozzle facing upwards, slide the 

open edge of the adapter onto the utility nozzle  until it securely clicks onto the mounting clip (Fig. 
4).

4)  To remove, press the securing tab and slide the accessory tool off the utility nozzle (Fig. 4).

4. Installing Shoulder Strap

1)  The vacuum cleaner has two mounting brackets on either side of the top cover for the optional 

shoulder strap.  Ensure the metal connections on the shoulder strap are fully inserted into each 
mounting bracket (Fig. 5).

5. Installing & Removing Battery Pack

NOTE: This vacuum cleaner has the capacity to hold two battery packs if required, one 
for operation and one for secondary use in a storage compartment. Follow the product 
labelling to ensure the operational battery is located into the correct battery bay.

1)  Ensure the vacuum cleaner switch is in the 'O' OFF position and the hose is removed .
2)  To access the battery cover, un-clip the upper cover latches to open the top cover. 
3)  To insert the battery pack, lift the battery bay cover and slide the battery along the guide rails of 

the operational/power side, ensuring the battery locks into position.

4)  To remove the battery pack, stop the vacuum cleaner, activate the release latch on the battery 

pack and slide the battery out of the chamber.

5)  The battery can be stored in the storage bay when not utilised.

6. Installing Washable Cartridge Filter

1) Verify that the battery is removed and remove the power head.
2)  Install the cartridge filter over the filter cage; this can only be installed one way. Secure the filter 

with the retainer nut, turning clock-wise to tighten. Ensure the filter sits flush against the power 
head forming a tight seal. Be careful not to over-tighten (Fig. 6).

Summary of Contents for DVTB2010

Page 1: ...DVTB2015 15L 20V MAX...

Page 2: ......

Page 3: ......

Page 4: ......

Page 5: ...1 2 5 7 8 8 9 10 3 3 4 5 11 6 1 1 12 14 13...

Page 6: ...that with Vacmaster you are obtaining a high quality product engineered for optimal performance This vacuum cleaner is suitable for use with both liquids and dry materials FOR YOUR SAFETY CAREFULLY RE...

Page 7: ...e hazards involved Children shall not play with the vacuum cleaner Cleaning and user maintenance shall not be made by children without supervision The vacuum cleaner is only to be used with the batter...

Page 8: ...ttery Safety Instructions Recharge only with the charger specified by the manufacturer A charger that is suitable for one type of battery pack may create a risk of fire when used with another battery...

Page 9: ...hort circuit and fumes may be emitted Ensure fresh air and seek medical assistance in the event of discomfort Always remove battery pack before storing the device When battery becomes fully charged un...

Page 10: ...shock or electrocution Protect the charger against moisture and wet conditions There is a danger of electric shock Operate the charger only with the appropriate original batteries Charging other batt...

Page 11: ...Verify that the battery pack is not installed and un clip the main latches to release the collection tank and remove the power head 2 Remove the contents make sure you have all contents as listed on p...

Page 12: ...rational battery is located into the correct battery bay 1 Ensure the vacuum cleaner switch is in the O OFF position and the hose is removed 2 To access the battery cover un clip the upper cover latch...

Page 13: ...level indicator panel to show the current charging status OPERATION Green Light Green Light Yellow Light Red Light Capacity Status ON ON ON ON 75 100 Continue use OFF ON ON ON 50 75 Continue use OFF O...

Page 14: ...r battery bay Fig 9 5 Turn the motor on by assigning the switch to the I ON position 6 Once you have completed vacuuming turn the motor off by switching to the O OFF position 5 Blower Operation WARNIN...

Page 15: ...Cleaning Washable Cartridge Filter IMPORTANT For optimal performance it is recommended to replace the old filter with a new filter regularly Replacement filters can be purchased from www cleva europe...

Page 16: ...lution The vacuum cleaner will not operate The battery has no capacity Charge the battery The battery is not inserted properly Insert the battery pack correctly Wrong battery being used Be sure to use...

Page 17: ...dance with the local regulations where they will be recycled in an environmentally friendly manner TECHNICAL DATA Product Model Number DVTB2015 Battery Model Number 20LB4027 Charger Model Number 20LFC...

Page 18: ...1 3 2 4 5 6 8 7 9 10 11 12 10 15 19 20 16 17 18 21 22...

Page 19: ...19 GB GB...

Page 20: ...20 GB...

Page 21: ...21 GB GB...

Page 22: ...DVTB2015 Suzhou Cleva Electric Appliance Co Ltd No 8 Ting Rong Street Suzhou Industrial Park Suzhou Jiangsu Province China www cleva europe com Made in P R C...

Reviews: