background image

7 User settings

Switching the childproof lock off

▸ With the childproof lock activated, select the «Childproof

lock» user setting. 

▸ Touch   to deactivate the childproof lock.
▸ Confirm the setting with 

.

off

Childproof lock

7.2 

Languages

The language of the display can be changed. Different languages are available for selec-
tion.

▸ Select the «Languages» user setting.
▸ The language selection can be changed using   or   be-

low.

▸ Confirm the setting with 

.

Languages

English

7.3 

Brightness

The brightness of the display can be changed. Nine different levels are available for se-
lection.

▸ Select the «Brightness» user setting.
▸ Select level of brightness from «1–9» on the slider.
▸ Confirm the setting with 

.

Brightness

7.4 

Loudness

The loudness of the button signal can be changed. Nine different levels of loudness are
available for selection.

▸ Select the «Loudness» user setting.
▸ Select level of loudness from «1–9» on the slider.
▸ Confirm the setting with 

.

Loudness

27

Summary of Contents for GKD46TIMASZO

Page 1: ...Operating instructions GKD46TIMASZO Fusion Induction hob with integrated range hood...

Page 2: ...cal standard of the appliance at the time these operating instructions went to press The right to make technical modifications for the purpose of the further development of the appliances is reserved...

Page 3: ...at indicator 14 5 6 Power management 15 5 7 PowerPlus 15 5 8 Operating time 15 5 9 Cooking functions 17 5 10 Easy cooking 18 5 11 Timer 20 5 12 Pause cooking 21 5 13 Wipe protection 22 5 14 Recall fun...

Page 4: ...lack of experi ence and or knowledge provided they are supervised or have been instructed on the safe use of the appliance and have understood the haz ards involved Children shall not play with the a...

Page 5: ...RNING NEVER store ob jects on the hob due to the risk of fire WARNING The cooking pro cess must be constantly su pervised A short cooking process must be supervised the whole time Do not operate the a...

Page 6: ...aware of the danger involved in using electrical appliances Ensure proper supervision and do not allow children to play with the appliance there is a danger that children could hurt themselves Caution...

Page 7: ...erly disconnect it from the power sup ply immediately If the mains cable of the appliance is damaged it must be replaced by Cus tomer Services in order to avoid hazard Caution Accessible parts may bec...

Page 8: ...nce remove the screw fuse from the holder or switch the circuit breaker off or disconnect from the mains supply When cleaning the appliance make sure no water gets inside it Use a mod erately damp clo...

Page 9: ...oom is well ventilated 3 Appliance description 3 1 Appliance overview 1 cooking zone 210 mm back left PowerPlus output 3500 W 1 cooking zone 210 mm back right PowerPlus output 3700 W 2 cooking zones 1...

Page 10: ...he pan must be centred on The diameter of the base of the pan should not be greater than the diameter of the cooking zone 3 5 Pan detection Each cooking zone is equipped with pan detection This detect...

Page 11: ...r diameter of the cookware We advise against the use of cook ware with a pressed base as this type of cookware does not work with all in duction hobs Some induction hobs have the melt keep warm and si...

Page 12: ...t indicate any malfunction nor does it affect the functioning of the appliance in any way Noise depends on the cookware used If the noise causes considerable disturb ance it can help to change the coo...

Page 13: ...for the range hood Functions and op tions of the range hood OptiLink After running time CleanAir Filter options Hold or de pressed for 1 second or touch 2 User menu Functions and op tions affecting th...

Page 14: ...educing stewing steaming Vegetables potatoes sauces fruit fish 5 6 Continue cooking braising Pasta soup braised meat 7 Gentle frying R sti omelettes breaded fried foods sausages 8 Frying deep frying M...

Page 15: ...6 6 If the power level is increased above these levels PowerPlus switches off 5 7 PowerPlus All the cooking zones are equipped with the PowerPlus booster When PowerPlus is switched on the cooking zone...

Page 16: ...ooking zone 1h 30 Changing the operating time Hold the cooking zone with the operating time depressed for 1 second or touch 2 Increase or decrease the selected value with or re spectively Use and in t...

Page 17: ...p warm The keep warm setting keeps cooked food warm at approx 65 C Simmering With the simmer function sausages dumplings and stuffed pasta for instance can be cooked just below boiling point Switching...

Page 18: ...In order to correctly detect the boiling point use cool unsalted unseasoned water only The use of a pan lid is recommended Cooking Control can only be started on a cooking zone that is switched off Th...

Page 19: ...king menu with Automatic boost With the automatic boost a cooking zone works at the highest continued cooking level for a certain duration see table When this duration is up it automatically switches...

Page 20: ...99 hours and 59 minutes It can be used at any time and independently of all other functions Setting the timer Touch Increase or decrease the selected value with or re spectively Switch between hours a...

Page 21: ...n be resumed using the previous settings Temperature Control and Cooking Control are switched off through use of pause cooking Switching pause cooking on Touch All cooking zones that are switched on s...

Page 22: ...an be cancelled during the first 3 seconds Then disappears Touch Wipe protection has been cancelled and the appliance may be operated again Wipe protection activated 19s Touch the button to switch the...

Page 23: ...s the range hood s most powerful level The range hood automatically changes the power level to a lower level after 6 minutes After 30 seconds without an entry the range hood resets to power level P 6...

Page 24: ...above are displayed OptiLink Standard 6 5 CleanAir With this function the range hood is regularly switched on after operation in order to re move unpleasant odours from the air The following settings...

Page 25: ...tes 30 minutes The range hood continues to run at level 1 for 30 minutes Setting the after running time Hold depressed for 2 seconds or touch 2 Select the After running time menu item with or Make sel...

Page 26: ...7 1 Childproof lock The childproof lock makes it difficult for children to switch the appliance on Switching the childproof lock on Select the Childproof lock user setting Touch to activate the child...

Page 27: ...ge selection can be changed using or be low Confirm the setting with Languages English 7 3 Brightness The brightness of the display can be changed Nine different levels are available for se lection Se...

Page 28: ...ion Confirm the setting with Ventilation Extracted air 7 7 Factory setting User settings that have been changed can be restored to the factory setting Select the Factory setting user setting Touch to...

Page 29: ...ubborn soiling e g boiled over milk while still warm using a glass ceramic hob scraper Always follow the scraper manufacturer s instructions for use Foods with a high sugar content e g marmalade that...

Page 30: ...nsate water can build up on the inside Wash with a brush if necessary and then wipe dry with a kitchen towel Cleaning the grease filters The grease filters must be cleaned at least once a month with n...

Page 31: ...ssette can be cleaned in the dishwasher together with the grease fil ters Place the filter cassette in the dishwasher with the handle facing down or to the side Inserting the filter cassette Reassembl...

Page 32: ...the control panel Remove the object or liquid from the display The appliance can be used again as normal Repeated activation Release or clean buttons Object e g pan dish on the control panel There is...

Page 33: ...se with induc tion hobs Use suitable magnetic cook ware See Cookware sec tion Cookware is too small for the cooking zone selected The diameter of the base of the cookware must be at least 10 cm Childp...

Page 34: ...object e g paper underneath the hob is obstructing the air in take for cooling the hob Remove object in the drawer underneath the hob Touch any button to cancel the error After 10 minutes the applian...

Page 35: ...nergy consumption of entire hob EC Wh kg 173 9 11 2 Range hood In accordance with EU Regulation No 65 2014 and No 66 2014 Description Abbreviation Unit Value Brand V ZUG Ltd Model number 31094 Yearly...

Page 36: ...er allow children to play with packaging material due to the danger of injury or suffocation Store the packaging material in a safe location or dispose of it in an environmentally friendly way 12 2 Sa...

Page 37: ...sy cooking function Switching off 19 Energy efficient cooking 12 Extraction mode 12 F Factory setting 28 Filter 25 Resetting 25 Flexible cooking 10 G General operation 13 H How induction hobs function...

Page 38: ...rcoal fil ters 12 Residual heat indicator 14 S Safety precautions General 4 Safety shut off 32 Serial number SN 39 Service Support 39 Service agreement 39 Setting the power level 13 Spare parts 35 Swi...

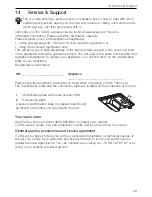
Page 39: ...tification plate of your appliance My appliance information SN __________________________ Appliance __________________________________ Please have this appliance information to hand when contacting V...

Page 40: ...cooking zone or range hood Touch or swipe the slider 0 P to set the power level To switch cooking zone or range hood off Touch the required cooking zone or range hood Touch 0 on the slider To switch a...

Reviews: