background image

Installation instructions

Built-in variants of gas hob

GAS731

1094429-04

26/07/2023

1094429-04

7

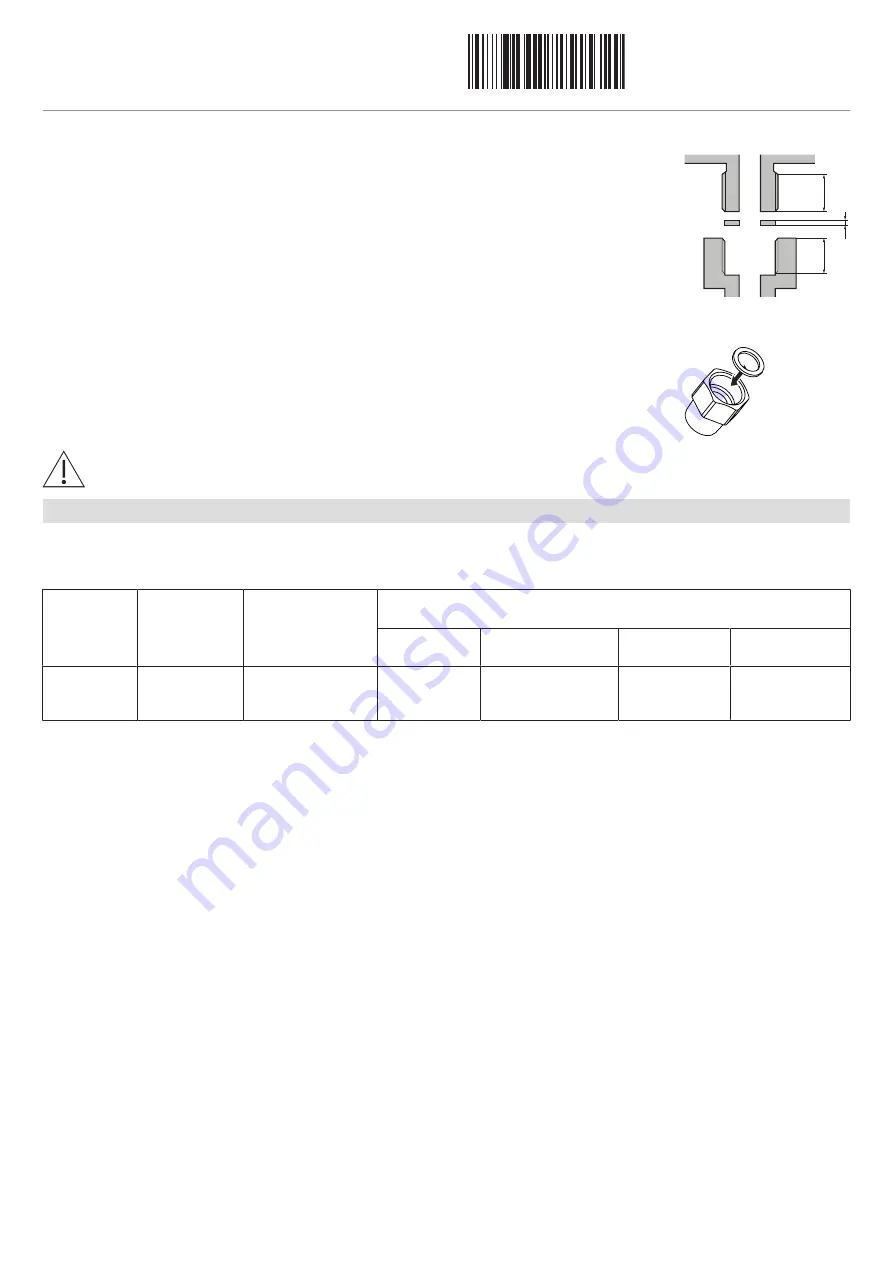
Thread length

Thread length of gas connection on the appliance (external thread) 

So

 is 16 mm. If the thread

length of the on-site counterpart (internal thread) 

Si

 is longer than 17 mm, the front-end seal is no

longer guaranteed through the supplied green sealing ring H64006 with a height of 1.5 mm.

In this case, the yellow sealing ring 1030096 with a height 

h

 of 5 mm is to be used as it provides a

leak tight connection for on-site thread lengths of up to 20.5 mm.

Si

So

h

½-inch conical thread

If the gas connection has a conical thread, the transition piece and sealing ring must first be
screwed onto the appliance. The transition piece has a conical external thread R ½-inch in accord-
ance with ISO 7/11. In the case of a conical screw connection, the thread makes the seal, which is
why the thread must be sealed with hemp or Teflon tape.

After the gas has been connected, leak and function testing must be carried out by a registered gas fitter.

Conversion to another gas type

The appliance is set up for a certain gas type, which is also recorded on the identification plate. The appliance can be converted to an-
other type of gas using the nozzle sets supplied (others available as accessories). This requires the burner injector nozzles and the gas
tap bypass nozzles be changed.

Type

Default gas 
setting

Nozzle set 
(supplied)

Additional nozzle sets available for country-specific combinations of gas type
and connection pressure

Liquid gas G30,
50 mbar

Natural gas L/K (G25/
G25.3), 25 mbar

Natural gas G20,
13 mbar

Natural gas G20,
25 mbar

GAS731GKBZ Natural gas H, E

(G20), 20 mbar

Liquid gas butane/
propane (G30/31),
28–30/37 mbar

Nozzle set
1015475

Nozzle set 1015476

Nozzle set
1015478

Nozzle set
1015477

All the nozzles are numbered to avoid any mix-up.
Always disconnect the appliance from the electricity and gas mains before changing the nozzles.

Changing the injector nozzles

Remove the pan supports and burners.

Remove injector nozzles (using 7 mm socket wrench).

Screw in the new injector nozzles (according to the table) as far as they will go.

Changing the bypass nozzles

Pull all control knobs up and off.

Loosen all the screws in the burner plates (torx no. 10) and then remove the burner plates.

Remove the drawers or cabinet front to gain access from below.

Flush mounted

Surface mounted

A

Remove all the nuts from around the circumference of
the appliance (using 8 mm socket wrench).

A

Loosen any adjusting braces and lift gas hob up and out
of the cut-out.

B

Supporting the appliance tray with one hand, unscrew
the two knurled nuts in opposite corners.

B

Remove lateral screws from around the circumference
of the appliance (torx no. 20).

C

Let the appliance tray slide down and remove from the
kitchen cabinet.

C

Lift the base plate upwards and carefully remove from
the base.

Remove the springs and microswitch from the gas taps.

Remove the bypass nozzle from each gas tap and screw in the new nozzle as far as it will go.

Put back the microswitch and springs.

Summary of Contents for GAS731 Series

Page 1: ...tible material the guidelines and standards for low voltage installations and fire protection must be strictly observed All leak tests should be done with a soapy water solution Never use an open flame to check for leaks Validity These installation instructions apply to the following models Model designation Model number Type Appliance class GAS731GK 31075 GAS731GKBZ Class 3 DIN EN 30 1 1 General ...

Page 2: ...e surface mounted combination of several hobs 1019199 Flush installation Designation Art no Steel angle set hob size 70 H63773 Designation Art no Instant adhesive for installation of the steel angle 50 ml B11657 Straight mixing nozzle B11656 TREMCLEAN isopropyl alcohol 1000 ml 1056609 Black silicone FA880 310 ml B11555 Anthracite silicone FA880 310 ml B11556 White silicone FA880 310 ml 1031313 Sto...

Page 3: ... appliance for base plate Ra Outer corner radii of cut out S Minimum distance between the top of the work surfaces and any drawer T Minimum distance between the cut out in the back and any drawer Installation Do not damage the sealing bead The sealing bead must lie all around the edge of worktop Create an accurate installation cut out Carefully put the appliance in the installation cut out and pre...

Page 4: ...tween the cut out in the back and any drawer Installation Create an accurate installation cut out The mounting surface can be reamed out or created by installing wood stone supports or using the steel angle set see Ac cessories Access to the appliance from below via the entire cut out area must be guaranteed For servicing purposes the appliance base can be removed from below Prepare the cut out an...

Page 5: ...onnection cable has either a plug or three stranded wires Plug in appliances must be connected to an easily accessible power socket Appliances with stranded wires must be connected by a qualified electrician via a junction box according to local regulations Installation pipe Distribution box Clamp The mains plug must not be cut off Ventilation In order to guarantee minimum ventilation a space of 2...

Page 6: ...de of over 2 000 metres a reduced performance must be expected Gas connection The gas connection and the conversion to another gas type must be carried out by an authorized installer 51 46 22 4 G ISO 228 1 GAS731 65 The gas connection must be positioned so that the stop cock and the supply connection point are accessible with the appliance in stalled The gas connection must be positioned so that i...

Page 7: ...ditional nozzle sets available for country specific combinations of gas type and connection pressure Liquid gas G30 50 mbar Natural gas L K G25 G25 3 25 mbar Natural gas G20 13 mbar Natural gas G20 25 mbar GAS731GKBZ Natural gas H E G20 20 mbar Liquid gas butane propane G30 31 28 30 37 mbar Nozzle set 1015475 Nozzle set 1015476 Nozzle set 1015478 Nozzle set 1015477 All the nozzles are numbered to ...

Page 8: ... position for each burner Nozzle table Change injector nozzles using a 7 inch socket wrench or corresponding wrench For the appliance the following gas types are available Gas type Test gas Connection pressure Injector nozzles ø in hundredths of a mm Wok burner Standard burner Rapid burner A inside B inside A outside B outside A B A B Natural gas H E G20 20 mbar 71 42 2 125 82 97 48 125 63 Liquid ...

Reviews: