


1. BEFORE USE
Unpack your ceiling fan carefully then remove all parts and components and lay on a cloth or
soft surface to avoid damage. Do not lay the motor housing on its side, the housing may get
damaged. Before commencing installation, check that all parts are included.
2. PRODUCT ASSEMBLY
WARNING: All electrical tasks should only be undertaken after disconnection of electricity
by removing fuses or turning off the circuit breaker to avoid risk of electric shocks.
ASSEMBLY STEPS:
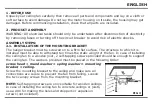
2.1. INSTALLATION OF THE MOUNTING BRACKET
The hanger bracket must be screwed on to a firm flat surface. The structure to which it is
installed must be able to withstand ten times the static weight of the fan. In case of installing
the ceiling fan to a wooden joist, 2 self-tapping screws provided should be enough to support
the ceiling fan. The washers provided must be placed in the following Order:
screw head > round washer > spring washer > mounting
bracket > ceiling.
Screw the mounting bracket to the ceiling and make sure all
connections are secure to prevent the fan from falling. Loosen
the two canopy screws from the mounting bracket.
NOTE:
Self-tapping screws are only suitable for wooden ceilings.
In case of installing the ceiling fan to concrete ceilings or joists,
use a drill for making the holes and stoppers or expansion
screws (not included).
ENGLISH
FIG 3
Summary of Contents for VT-6052-5
Page 33: ...8 8 8 2 3 m 45 kg 8 3 mm BULGARIAN...
Page 34: ...150 mm 6 BULGARIAN...
Page 35: ...BG V TAC 2 10 12 24 BULGARIAN...
Page 36: ...1 1 2 3 4 5 6 7 8 1 2 2 1 3 3 2 9 10 11 12 13 14 15 BULGARIAN...
Page 37: ...2 2 4 U 4 5 U U 5 5 6 6 2 3 7 7 7 2 4 8 9 BULGARIAN...
Page 38: ...2 5 3 10 3 10 10 2 6 LED 11 3 12 H M L BULGARIAN...
Page 39: ...1H 1 2H 2 4H 4 8H 8 1 2 1 A23 12V 3 4 1 2 BULGARIAN...
Page 40: ...5 1 2 1 2 3 4 5 6 7 1 2 3 1 2 BULGARIAN...
Page 81: ...8 8 8 2 3 45 kg 8 GREEK...
Page 82: ...3 mm 150 mm 6 GREEK...
Page 83: ...EL V TAC V TAC 2 10 12 24 GREEK...
Page 84: ...1 1 2 3 4 5 6 7 8 1 2 2 1 3 3 2 9 10 11 12 13 14 15 GREEK...
Page 85: ...2 2 4 U 4 5 U U 5 5 6 6 2 3 2 4 8 9 2 5 3 10 GREEK...
Page 86: ...3 10 10 2 6 LED 11 3 12 H M L 1H 1 2H 2 4H 4 8H 8 GREEK...
Page 87: ...1 2 A23 12V 3 4 1 2 GREEK...