background image

2


(FR) INTRODUCTION & GARANTIE


Merci d’avoir choisi et acheté un produit à V

-TAC. V-

TAC vous offrira le meilleur. Veuillez lire


attentivement ces instructions avant de commencer l’installation et conservez ce manuel à


portée de main pour référence ultérieure. Si v

ous avez d’autres questions, veuillez contacter


notre distributeur ou le fournisseur local auprès duquel vous avez acheté le produit. Ils sont 
formés et prêts à vous servir au mieux. La garantie est valable pour une période de 2 ans à 

compter de la date d’achat. La garantie ne s’applique pas à des dommages causés par une


installation incorrecte ou une usure anormale. La société ne donne aucune garantie pour des 
dommages causés à une surface en raison 

d’un

 enlèvement et 

d’une

 installation incorrects du 

produit. Ce produit est couvert par une garantie pour des défauts de fabrication seulement

.


(DE) INFÜHRUNG UND GEBRAUCHSANWEISUNG


Wir danken Ihnen, dass Sie ein V-TAC ausgesucht und gekauft haben. V-TAC wird Ihnen die 
besten Dienste erweisen. Lesen Sie, bitte, diese Gebrauchsanweisung vor der Montage 
aufmerksam durch und halten Sie sie für Auskünfte in der Zukunft parat. Sollten Sie weitere 
Fragen haben, kontaktieren Sie, bitte, unseren lokalen Händler oderVerkäufer, von dem Sie 
das Produkt gekauft haben. Sie sind ausgebildet und bereit Sie auf die bestmögliche Art und 
Weise zu unterstützen. Die Gewährleistungsfrist beträgt 2 Jahre ab dem Kaufdatum. Die 
Gewährleistung bezieht sich nicht auf Schäden, die durch unsachgemäße Montage oder 
ungewöhnliche Abnutzung und Verschleiß verursacht worden sind. Das Unternehmen gewährt 
keine Garantie für durch unsachgemäßen Produktabbau oder unsachgemäße Montage 

entstandene Schäden an jeglichen Oberflächen. Diese Gewährleistung gilt nur für Herstellung

smängel.


(BG) 

ВЪВЕДЕНИЕ


И


ГАРАНЦИЯ


(V-TAC) 

ще


ви


послужи


по


най

-

добрия


възможен


начин.


Моля


прочетете


тези


инструкции


внимателно преди инсталация и съхранявайте ръководството за бъдещи справки. Ако


имате други въпроси, моля свържете се с нашия дилър или с местния търговец, от който


сте закупили продукта. Те са обучени и са готови да ви послужат по най

-

добрия начин.


Гаранцията


е


валидна


за


период


от

 2 

години


след


датата


на


закупуване.


Гаранцията


не


се


прилага по отношение на щети, причинени поради неправилен монтаж или необичайно


износване. Дружеството не предоставя гаранция срещу щети по каквато и да е


повърхност поради неправилното отстраняване и монтаж на продукта. Гаранцията за


този


продукт се


дава


само за


производствени дефекти.


(HR) UVOD I JAMSTVO


Hvala vam, što ste odabrali

 i kupili tvrtke Vi-Tek (V-TAC). Vi-Tek (V-

TAC) će vam poslužiti na


najbolji mogući način. Molimo, pažljivo pročitajte ove upute prije instalacije i spremite upute


za buduću uporabu. Ako imate dodatnih pitanja, molimo obratite se našemprodavaču ili


lokalnom trgovcu gdje ste kupili ovaj proizvod. Oni su osposobljeni i spremni vam pomognu na 

najbolji način. Jamstvo za ovaj proizvod vrijedi za razdoblje od 2 godine, računajući od dana


kupnje. Jamstvo se ne odnosi na štetu, nastalu nepravilnom ugradnjom ili neuobičajenim


habanjem. Tvrtka ne jamči za štete koje nastanu po bilo kojoj površini proi

zvoda, zbog 

nepravilne demontaže odnosno i ugradnje proizvoda. Jamstvo za ovaj proizvod dano je samo


za nedostatke koji su nastali samo tijekom njegove proizvodnje.


Summary of Contents for SMART LIGHT VT-5050

Page 1: ...F CONTENTS ENGLISH 1 18 FRENCH 19 32 GERMAN 33 46 BULGARIAN 47 60 CROATIAN 61 74 PORTUGUESE 75 88 SPANISH 89 102 HUNGARIAN 103 116 ITALIAN 117 130 GREEK 131 144 POLISH 145 158 ROMANIAN 159 172 CZECH 1...

Page 2: ...vendor from whom youhave purchased theproduct Theyaretrained andreadyto serve you at the best The warranty is valid for 2 years from the date of purchase The warranty does not applytodamagecaused byin...

Page 3: ...e unseren lokalen H ndler oderVerk ufer von dem Sie das Produkt gekauft haben Sie sind ausgebildet und bereit Sie auf die bestm gliche Art und Weise zu unterst tzen Die Gew hrleistungsfrist betr gt 2...

Page 4: ...icies de cualquier tipo generados por su eliminaci n e instalaci n incorrectas La garantia cubrir solo defectos de producci n de f brica HU BEVEZET S S GARANCIA K sz nj k hogy v lasztotta s megv s rol...

Page 5: ...ru sau cu comerciantul de la care v a i achizi ionat produsul Ace tia sunt bine instrui i i ntotdeauna sunt disponibili s v serveasc n modul cel mai bun posibil Garan ia este valabil pe un termen de 2...

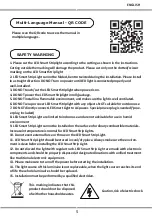
Page 6: ...EDSmartStrip Lightare limitedtoindoor useand arenotadvisable for use in humid environment 9 LEDSmartStrip Light cannotbeinstalled onthesurface ofordinarycombustible materials Increase intemperatureisn...

Page 7: ...ypairing the striplight with V TAC Smart Light APP 2 The Wi controller allows alternative method of enabling the controller into pairing mode for connectingwiththeAPP Press andholdtheON OFFbutton for...

Page 8: ...ow you to step by step switch from 3000K to 6400K Tap on CT until you reach 6400K output and tap on CT until you reach 3000K This features allows you to set desired color temperature ranging from 3000...

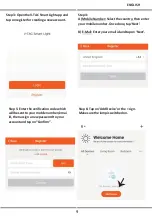
Page 9: ...Step1 Connecttheadaptor controller andstrip lightas per below diagram WIFI CONTROLLER For ANDROID For IOS Step 2 Scan the given QR code or download V TAC Smart Light from the App Store iOS or theGoog...

Page 10: ...cation code which willbe sent toyour mobilenumber emai id then assign a new password to your accountandtapon Con rm Step 4 A Mobile Number Select the country then enter your mobilenumber Oncedone tap...

Page 11: ...tedlyfor 3times with shortintervalsof less than 2seconds B Tap the Howtomakelightblinkrapidly link as shown on the imageto the right C You can also enable pairing mode from the Wi Fi controller Press...

Page 12: ...registers and initializes thedevice lamp refimage below Step 10 Once your device is successfully added rename the device to your preference Step 11 After successfully pairing the Wi Fi receiver with...

Page 13: ...g account with Amazon Alexa please proceed tologging in Step3 Tap on settings and tap on skillsandgames as shown below Step2 Once you are on the Amazon Alexa home page tap on the lower right icon wher...

Page 14: ...mart Light login IDandpassword andtap on LinkNow Step7 OnceyoutaponLinkNow youwillbe redirected to a new page requesting for authorization RefImagebelow Tapon Authorize Step8 You will receive con rmat...

Page 15: ...Note Discovering the device must be done every time the device s name is changed on the app ALEXA Commands Now youcan controlyour smart deviceusing voicecommandson Alexa Below are a few commands you...

Page 16: ...ountwithGoogleHome please proceedto logging in c Create aNewHome Choose from theexistinghome if any d Power ONthe GoogleHome deviceand connectit tothe App Then Proceed to step 2 b Step2 Onceyouareonth...

Page 17: ...g step 3 Tap onthearrowsection ashighlighted inthebelowimage Step5 Sign In with your V TAC Smart Light Logincredentials to Linkthe Smart Lightdevice Step4 Type V TAC Smart Light on the search bar andt...

Page 18: ...device to add to your home b Selectthedeviceandtapon Next as show in imageb a Account is now Linked b Step8 Select the Home where you would like to add the Smart Light under Or you can create a Newhom...

Page 19: ...wer and Dimmingfunctionality Google Commands Now youcancontrolyour smart deviceusingvoice commandsonGoogleHome Below are a few commands you can use OK Google turn on off bedroom t light OK Google set...

Page 20: ......

Reviews: