background image

SETTINGS

SETTINGS

49

SETTINGS

SETTINGS

48

1

1

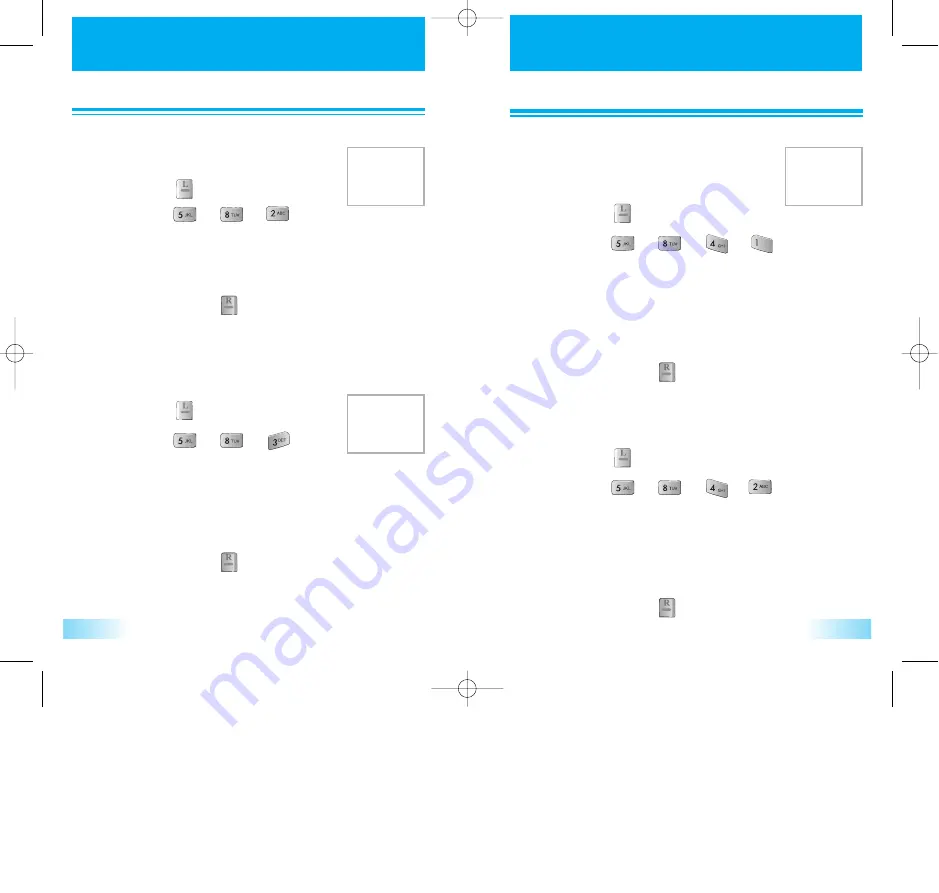
Press [           ].

2

2

Press [           ] [           ] [           ].

Select the parameters by using navigation key.

•   Standard : Not activate voice privacy when it is

available by system.

•   Enhanced : Activate voice privacy when it is

available by system.

3

3

To save, press [           ].

3. Privacy

3. Privacy

Select preferred system..

Select voice privacy mode of conversation.

1

1

Press [           ].

2

2

Press [           ] [           ] [           ] [           ].

Select the parameters by using navigation key.

•   Modem : Always answer voice as modem
•   Modem Once : Answer voice as modem once
•   Fax : Always answer voice as fax
•   Fax Once : Answer voice as fax once
•   Cancel : Never answer voice call as a data call

3

3

To save, press [           ].

4. Data Service

4. Data Service

TERMINATION

Select termination type

1

1

Press [           ].

2

2

Press [           ] [           ] [           ] [           ].

Select the parameters by using navigation key.

•   Async/Fax : Async data and Fax services
•   QNC : Quick net connect
•   Packet 115k : Packet data service (115kbps)
•   Packet 230k : Packet data service (230kbps)

3

3

To save, press [           ].

SERVICE TYPE 

Select data service type

1

1

Press [           ].

2

2

Press [           ] [           ] [           ].

Select the parameters by using navigation key.

•   Standard : Automatic system selection.
•   Home Only : Service is limited to home system only.

3

3

To save, press [           ].

2. Set  Mode

2. Set  Mode

c3000_2  2004.9.14 7:5 PM  페이지48

Summary of Contents for UTS-C3000

Page 1: ...10 BASIC OPERATION 11 TURNING THE PHONE ON 11 TURNING YOUR PHONE OFF 11 MAKING A CALL 11 ENDING A CALL 12 LAST NUMBER REDIAL 12 SPEED DIALING 12 EMERGENCY CALL 13 ANSWERING A CALL 13 CALLER ID WITH NAME 14 ADJUSTING THE EARPIECE VOLUME 14 TO VIEW CALL HISTORIES 14 CALL WAITING 15 STORING A PHONE NUMBER 16 SOUND 18 BELL VIBRATE 18 RING TYPE 19 DTMF LENGTH 19 VOLUME CONTROL 20 CONNECT TONE 20 c3000_...

Page 2: ...LCULATOR 36 CONVERT UNIT 37 SETTINGS 38 SECURITY 38 CALL ANSWER 40 CALL TIMERS 41 CALL INFO 42 T9 SETTING 44 LANGUAGE 44 OWN PHONE NO 45 SYSTEM 45 DATA FOLDER 49 GAMES 50 EGGMAN 2 50 JUNGLE BOY 50 MY MENU 51 PHONE BOOK 52 SEARCH NO 52 RECORD NO 54 EDIT GRP 56 CALL HISTORY 56 CLR PHONEBOOK 58 SPECIAL NO 59 SMS 60 VOICE 60 NEW MESSAGE 60 INBOX 62 OUTBOX 64 SAVED 65 SETTINGS 67 DELETE ALL 70 BREW 71 ...

Page 3: ...ng them with following pictures Handset User Manual in English Warranty Card Battery Battery Cover Travel Charger Volume Button Used to adjust the volume of the earpiece and keypad ringer volume Earpiece LCD Screen Function Keys Voice Memo Voice Dial Button Voice Dial Speaker phone Keypad Microphone Earjack Sub speaker Antenna LED c3000_2 2004 9 14 7 4 PM 페이지4 ...

Page 4: ...so used for upper arrow key To enter Quick search list directly And also used as down arrow key To clear digits and letters from the display in edit mode or return to previous mode To activate voice memo by pressing and holding Side Keys To control the volume of ringer key tone and earpiece And also used as up down arrow key Top Line on Main LCD Received signal strength bar No service area In call...

Page 5: ...urn on or the battery may slip out during use 1 1 Press the Upper part of the battery until the sound of a click is heard 2 2 CHARGING THE BATTERY POWER CONNECTION Connect the charger to a standard 100 240 VAC Oultet LED Off No battery LED Blinking 500msec Battery faut The temperature of battery is abnormal LED Blinking 1sec on 3 sec off Normal Charging Service Light Charging completed 1 1 WARNING...

Page 6: ... on 1 1 In idle mode enter the phone number with the area code Press the key to make a call A maximum of 32 digits will be displayed 2 2 Full charge Low charge Flashing indicates discharged Battery Lithium Ion 800 mAh Mode Digital Analog 160 210 min 70 90 min 45 140 Hour 11 13 Hour Standby Time Talk Time The criteria of measurement is in accordance with our internal specification The operating tim...

Page 7: ... CALL Enter the one or two or three digits of your Phonebook address and hold down the last digit 1 to 9 or 10 to 99 or 100 to 500 If you know the phonebook address of the telephone number that you want to calls NOTE If two telephone numbers are stored in the address the Primary Number will be dialed This feature permits you to place an emergency call even if your phone is in Phone Lock or Restric...

Page 8: ...tgoing calls incoming calls missed calls history This feature allows you to preview in your display the number and name of the party calling you before you answer the call The name is as you programmed it in your phonebook NOTE Number Restricted or Number Unavailable is displayed when the Caller ID is restricted or not available Your service provider may provide Call Waiting service When you are o...

Page 9: ...ase of the standard text input or Abc Symbols 123 indicate standard text input Press to change text input mode as blew 1 T9 Portuques T9 Po T9 PO T9 po T9 Spanish T9 Sp T9 SP T9 sp 2 T9 Eng T9 En T9EN T9 en 3 ABC Abc ABC abc Press once to delete a character to the left of the cursor or press and hold to delete all characters To move the cursor To set next word at T9 mod KEY FUNCTION Input the lett...

Page 10: ...sing the navigation key 2 2 Press to save it 3 3 RING TYPE Press Classic Bell Lake Waltz Spring Skate Waltz Carmen Turkischer Chorus La Paloma Pathetic Sym Joy to World Noel Hungari Dance Jingle Bell Serenade Pastoral My Bell Select File Create Bell Analog Effect01 Funny Park Western Chinese Song Fanatstic Orgol Duck Country Tap Dance Seashore Comic 1 1 Press then Select the parameter by using the...

Page 11: ...navigation key 2 2 FADE TONE This function beep a tone when call has been connected Press On Off 1 1 Press to save it 3 3 Press then Select the parameter by using the navigation key 2 2 This function beep a tone when call has been disconnected Adjust ringer volume If volume is set to 0 mute silence icon is appeared except for etiquette mode MINUTE BEEP Press On Off 1 1 Press to save it 3 3 Press t...

Page 12: ...en Light Level On Off Keypad Light Adjust the keypad lighting time 10 20 30 seconds Flip open Idle Outgoing calls Incoming calls Power On Power Off 1 1 Press to save it 3 3 Press to save it 3 3 Press then Select the parameter by using the navigation key 2 2 This function is to select wallpaper on each state 2 Wallpaper 2 Wallpaper Press 1 1 Press then Select the parameter by using the navigation k...

Page 13: ...rameter by using the navigation key 2 2 Digital Analog Press to save it 3 3 To input a personal greeting on edits an existing one 3 Greeting 3 Greeting Press 1 1 Press then 2 2 Press the navigation key to edit the greeting 3 3 Press 4 4 Press to save it 8 8 Press 6 6 Move the greeting message by using the navigation key 7 7 Select the greeting message display On Off Select the greeting message sli...

Page 14: ...ect the parameter by using the navigation key Digital Analog 1 1 2 2 3 3 2 Clock 2 Clock 1 Main Screen 1 Main Screen CONTRAST SET This function adjusts main screen contrast level Press Press to save it Press then Press Navigation key on the Main Screen line to change back light level 1 1 2 2 3 3 2 Sub Screen 2 Sub Screen Press Press to save it Press then Press Navigation key on the Sub Screen line...

Page 15: ...mpts by pressing except for user prompt In Greet Record menu Record user comment to use as answering machine greeting Press then Record the user prompt by pressing 2 2 Set Bell Time Off Immediately 5sec 10sec Set Greet Voice Common User Driving Meeting Set Greet Rec Press to save it 3 3 NOTE Can be reduced the standby time when service light is on 1 Incomming call lamp is checked by alert type set...

Page 16: ...where you can make enough your personal voice NOTE The sum of all recorded voice from voice memo answering machine answering machine greeting and sound is limited to 4 minutes totally NOTE The sum of all recorded voice from voice memo answering machine answering machine greeting and sound is limited to 4 minutes totally 1 1 To use voice dial press VAD key shortly then say recorded name in standby ...

Page 17: ...Press 1 1 Press Navigation key to select alarm and then press Key to delete the alarm or press to edit the alarm 2 2 Press digit keys to chang the value of Date Time Press keys to change the value of Repeat Remind Melody Press Navigation keys to move to item which user wants to change to 3 3 2 Personal Setting 2 Personal Setting 2 2 NOTE The phone does not provide a clock IC but displays the date ...

Page 18: ... Press Navigation keys to move to item which user wants to change to 2 Record Schedule 2 Record Schedule Records schedule time and contents 1 1 1 1 Press 2 2 Press then Press Navigation key to select d day and then to record d day Press digit keys to change the value of To Press Navigation keys to move to item which user wants to change to 2 2 Press to delete the present d day 1 Record 1 Record D ...

Page 19: ...then Press Navigation key to change the city Honolulu Vancouver Los Angeles Denver Chicago Mexico City Toronto New York Sao Paulo London Paris Athene Nairobi Moscow New Delhi Bangkok Beijing Hong Kong Seoul Tokyo Sydney Auckland Press 2 2 Press to display selected city time on idle screen Press to display dual time Press not to display dual time Dual Time Display Dual Time Display Displays current...

Page 20: ...ic functions addition subtraction multiplication division Press number keys to input number press for press key for point and press key for prefix minus sign press key for all clear and key for calculation EXAMPLE To calculate 128 X 32 1 Enter 128 2 Press 3 Enter 32 4 Press 1 1 Press 3 3 Press or to change the unit item 1 6 and press or press press or to change the unit of that kind km m cm Press ...

Page 21: ... others from using the phone without permission and allows an access to a security features only after pasword input To set security mode 1 1 Press and enter password 2 2 3 3 Press to select Enter a new password and press Enter a new password again and press 2 Change PWD 2 Change PWD Changes your 4 digit password 1 1 Press and enter password 2 2 Press and select Off On by using navigation key on e...

Page 22: ...veral Call Timers Total usage time and the number of calls resettable Time of Last Call only 1 call non resettable Total time of Incoming Calls and the number of calls resettable Total time of Outgoing calls and the number of calls resettable 1 1 Press 1 Total Calls 1 Total Calls 1 1 Press 2 Last Calls 2 Last Calls 1 1 Press 3 Incoming Calls 3 Incoming Calls 1 1 Press 4 Outgoing Calls 4 Outgoing C...

Page 23: ...condition Enable Disable calling line identification number showing at incoming call state 1 1 2 2 Press Enter password Select on off forCaller Phone and Caller Name Caller Phone Restrict phone number of caller Caller Name Restrict name of caller include phonebook referencing 1 Info Display 1 Info Display 1 1 2 2 Press Select on off for Call Waiting 2 Call Waiting 2 Call Waiting 1 1 2 2 Press Sele...

Page 24: ...ais 3 3 Press This function changes the language of the phone OWN PHONE NO 1 1 Press 2 2 This allows user to confirm their own Tel No Press then It displays user s own phone no for about 1 Min SYSTEM 1 1 Press 2 2 Press then Select the parameter by using the navigation key This function changes the language of the phone 1 1 Press 2 2 Press Select the parameters by using navigation key NAM 1 NAM 2 ...

Page 25: ...e Fax Always answer voice as fax Fax Once Answer voice as fax once Cancel Never answer voice call as a data call 3 3 To save press 4 Data Service 4 Data Service TERMINATION Select termination type 1 1 Press 2 2 Press Select the parameters by using navigation key Async Fax Async data and Fax services QNC Quick net connect Packet 115k Packet data service 115kbps Packet 230k Packet data service 230kb...

Page 26: ...s 4 4 Edit user ID and press to save it PPP AUTH INPUT ID 3 3 Enter password and press Input user ID for password authentication protocol 1 1 Press 2 2 Press 4 4 Edit user password and press to save it INPUT ID 3 3 Enter password and press Input user ID for password authentication protocol This allows user to confirm the software version 1 1 Press 6 S W Update 6 S W Update Upgrade phone software v...

Page 27: ...ss Change or Delete Choose 1to 8 that you want to change or delete Press Choose any parameter then press to change or press No register to delete My Menu You can select my menu that allows you to various setted phone functions Sound Display Voice Diary Settings Games are etc and changing phone function to set my menu CUTY 1 1 Press START EASY RANK HELP RIGHT LEFT STAR PONG 1 1 Press START EASY RAN...

Page 28: ...Press Nevigation keys or input searching name by Alpha mode to select a record and then press to view detail information 2 Srch by Name 2 Srch by Name This Function is searching recorded phonebook data with number 1 1 Press 2 2 Input part of phone number and press to find out matched number and then press key to delete the record or press to view detail information 3 Srch by No 3 Srch by No This F...

Page 29: ...t name 16 characters Maximum number of input telephone No 32 digits in address 1 500 Maximum number of input E mail address 48 characters Maximum number of input URL address 128 characters Voice Dial Press key to select VR Mode You can choose to add a voice tag to the entry for use with Voice Activated Dialing Select Yes or No and press If you choose yes VR mode Please speak voice tag will be disp...

Page 30: ...If the number is already stored in your phone book only the name appears If the number is not stored only the phone number appears 2 2 To view incoming call details press the Navigation key Press again to save it or press to delete it 2 2 Press Nevigation keys to select a record and then press key to delete the record or press to view detail information Maximum number of history 20 Displays inform...

Page 31: ...4 Clear Calls 1 1 Press and press three times 2 2 Select Yes or No with the scroll key press When you select Yes you will see Enter Lock Code on the display and input your phone password CLR PHONEBOOK Press 1 1 Enter Lock Code 3 3 Press 4 4 Press Select the parameter by using the navigation key 2 2 This function is clears all the phonebook data This function is adds or edits emergency phone number...

Page 32: ...e Edit Message 1 1 Input text message 2 2 To delete one character press 3 3 To delete all characters press and hold Input a Destination Phone Number Input a Destination Phone Number 1 1 Input phone number 2 2 To search the phone number of Phonebook Call History press or Edit a Default Callback Number Edit a Default Callback Number 1 1 Press Edit a default Callback Number 2 2 Select the Priority Se...

Page 33: ... MASSAGE except for input a Destination Phone Number Save Address Save Address 1 1 To save the original address Fr of message press Save CB Save CB 1 1 To save the callback number of message press Lock Msg Lock Msg 1 1 To lock or unlock the message press Delete Delete 1 1 To delete the message press Move to Saved Move to Saved 1 1 To move to saved folder the message press Forward Forward 1 1 To fo...

Page 34: ...ss Detail Detail 1 1 To see the status of the message press or Lock Msg Lock Msg 1 1 To lock or unlock the message press Delete Delete 1 1 To delete the message press Move to saved Move to saved 1 1 To move to saved folder the message press Send To Send To 1 1 To forward the message press 2 2 Process as like NEW MASSAGE and edit the text message SAVED Press Save message Save Lock message Moved fro...

Page 35: ...delete the message in the saved folder Lock Msg Lock Msg 1 1 To lock or unlock the message press Delete Delete 1 1 To delete the message press Alert Remind Alert Remind 1 1 Press keys sequentially One Time Every 2 Min Every 2 minutes alert 2 2 Press Nevigation keys to select alert remind method and then press to confirm If user has not read new incoming messages phone alert by selected option Move...

Page 36: ...er a received message can not be received since the memory reaches full Delivery Ack Delivery Ack 1 1 Press keys sequentially 2 2 Press and press Enhanced Ack Normal Ack No Ack Set the priority of outgoing messages Priority Priority 1 1 Press keys sequentially Normal Normal messages Urgent Urgent messages Emergency Emergent messages After sending outgoing messages user can select save sent message...

Page 37: ...t Download Detail information on downloadable application list downloading cost how to download and memory status so on DELETE ALL Press keys sequentially 1 1 Enter the Lock Code 2 2 Press Navigation keys to select delete option and then press Select to confirm Inbox To delete inbox message Read Inbox To delete only Read Inbox message Outbox To delete outbox message Saved To delete saved folder me...

Page 38: ...nage View Properties Web page information Set folder Select folder among main menu work and fun where to be saved each selected application Lock App Select Locked or Unlocked Remove Remove application from your folder Upgrade Check If application is upgraded it lets you have automatical application upgrade by connecting to the server Main Menu View Select Main Menu Display style among Small Icon L...

Page 39: ... browser Settings Linger timer User can set a linger timer which triggers the termination of an idle data call the default value is 30 seconds User can select one of time lists 30 sec 1 min 2 min 3 min 4 min BROWSER MENU BROWSER MENU Press SideBottom key while the browser is active to see the browser s local menu Reload To reload the current page Home To get back to the Homepage Press and hold sen...

Page 40: ... equipment and for the safety of personnel it is recommended that the equipments should only be used in the normal operating position held to your ear with the antenna pointing over your shoulder Electronic devices Most modern electronic equipment is shielded from radio frequency signals However certain electronic equipment may not be shielded against the RF signals from your wireless phone WEB BR...

Page 41: ...or particles such as grain dust or metal powders and any other area where you would normally be advised to turn off your vehicle engine IMPORT IMPORTANT SAFETY INFORMA ANT SAFETY INFORMATION TION Pacemakers Pacemaker manufacturers recommend that a minimum separation of 6 inches be maintained between a handheld wireless phone and a pacemaker to avoid potential interference with the pacemaker These ...

Page 42: ...essory Keep it and all its parts and accessories out of small children s reach Keep it dry Precipitation humidity and liquids contain minerals that will corrode electronic circuits Do not use or store it in dusty dirty areas as its moving parts can be damaged Do not store it in hot areas High temperatures can shorten the life of electronic devices damage batteries and warp or melt certain plastics...

Page 43: ...tronic equipment may be shielded against RF signal from you wireless phone pacemakers Hearing Aids and so on Turn your phone OFF in health care facilities when any regulations posted in these areas instruct you to do so RF signals may affect improperly installed or inadequately shielded electronic system in motor vehicles EXPOSURE TO RF ENERGY Use only the supplied or an approved replacement anten...

Page 44: ...na the lower the power output Before a phone model is available for sale to the public it must be tested and certified to the FCC that it does not exceed the limit established by the government adopted requirement for safe exposure The tests are performed in positions and locations e g at the ear and worn on the body as required by the FCC for each model The highest SAR value for this model phone ...

Page 45: ...phone including the antenna The use of belt clips holsters and similar accessories should not contain metallic components in its assembly The use of accessories that do not satisfy these requirements may not comply with FCC RF exposure requirements and should be avoided FCC Compliance Information This device complies with Part 15 of FCC Rules Operation is subject to the following two conditions 1 ...

Page 46: ...nce will not occur in a particular Installation If this equipment does cause harmful interference to radio or television reception which can be determined by turning the equipment off and on the user is encouraged to try to correct the interference by one or more of the following measures z Reorient or relocate the receiving antenna z Increase the separation between the equipment and receiver z Co...

Reviews: