background image

C

H

1

11

C

H

1

10

BATTERY USAGE

BATTERY USAGE

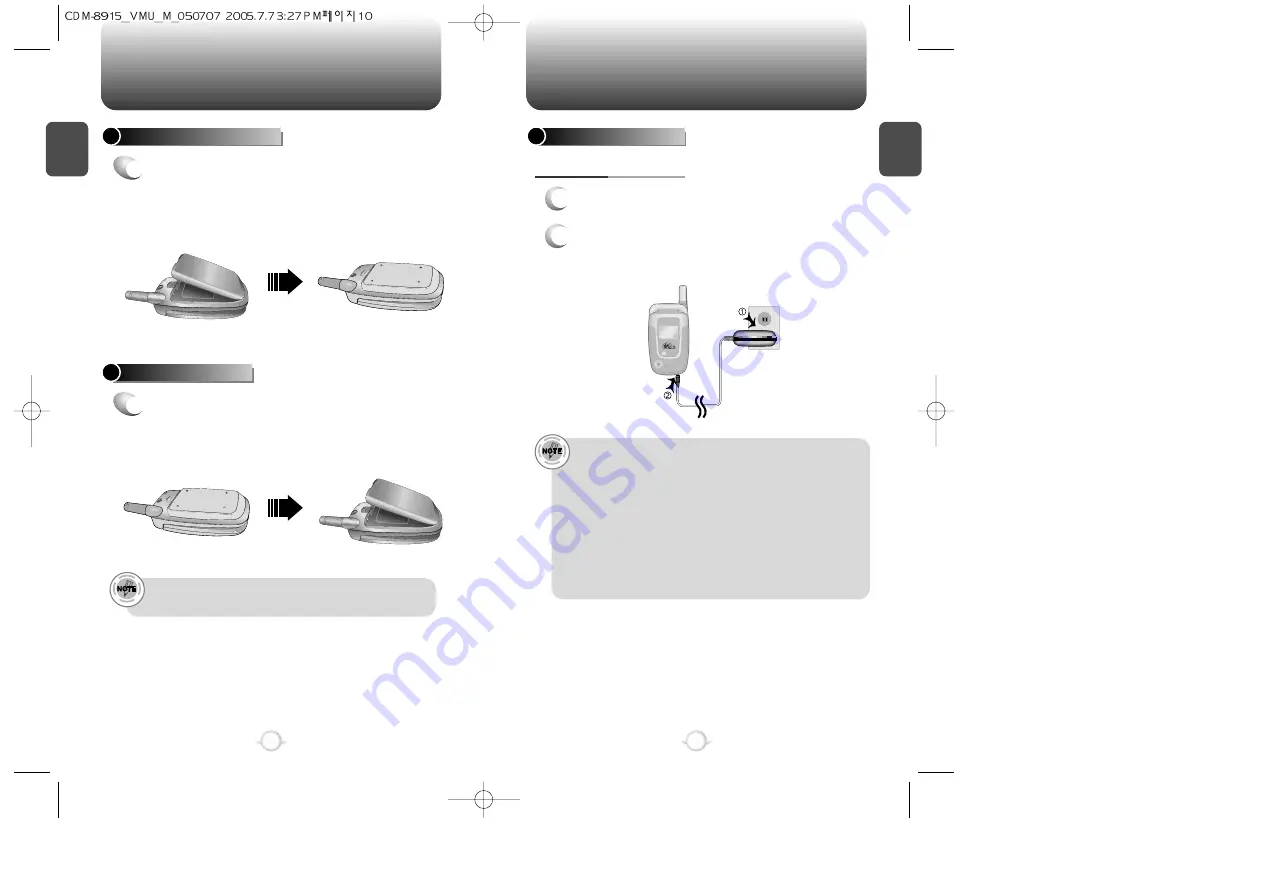
BATTERY INSTALLATION

1

u

Place the battery on the back of the handset

and slide into place. 

v

Push the battery down

until it locks into place.

BATTERY REMOVAL

1

u

Pull down the release latch, lift up the

battery and 

v

remove the battery from the

handset.

If the battery is not correctly placed in the compartment, the
handset will not turn on and/or the battery may detach during use.

• When you charge the battery with the phone power off, you 

will see a charging status screen. You cannot operate the 
phone until it is powered on.

• The battery is not charged at the time of purchase.

• Fully charge the battery before use.

• It is more efficient to charge the battery with the handset

powered off.

• The battery must be connected to the phone in order to charge it.

• Battery operating time gradually decreases over time.

• If the battery fails to perform normally, you may need to replace

the battery.

1

Plug the AC Charger into a standard outlet.

2

Plug the other end of the AC Charger into the
bottom of your phone. The battery must be
installed onto the phone.

BATTERY CHARGING

POWER CONNECTION

Summary of Contents for CDM-4500

Page 1: ...utstar com 2005 UTStarcom Personal Communications All rights reserved UTStarcom and the UTStarcom logo are the registered trademarks of UTStarcom Inc and its subsidiaries All other trademarks are the...

Page 2: ...lays The one inch black and white sub display screen on the outside allows you to quickly view incoming calls message alerts or date and time functions while the 65K 1 8 color main screen on the insid...

Page 3: ...S 108 AUTO TEXT 108 SAVE TO OUTBOX 109 AUTO ERASE 109 INBOX 109 OUTBOX 109 TEXT ENTRY MODE 110 SIGNATURE 110 REPLY WITH COPY 110 MY GRAPHICS 47 MY SOUNDS 48 CONTACTS 49 FIND BY NAME 49 FIND BY NUMBER...

Page 4: ...DEVICES 116 PACEMAKERS 116 OTHER MEDICAL DEVICES 116 POSTED FACILITIES 116 OTHER SAFETY GUIDELINES 117 AIRCRAFT 117 BLASTING AREAS 117 POTENTIALLY EXPLOSIVE ATMOSPHERES 117 PRECAUTIONS 118 SAFETY INF...

Page 5: ...he phone 7 INSIDE THE PACKAGE C H 1 6 The Snapper weighs 3 7 ounces and the dimensions are 1 92 x 3 43 x 94 User Manual AC Travel Charger Handset Standard Battery Antenna Earjack Camera Key Volume Key...

Page 6: ...VirginXL My Account Speakerphone Phone is in speakerphone mode Contacts Service Indicator Indicates call is in progress indicates the phone cannot receive a signal from the system Press to make or rec...

Page 7: ...the phone power off you will see a charging status screen You cannot operate the phone until it is powered on The battery is not charged at the time of purchase Fully charge the battery before use It...

Page 8: ...l If the battery is stored in temperatures above or below the recommended range give it time to warm up or cool down before using l Completely drain the battery before recharging It may take one to f...

Page 9: ...chapter addresses and explains the basic features of your cellular telephone including Chapter 2 C H 2 15 C H 1 14 TURNING THE PHONE ON OFF ACCESSING THE MENU MENU SUMMARY BASIC FUNCTIONS DURING A CAL...

Page 10: ...rs on the display enter your 4 digit password to unlock your phone The default password is the last 4 digits of your phone number 16 TURNING THE PHONE OFF 1 Press and hold until your Power Off Logo ap...

Page 11: ...ith copy 1 Read msgs only 2 Entire inbox 1 Inbox 2 Outbox 8 Tools 9 Settings 1 Voice tools 2 Alarm 3 Scheduler 4 Calculator 5 Stopwatch 6 World clock 1 Sounds 2 Display 3 Call options 1 Voice memo 2 V...

Page 12: ...ce or receive a call from stored phone numbers both the name and phone number will be displayed There is another way to make a call through the VR mode which is called VAD Voice Activated Dialing Plea...

Page 13: ...etails about storing a phone number 23 C H 2 SPEAKERPHONE 1 To activate the speakerphone in idle answering or calling modes press 2 The phone returns to normal speakerphone off after ending a call or...

Page 14: ...select one of the following 2 Adjust volume then press OK to save it Mutes key tones and activates the vibration mode to alert you of an incoming call or message SILENCER 1 To turn Silencer mode on o...

Page 15: ...mergency Call or Callback mode l l This 911 feature puts the phone in the Emergency Call Mode when you dial the preprogrammed emergency number 911 It also operates in the lock mode and out of the serv...

Page 16: ...MEMORY FUNCTION This chapter addresses memory functions including Chapter 3 C H 3 29 MEMO C H 2 28 STORING A PHONE NUMBER ENTERING LETTERS NUMBERS SYMBOLS...

Page 17: ...elow press MODE then enter letters and numbers 3 If New contact is selected the phone will appear above a list of icons The name of the icon is displayed below the list Press the Navigation Key left o...

Page 18: ...eded for the letter to appear on the screen To enter the name John Press J Press o Press h Press n 33 C H 3 Use the digit keys to enter letters numbers and characters STANDARD INPUT MODE 1 Enter lette...

Page 19: ...STUFF CONTACTS RECENT CALLS VOICE TOOL TOOLS SETTINGS NUMERIC MODE 1 To enter Symbol Mode press Abc then select Symbols 1 To enter Numeric Mode press Abc then select 123 2 To enter a number press a d...

Page 20: ...someone When this occurs all incoming calls will be automatically forwarded to voicemail TAKING A PICTURE THROUGH THE MENU To activate Camera Mode press and hold the Side Camera Key or press and hold...

Page 21: ...ROLS 6 SHUTTER SOUND Activate the flash function On this shot Always on Off 3 FLASH Select a shutter sound Classic Say Cheese Ready 123 Pictures taken To view photos you have captured with your camera...

Page 22: ...tantly share it with family and friends To send a picture to a recipient s email address or to a Virgin Mobile camera phone 2 The Pictures taken menu appears with all the saved picture thumbnails Scro...

Page 23: ...arry them or register a debit or credit card with Virgin Mobile TOP UP YOUR ACCOUNT 1 1 Press MENU My Account 2 Press OK to proceed From the main screen press MENU My Account or press the Navigation K...

Page 24: ...y games download menu 5 A confirmation page will notify you that the game has been purchased To download the game select Download 4 From the item information page select Buy 3 Use the Navigation Key t...

Page 25: ...details MY GRAPHICS 1 Press MENU 2 Select Get more graphics then press OK You will be taken to the My graphics download menu 5 A confirmation page will notify you that the graphic has been purchased...

Page 26: ...or scroll through the list with the Navigation Key Please refer to page 31 for more details on entering letters numbers symbols The list of names in your Contacts is displayed alphabetically All match...

Page 27: ...rs saved in your phone book will be displayed in numerical order To call the selected number press 3 4 Enter a part of the phone number or scroll through the list with the Navigation Key The name asso...

Page 28: ...seven groups is allowed ADD NEW GROUP Input a new group name 4 To save press OK 2 Press OPTIONS to select Add group then press OK CHANGE GROUP NAME 2 Select an existing group name with the Navigation...

Page 29: ...NTACTS CONTACTS MSG GROUP Allows the user to group up to 10 phone numbers The user can add change and delete Msg group 1 3 To add a new group press MENU A maximum of five groups is allowed ADD NEW MSG...

Page 30: ...ect Send pic msg 1 Press MENU 1 Press MENU 1 Press MENU SEND TEXT 2 Scroll to the group name Select an existing group name with the Navigation Key 4 Press the Navigation Key down to select the Message...

Page 31: ...MENU To see a list of the 60 most recent incoming outgoing or missed calls press MENU or If the number is already stored in your Contacts only the name appears If the number is not stored only the ph...

Page 32: ...etails include date time and phone number After 20 incoming calls the oldest call will automatically be erased from the history Erase To erase the phone number Send text To send a text message to the...

Page 33: ...he phone number appears OUTGOING CALLS 1 2 To view outgoing call details press 3 Press OPTIONS Select ERASE to erase it or press SAVE to save it Call details include date time and phone number After 2...

Page 34: ...sage you want to play press PLAY Press OPTIONS for Send pic msg or Edit title To erase the memo press ERASE 4 To erase all voice memos press Erase all voice memos will be displayed Press OK or CANCEL...

Page 35: ...splayed and you will hear Now training control words Please say the word no 3 Say No You will hear Again Say No again You will hear Training was Successful Use to train or untrain the Voice Recognitio...

Page 36: ...ly Off Once SETTING Use the Navigation Key to select a Snooze Setting Off 1 time after 5 min 1 time after 10 min 3 times by 5 min SNOOZE SETTING Once Select the single date of the alarm Daily Select t...

Page 37: ...lect AM or PM then press TIME Using the Navigation Key select an alert time interval option On Time 10 Min Before 30 Min Before 1 Hour Before No Alarm SETTING To set a ringtone press OPTIONS then sele...

Page 38: ...ation Key Erase all events will appear then select Yes or No Press to delete 4 Press SAVE to save it To return to the calendar 5 The date of the event will be marked on your calendar 1 Press MENU 2 Fo...

Page 39: ...r one press CONT 3 To stop the second and continue measuring a third one press CONT 4 To measure up to six time periods repeat the above steps 5 To stop the stop watch press STOP 6 To review the resul...

Page 40: ...Tone 10 Press to play or pause sound Sets Ringtones Msg tones Voicemail Volume Tone Length Silencer mode Controls the Ringtones Key tone Voice call Speakerphone Volume setting can be changed by using...

Page 41: ...volume with the Navigation Key then press OK Level 1 5 Min Max 1 Press MENU To adjust speakerphone volume SPEAKERPHONE 2 Adjust the speakerphone volume using the Navigation Key then press OK Level 1 5...

Page 42: ...INCOMING CALL 1 Press MENU 2 Select Default to choose a pre installed display or Downloads or Saved to Phone to choose a display you have downloaded to your phone 3 To save it press OK SUB SCREEN 1 Pr...

Page 43: ...f the following options with the Navigation Key then press OK Main LCD Level 1 5 Sub LCD Level 1 5 l l CALL OPTIONS 1 Press MENU 2 Select Any Key or Send Key with the Navigation Key then press OK CALL...

Page 44: ...Auto Answer will be active except Ringtone Off mode 1 Press MENU 2 Select either 911 only or Location on with the Navigation Key then press OK LOCATION Your cellular telephone is equipped with a Locat...

Page 45: ...uthorized use of your Snapper The following settings can be restricted SECURITY Prevents the phone from being used without entering the password first 1 Press MENU then enter Password LOCK PHONE 2 Pre...

Page 46: ...rict access to Recent Calls menu l l Restricts access to pictures 1 Press MENU then enter Password 2 Press select Allow or Restrict with the Navigation Key then press OK PICTURES Allow Allows access t...

Page 47: ...lete a special number by selecting it pressing ERASE then press OK 1 Press MENU then enter Password To erase all the names and phone numbers in your Contacts list 2 Press ERASE CONTACTS 3 Erase all co...

Page 48: ...s Call History Scheduler and Messaging are not affected 2 Press RESET PHONE 3 Select Yes or No by pressing the Navigation Key then press OK When you select Yes you will see Reset Phone this will reset...

Page 49: ...4 C H 5 95 SETTINGS C H 4 1 Press MENU 2 The PRL version appears 3 PRL VERSION 1 Press MENU 2 The Browser appears 3 BROWSER 1 Press MENU 2 The ESN appears 3 ESN This chapter addresses Voicemail and Te...

Page 50: ...ing Contacts Search for a phone number stored in the Contacts Text mode Select T9Word Abc 123 Symbols Msg group Select Msg group Save Contact Stores the phone number the message was sent to By pressin...

Page 51: ...essing OPTIONS you can choose from the following Record Voice Records a voice memo Insert voice memo Inserts a recorded voice memo Insert Auto text Inserts canned text into a text msg Save to Auto tex...

Page 52: ...e sending the message then press OK 3 Input any text message to go along with the forwarded message 4 To send the text message press SEND FORWARD 1 To forward the MMS message select Forward 2 Input th...

Page 53: ...he Virgin Alert or Download Alert will be displayed SAVE MSG 1 To save received MMS message select Save msg SAVE ATTACHED 1 To save attached sound or picture file select Save attached INFO 1 To show r...

Page 54: ...l a send phone number select Call Manages sent text messages or messages waiting to be sent Auto resend Fail Not Sent Sent Canceled 2 Select a message then press OK The text message is displayed Press...

Page 55: ...enu this screen will be displayed 5 Select one then press OK To select inbox menu Reply Reply with Copy Forward Erase Save to Contact Save to Quick Text Lock Unlock To select outbox menu Resend Send t...

Page 56: ...tone Vibrate Silent Ring Remind Vibrate Remind Hey What s up Where are you You there Can t talk now On my way Call me Sorry was busy Later C ya Busted Peace Bite me I m freaking out You wish Miss you...

Page 57: ...Mode as a default For example if T9 Mode is the default its icon will appear Press MENU REPLY WITH COPY 1 2 Select Off or On with the Navigation Key then press OK Press MENU Create a signature that ca...

Page 58: ...R WARRANTY 12 MONTH LIMITED WARRANTY Chapter 7 113 C H 6 C H 7 112 ACCESSING NAVIGATING VIRGINXL 1 To access VirginXL press Or press MENU VirginXL is a fun collection of features which you can access...

Page 59: ...ments could damage the phone and may violate FCC regulations ANTENNA CARE Read This Information Before Using Your Handheld Portable Cellular Telephone Talking on the phone while driving is extremely d...

Page 60: ...ould be sensitive to external RF energy OTHER MEDICAL DEVICES Turn your cellular telephone OFF where posted notices so require POSTED FACILITIES ELECTRONIC DEVICES Most modern electronic equipment is...

Page 61: ...tional standards Use only the supplied or an approved antenna Unauthorized antennas modifications or attachments could impair call quality damage the phone or result in violation of FCC regulations Do...

Page 62: ...ation antenna the lower the power output Before a phone model is available for sale to the public it must be tested and certified to the FCC that it does not exceed the limit established by the govern...

Page 63: ...ecause of the short distance between the phone and the user s head These RF exposures are limited by Federal Communications Commission safety guidelines that were developed with the advice of FDA and...

Page 64: ...des the scientific oversight obtaining input from experts in government industry and academic or ganizations CTIA funded research is conducted through contracts to independent investigators The initia...

Page 65: ...t s will be repaired or replaced with new or rebuilt parts at the Company s option without charge for parts or labor directly related to the defect s The antenna key pad display rechargeable battery a...

Page 66: ...SEQUENTIAL OR INCIDENTAL DAMAGES FOR BREACH OF THIS OR ANY OTHER WARRANTY EXPRESS OR IMPLIED WHATSOEVER THE COMPANY SHALL NOT BE LIABLE FOR THE DELAY IN RENDERING SERVICE UNDER THIS WARRANTY OR LOSS O...

Reviews: