


AC-PRO-II
®
Instruction Manual www.utilityrelay.com
Page 16
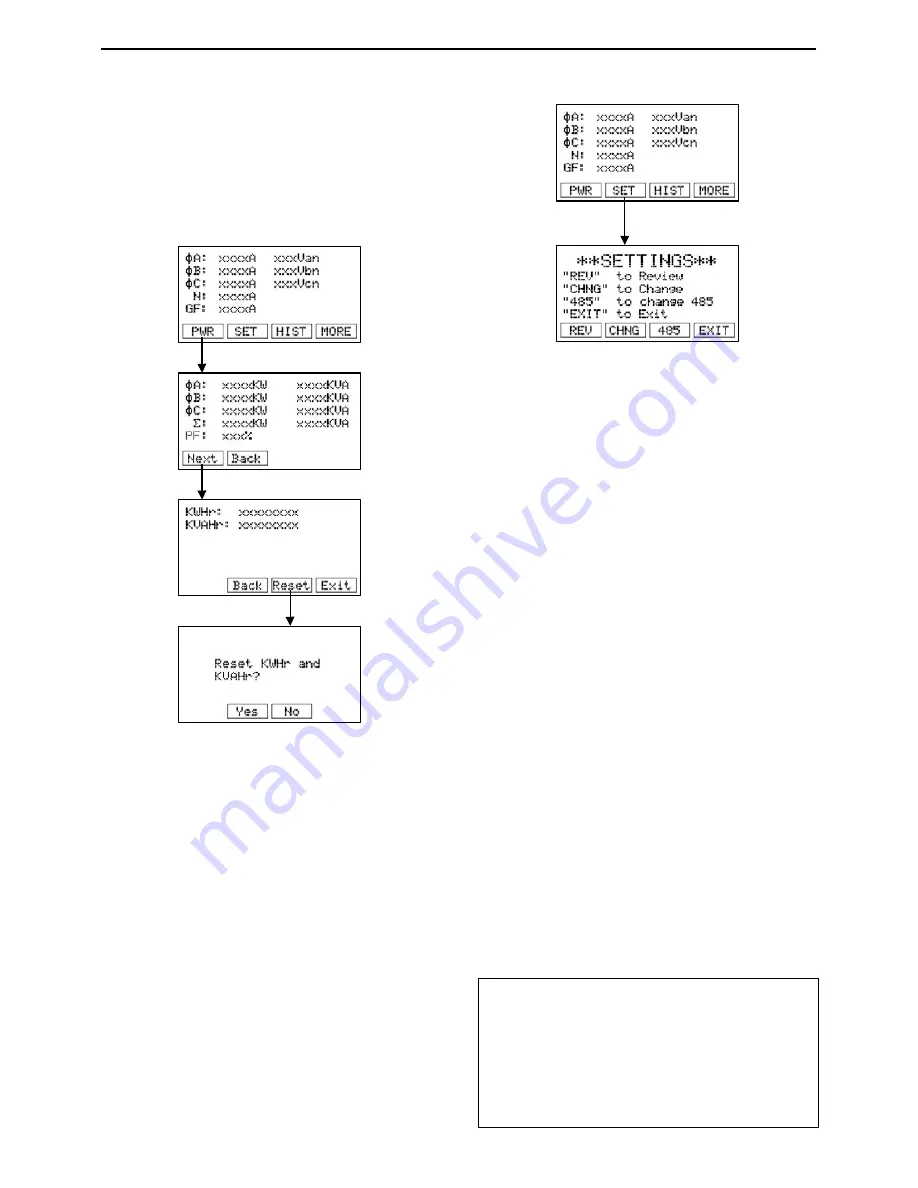
If the AC-PRO-II is equipped with the optional Voltage
Divider Module (VDM), the power menu becomes available.
The power menu is accessed from the main screen by
pressing the “PWR” smart button. The smart buttons allow
navigation to subsequent screens, which display power
information, as well as the capability of resetting energy
usage values. The figure below shows the flow of the Power
Menu.
Press PWR to access Power Menu
Figure 6.3: Power Menu Screens
Note: Power Menu only appears if the optional VDM is
connected.
See Section 13.0 for information on values displayed on the
readings screens.
The settings menu provides the ability to review and modify
settings. The first settings menu screen provides access to
the following settings sub-menus by pressing the associated
smart push buttons: review settings sub-menu, change
settings sub-menu, and RS-485 settings sub-menu. See the
settings menu first screen in the following figure:
Press SET to access
the settings menu
Figure 6.4: Settings Menu first screen
For details regarding Settings, refer to Section 11.0.
The AC-PRO-II stores data from the last eight (8) trips. The
trip history menu displays this information. The trip unit
stores trip counts, types, time stamps, and currents. If a
VDM is connected, voltages will also be stored in the trip
history. Additionally, the breaker clearing times for non-
instantaneous trips are stored. Refer to Section 12.0 for
details regarding trip history and navigating the trip history
menu.
In addition to the data displayed on the trip unit display, the
AC-PRO-II also saves current and voltage waveforms that
can be displayed using InfoPro-AC Software. See Section
23.0.
The more menu provides access to the following trip unit
information:
1)
Trip unit serial number.
2)
Local display serial number (this is separately
provided since the local display can be separated
from the trip unit).
3)
Trip unit firmware revision number.
4)
Local display firmware revision number.
5)
Viewing and setting time and date.
6)
Manually reset the alarm relay
7)
Battery test and status.
8)
Utility Relay Company contact information.
The time and date setting is accessed via the MORE menu,
by pressing the MORE button at the main screen, then the
time button, then the change button, as shown and noted
below in Figure 6.5.
The time and date setting is important, as trip events and
waveform captures are time stamped.
**** IMPORTANT ****
The time and date must be set after commissioning the
AC-PRO-II or after replacing the battery to ensure the time
stamps (of trips and on-demand waveforms) are recorded
and are correct.
In order for the time and date to remain accurate after
setting, a fresh battery must be in place.
There is no provision for daylight savings time.
6.1 Power Menu
6.2 Settings Menu
6.3 Trip History Menu
6.4 More Menu
6.4.1 Time and Date Setting
Summary of Contents for AC-PRO-II
Page 2: ......
Page 53: ...This Page Intentionally Left Blank...
Page 54: ...This Page Intentionally Left Blank...
Page 55: ......


