45-8448
Torque Settings for Dual Scale Models
TCI-150RA, TCI-150RA-3/8, TCI-250R, TCI-75FRN, CH-150,
CH-75F and CH-150F:
The torque settings of these wrenches are read from two
micrometer scales: Major and Fine. These wrenches can be
utilized in Foot-Pounds (ft-lbs) or Inch-Pounds (in-lbs) and
Newton meters (Nm) applications. Therefore there are two
major and fine scales. The ft-lb or in-lb and Nm scales are on
opposite sides of the barrel.
Scale increments:
TCI-75FRN and CH-75F:
Major ft-lb = 5 ft-lbs
Fine ft-lb = 0.5 ft-lbs
Major Nm = 6.8 Nm
Fine Nm = 0.7 Nm
(rounded)
TCI-150RA, TCI-150RA-3/8, TCI-250RA and CH-150:
Major in-lb = 10 in-lbs
Fine in-lb = 1 in-lbs
Major Nm = 1.1 Nm
Fine Nm = 0.11 Nm
(rounded)
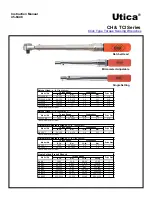
Setting the wrench is accomplished by considering all torque
settings as being made up of two parts, major scale plus fine
scale.
Example: A torque setting of 42 ft-lbs would be 40 ft-lbs
on the major scale plus 2 ft-lbs on the fine scale.
These wrenches can be set to the desired torque as follows:
Grasp the locking collar between the
1.
thumb and forefinger and pull it toward the
wrench handle as far as possible. Hold it in
this position.
While holding the barrel of the wrench
2.
securely in one hand, rotate the handle
until the major scale increment below the
torque desired is even with the edge of the
sleeve and the 0 increment on the sleeve is
in line with the zero line of the barrel.
Rotate the handle clockwise until the fine
3.
scale torque increment desired lines up
with the zero line on the barrel. Release the
lock collar and the wrench is automatically
locked at the torque setting selected.
NOTE: The lock collar will not lock until an
increment line on the sleeve lines up with
the zero line on the barrel.
For Newton meter torque settings, use the
4.
same procedure as described in steps 1-3
but using the Newton meter major scale on
the barrel and the fine scale on the sleeve.
The illustration shows a setting of 59.0
Nm. This can be accomplished by setting
57.6 on the major scale plus 1.4 on the
fine scale.
NOTE: The fine scale values
have been rounded to the nearest whole
decimal.
Single Setting (Preset) Torque Wrenches:
These wrenches are designed so when torque is applied to a
fastener, it will momentarily release and signal by impulse and
audible click (or snap) that the preset torque value has been
reached.
The preset torque wrench is calibrated and sealed at the factory
to the torque value specified by the customer. Wrenches are
also available not preset or sealed when requested. Wrenches
preset at the factory are set to an accuracy tolerance of ±4%
of the specified torque value.
To Use:
Attach the appropriate adapter to the torque wrench and apply
to the application. Hold the torque wrench by the padded
handle and tighten the fastener. Apply force with a steady,
smooth action.
Do not apply force by holding any part of the wrench, other than
the padded handle. Do not use an extension or other lever aid
on the handle. When the torque setting is reached, the wrench
will momentarily release with a feel impulse and audible click
(or snap). The wrench will move through a small arc about
the pivot pin. At this point the set torque has been achieved
and force on the handle must be released. The wrench will
automatically snap back to it’s original position and is ready for
the next torque application.
CAUTION: Do not apply force after the wrench releases, clicks
(or snaps) at the set torque. If the fastener is over torqued,
loosen it and repeat the operation.
Always actuate the wrench a few times before use and after a
period when the wrench has not been in use.
To Calibrate or Re-Calibrate:
Calibration of this torque wrench should only be done on a
1.
certified Torque Tester for the required torque range.
Using a suitable adapter, attach the wrench to the torque
2.
tester.
Using a hex key, loosen the lock plug in the rear of the
3.
handle.
Using a hex key (CHB models) or screwdriver (CHA
4.
models), turn the adjusting plug clockwise to increase the
torque value or counter clockwise to decrease. Turn the
adjusting plug in small increments at a time. Actuate the
wrench by applying force on the handle and observe the
readings on the torque tester. Continue this procedure
until the desired torque setting has been reached.
Tighten the lock plug and recheck the torque reading on
5.
the torque tester.
Make sure the seal washer is in place before applying any
6.
liquid seal over the lock plug.
Utica
®
“Click” Type Torque Sensing Wrenches


