


5
6
Fig.1.1
Fig.3.2
Fig.2.2
Fig.2.3
Fig.2.4
Fig.2.5
Fig.3.1
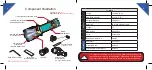
Battery Installation
1.
Unscrew the end cap and install a CR123A lithium battery (Fig.1.1).
2.
Replace and tighten the end cap (Fig.1.2).
Two Operation Modes
1. Push Button Operation
1). Ensure the end cap is properly tightened (Fig.2.1).
2). Press and release the button in the center of the end cap to
turn the light on or off (Fig.2.2).
2. Pressure Switch Operation
1). Unscrew and remove the push button end cap (Fig.2.3).
Make sure to keep the cap in a safe place for replacement
when Pressure Switch is not used.
2). Screw the end cap from the Pressure Switch onto the light
and tighten snugly (Fig.2.4).
3). Depress the Press Pad of the switch to turn on the light and
release to turn off (Fig.2.5).
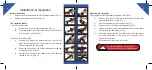
Mounting the Flashlight
Offset Angled Tactical Flashlight Ring Mount (RG-FL138)
1). Remove the top half of the ring by loosening the screws and
slowly backing them out (Fig.3.1).
2). Place the flashlight on the ring base (Fig.3.2).
3). Replace the top ring half on the flashlight (Fig.3.3).
4). Tighten the screws evenly with included Allen wrench to ensure
a firm grip on the flashlight (Fig.3.4).
5). Attach the ring base to the rail mount of the rifle. Hand tighten
the quick lock/release Thumb Nut for proper tension and fit
against the rail (Fig.3.5).
Recommended torque value: 20-inch-lb.
Installation & Operation
Do not over tighten the screws as you
could cause damage to the flashlight body.
!
Fig.1.2
Fig.2.1
Fig.3.5
Fig.3.4
Fig.3.3
Summary of Contents for New Gen LT-EL138
Page 1: ...LT EL138 LED Flashlight ...


