


2.2
95-8603
6
lEVElINg thE CAMErA
If the image on the monitor does not appear to be level,
this can be corrected by rotating the camera module.
Remove the housing cover from the xWatch.
1.
Loosen the setscrew on the side of the xWatch
2.
module. See Figure 6.
Align the two notches on the face of the module so
3.
that they are level with the horizon or until the image
on the monitor looks level.
When proper orientation has been achieved, carefully
4.
tighten the setscrew. Do not overtighten.
troUBlesHooting
The xWatch camera is not designed to be repaired in the
field. If it is determined that the problem is caused by
an electronic defect, the device must be returned to the
factory for repair.
rEplACINg thE xWAtCh CAMErA MoDUlE
CAUTION
Power must not be applied to the device while
opening the housing or while plugging in or
removing the module.
Disassemble the enclosure by turning the housing
1.
cover counterclockwise. See Figure 7 for an
illustration of the xWatch assembly.
Remove the existing camera module from the
2.
xWatch.
Using the index pin as a guide, install the new xWatch
3.
camera module on the terminal block.
Re-assemble the device housing.
4.
Clean the camera lens if required.
5.
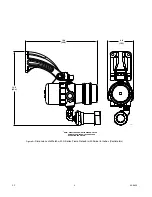
A2384
LOOSEN SETSCREW
USING 5/64 INCH ALLEN WRENCH
TURN RING TO ALIGN THE TWO NOTCHES
LEVEL WITH HORIZON OR UNTIL IMAGE IS LEVEL
Figure 6—xWatch Camera module
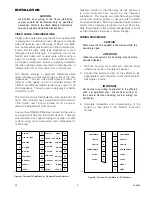
TERMINAL BLOCK
INDEX PIN
HOUSING COVER
CAMERA MODULE
A2385
QUICK CONNECT PLUG (4)
Figure 7—Exploded view of xWatch


