background image

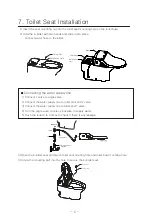
7. Toilet Seat Installation

  1) Insert the seat mounting nut into the toilet seat mounting hole on the toilet bowl.

  2) Hold the E-bidet with two hands and slide it into place.

    - Connect water hose to the bidet.


 Connecting the water supply line  

  1) Connect T valve to angle valve.

  2) Connect the water supply line to toilet tank and T valve.

  3) Connect the water supply line to bidet and T valve.  

  4) Turn the angle valve counter-clockwise to supply water.

  5)  Flush the toilet 2 to 3 times to check if there is any leakage.


Fixing Nut

Installation Hole

Overhang

Bidet

Installation
Part


3) Open the E-bidet seat and match toilet seat mouting hole and toilet bowl mounting hole.

4) Screw the mounting bolt into the hole to secure the E-bidet seat.


Bolt Cover

Fixing Bolt

                                                                     - 6 -                                                                          

Water tank

(a)

(b)

1/2" x 1/2" hose

T-valve

1/2"conversion nut

 (optional)

(c)

Summary of Contents for IB 835

Page 1: ...st stay its required level TABLE OF CONTENTS 1 Dimensions 2 Precautions for Installation 1 3 Preparation before Installation 4 Package Contents 5 Recommended Tools 6 Toilet Bowl Installation Installin...

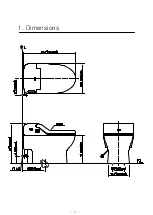
Page 2: ...1 Dimensions 1...
Page 3: ...ons before Installation Before installation please check locations of water inlet and drain hole Connect angle valve to water inlet Make sure the floor is level before installing 2 Angle Valve Drain H...

Page 4: ...B Hose 1 2 and 1 2 Hose B packed in T valve is packed in Bidet package Bidet package Wax ring Wax ring Cover Installation Template Mounting Bracket Screws Washer Mounting Bracket Anchor Cap Toilet Bo...

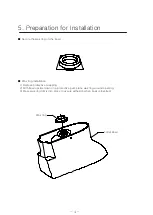
Page 5: ...ax ring on the bowl Wax ring installation 4 Wax ring Toilet Bowl 1 Remove protective wrapping 2 With bowl upside down on a protective pad place wax ring around opening 3 Press wax ring firmly into pla...

Page 6: ...ounting the toilet bowl 1 Be sure to mount the toilet bowl with two people to connect the flange on to the drain socket 2 Check floor level to make sure the toilet bowl will be placed level 3 Secure...

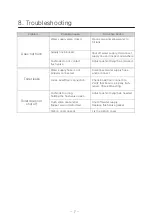
Page 7: ...formed Pushrods too long holding the flush valve open Loose bowl floor connection Water supply hose is not properly connected Pushrods do not contact flush valve Supply line blocked Water supply valve...

Page 8: ...ilet tank and T valve 3 Connect the water supply line to bidet and T valve 4 Turn the angle valve counter clockwise to supply water 5 Flush the toilet 2 to 3 times to check if there is any leakage Fix...

Page 9: ...he date of purchase See the included warranty statement for more information Inquiries For further product information please contact your local USPA dealer or contact our Customer Support Center 8 Re...

Reviews: