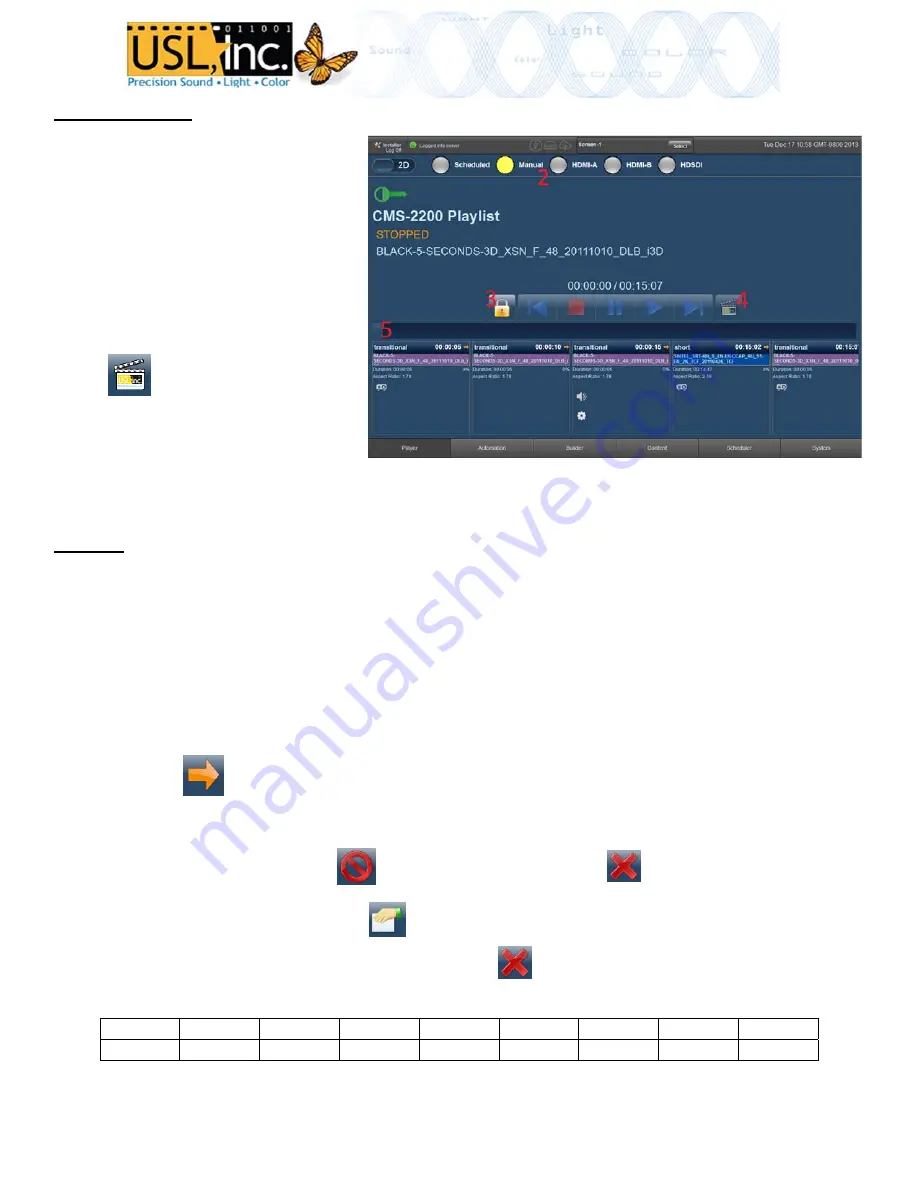
background image


Playing


Content


1.


The


SMS


will


enter


the


Player


screen


on


login.


2.


Long


press


the


input


controls


along


the


top


to


enter


different


playback


modes.


3.


Long


press


the


lock


icon


next


to


the


transport


controls


to


unlock


them.


4.


Select


content


to


play


by


pressing:


*Note


that


in


Scheduled


mode


content


cannot


be


selected.


5.


Drag


the


timeline


indicator


to


seek


to


a


specific


time


in


playback


6.


Icons


for


cues


are


shown


in


the


clip


panes


in


the


timeline.


Content


Press


“Content”


at


the


bottom


of


the


SMS


to


enter


the


content


page.


Content


that


is


currently


on


the


CMS


internal


drives


is


shown


on


the


right.


Sort


and


filter


the


view


with


the


buttons


at


the


top.


Keys


only


show


when


the


“Licenses”


filter


is


selected.


To


add


content:


Attach


an


ESATA


or


USB


drive


to


the


front


of


the


CMS.


1.


Once


the


drive


is


turned


on,


wait


for


the


CMS


to


read


the


contents.


Clips


and


KDMs


that


can


be


ingest


will


be


shown


in


the


left


pane


once


the


drive


has


finished


reading.


2.


Select


content


by


clicking


it.


3.


Press


the


Ingest


button


to


move


selected


content


onto


the


CMS


internal


drive.


4.


Track


transfer


status


by


clicking


the


“Transfer


Status”


button


above


the


external


content


pane.


5.


Cancel


all


current


transfers


with


Clear


the


transfer


history


with


View


properties


of


a


selected


clip


by


pressing


Delete


the


selected


content


from


the


internal


drive


by


pressing


AUTOMATION


port


pinout:


Pin


1


2


3


4


5


6


7


8


Signal


GPO1


GPO2


GPO3


GPO4


12V


GPI1


GPI2


GND


*Pin


1


is


on


the


right


All


connections


are


contact


closure


to


ground,


300mA


max


Pg


4


Summary of Contents for CMS-2200

Page 1: ...connect the AUTOMATION port to a network 7 Connect the AUTOMATION GPIO port to a CMSA with a Cat 5 cable The GPIO pinout is below 8 Power the projector and perform the marriage procedure IP address setup 1 Open the web tool Use a web to go to http ip_of_projector 43758 cgi bin pycgi py 2 Select Edit Network Port Configuration for Action Enter login information from the next page and press Send Com...

Page 2: ...per right to specify the network range that contains all CMS on your network 2 Press the Add All button once the discovery has completed 3 Return to the Overview by pressing the button on the bottom left 4 Select a screen by clicking it Double click to login or press the login button 5 Enter one of the following to login to your server Username projection Password Username manager Password manager...

Page 3: ...SMS software to enter the Playlist Builder Press to create a new playlist Name the playlist in the dialog View Properties for the playlist by pressing in the lower left Add clips by selecting them in the content pane upper right and pressing Select clips in the timeline by clicking them Long press to bring up the move delete options The button in the lower left to save your edits to the playlist U...

Page 4: ...eys only show when the Licenses filter is selected To add content Attach an ESATA or USB drive to the front of the CMS 1 Once the drive is turned on wait for the CMS to read the contents Clips and KDMs that can be ingest will be shown in the left pane once the drive has finished reading 2 Select content by clicking it 3 Press the Ingest button to move selected content onto the CMS internal drive 4...

Reviews: