


Oven Toaster Griller 9
UNPACKING AND INSTALLING
By following these basic steps you will be
able to quickly check that your oven is
operating correctly. Please pay particular
attention to the guidelines on where to
install the oven. When unpacking your
oven make sure you remove all accessories
and packing materials. Check to make sure
that your oven has not been damaged
during shipping.
1. Unpack your oven and place it on a
flat, heat resistant and non-flammable
surface.
2. Place the oven on the level location
of your choice with more than 85 cm
height but make sure there is at least
10 cm of space on the back and sides
of the oven for proper ventilation.
The front of the oven should be at least
8cm from the edge of the surface to
prevent tipping.
Blocking the exhaust outlets on the
rear and two sides can damage the
oven.
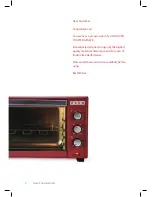
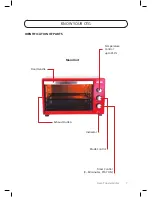
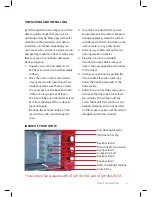
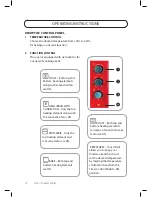
Top Heating Element
Illumination Lamp
Rack position 4
Rotisserie Motor Groove
Rack position 3
Rack position 2
Convection Fan*
Rack position 1
Bottom Heating Element
Crumb Tray
3. To remove any dust that may have
accumulated on the removable parts
during packaging, clean the surface
with damp cloth. DO not immerse the
oven in water or any other liquid.
4. Remove any stickers (except for any
warning/caution stickers).
5. Plug the oven into a standard
household socket. Make sure your
oven is the only appliance connected
to the socket.
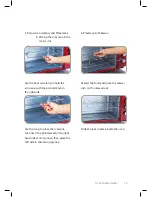
6. Open your oven door by pulling the
door handle. Place the crumb tray
below the heating elements at the
bottom side.
7. Before first use, heat the empty oven
and leave the door open for at least
ten minutes. This will burn off any
excess lubricants found in the oven’s
heating elements and is not harmful.
A little smoke may be normal and will
disappear within few minutes.
INSIDE OF YOUR OTGW
* Convection fan available with OTGW 3635 RC and OTGW 3642 RCSS


