


27
Connect Power Source to Battery Controller
(Transformer or Solar Panel Kit)
The battery controller accepts inputs from either the DC transformer or
the solar panel. The transformer and solar panel come with a DC plug
for easy installation. Once the charge device is selected and installed
connect the DC plug into the charge controller.
If needed, use power source adapter supplied with controller.
Install Safety Signs
Install the 2 warning placards in the gate area where they are visible
from the inside and outside of the gate. These are required per UL 325
to make persons aware of the possible danger of an automated gate.
Connect Linear Actuator Cable to Control Board
Before connecting the actuator cable to the control board check the
following:
- Verify that all previous steps were performed.
- Verify that the battery connections are correct red lead to positive
and black lead to negative.
- Verify that nothing is in the path of the gate. If by chance it begins
to move when power is applied, be prepared to disconnect the
actuator cable.
Ranger I (Single Gate) and Ranger II (Dual Gates)
- Locate the actuator cable and plug it into the Gate 1 actuator
connector (see image) on the control board.
*Only connect one actuator at this time.
Ranger II (Dual Gates)
with overlapping gates or electrical lock requiring gate delay.
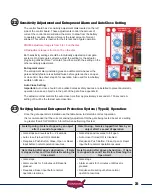
When either the electric gate lock or magnetic gate lock dipswitch is turned ON the gate connected to
Gate 2 will delay on an open command and close last on a close command, the delay is 1.5 seconds.
If an overlapping gate and no lock is being used then we recommend using the electric gate lock
dipswitch for the gate delay.
Photo Eye Alignment
With power now applied the photo eyes can be aligned, Verify alignment and adjust as necessary.
For detailed instructions refer to the installation instructions included with the photo eye.
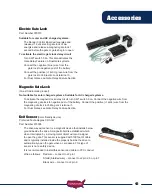
Charge Device
plugs in here
15
16
17
18


