

PCI Faxmodem
for Windows
®
Installation Guide
For Windows
95, 98, and 2000
Operating Systems
(models 3CP5699A and
3CP325699A)
READ
ME
FIRST!
part number 10031167
For troubleshooting help or to find out how to contact technical
support, see the other side of this Guide.
Copyright ©2000 3Com Corporation. All rights reserved. 3Com, the 3Com logo and U.S. Robotics are registered trademarks;
Connections is a trademark of 3Com Corporation. Windows is a registered trademark of Microsoft Corp. All other trademarks
are used for identification purposes only and may be trademarks and/or registered trademarks of their respective companies.
*IMPORTANT! In accordance with the ITU-T standard for 56K transmissions (V.90), this modem is capable of 56 Kbps down-
loads. However, the download speeds you experience may lower due to varying line conditions and other factors. Uploads
from users to server equipment travel at speeds up to 31.2 Kbps. An analog phone line compatible with the V.90 standard,
and an Internet provider or corporate host site compatible with the V.90 standard is necessary for these high-speed
downloads.
Use the Modem Installation Assistant! The Modem
Installation Assistant is a new software tool that will make
the installation of your modem even easier in Windows
95, 98, and 2000. In addition, Windows 95 and 98 users
can view a video presentation on installing the modem. In
Windows 95 and 98, it will check for the system resources
that your modem needs, help you free system resources
if none are available, and give you step-by-step instructions
or a video presentation on installing your modem.
To use the Modem Installation Assistant, insert the
Installation CD included with your modem into your CD-
ROM drive. The Modem Installation Assistant should run
automatically. If it does not, click Windows
Star t
and then
click
Run
. In the “Run” dialog box, type
D:\setup.exe
. If
your CD-ROM drive uses a different letter, type that letter
in place of “D.”
The Modem Installation Assistant will then go to work.
Follow the onscreen instructions to use the Assistant.
When the Assistant tells you to shut down your computer,
refer to Step One of this Guide to continue the installation
process.
1
Before You Begin
2
3
4
5
Write the modem’s serial number in the box below. The
serial number is located on the white bar code sticker on
the modem and on the modem’s box.
NOTE:
It is very important that you have your serial number
written down for future reference. If you ever need to call our
Technical Support department, you will need this number
to receive assistance.
Make sure you have run the Modem Installation Assistant.
For information on the Assistant, see the “Before You Begin”
section of this Guide. Once you have run the Assistant,
make sure that your computer is shut down. Turn off your
computer and all peripheral devices. Unplug your computer
and remove the computer ’s cover.
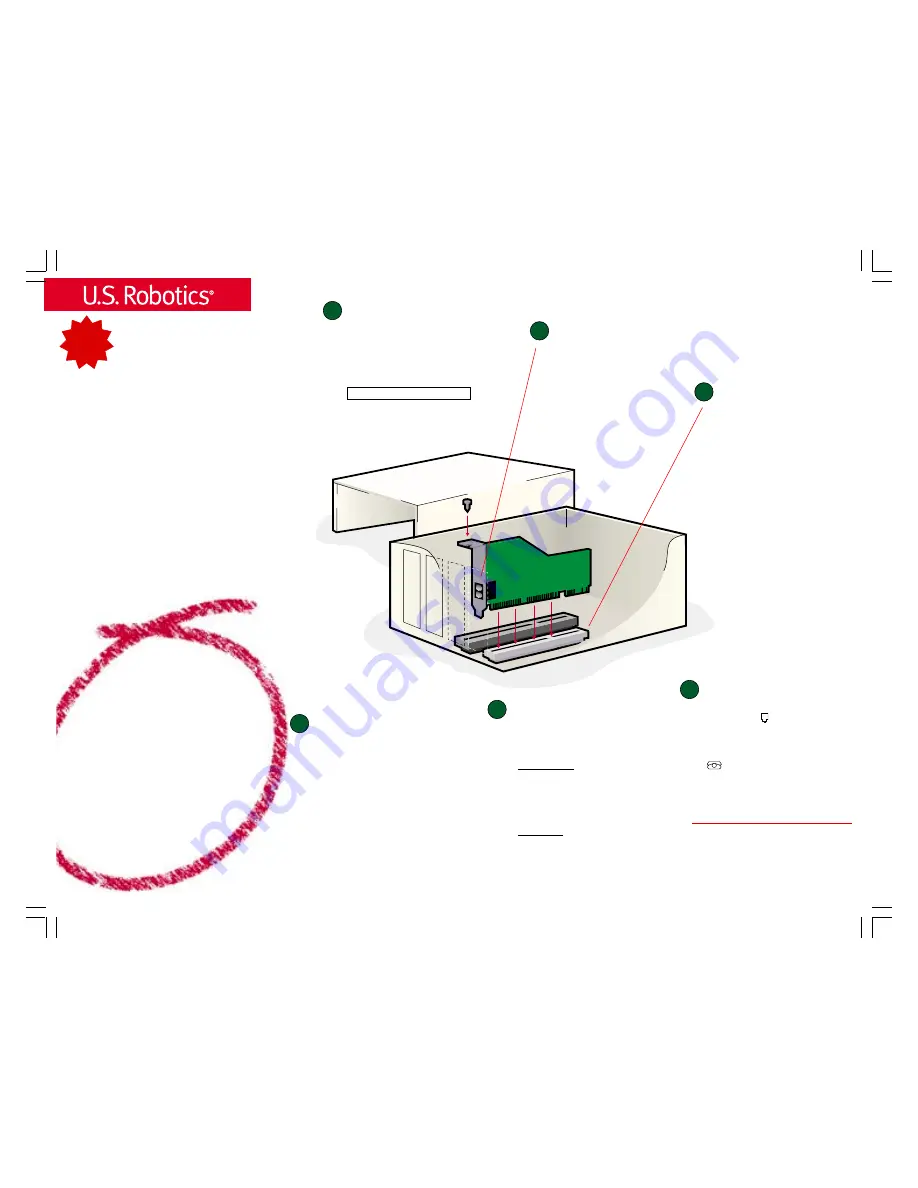
Remove the expansion slot cover.
CAUTION:
To avoid the risk of electrical shock, make
sure your computer and all peripheral devices are
turned off and unplugged.
Unscrew and remove the expansion slot cover at the
back of an empty PCI expansion slot. The slot cover
is on the back of your computer and covers an
opening on your computer’s case. The opening lines
up with the expansion slot inside the computer,
which is 3.5 inches long and usually white plastic
lined with metal.
Insert the modem into the
empty PCI expansion slot.
Insert the modem, black edge first, into the slot. The
modem will fit snugly. You may need to rock the modem
back and forth firmly to properly seat it in the slot.
NOTE:
Properly seating this modem in the slot can be
difficult, because it requires more force than some other
internal modems. Use firm downward pressure. When
the modem is properly installed, you will no longer see
any part of the black edge.
The modem’s metal bracket will cover the opening on
the back of the computer. Secure the modem with the
screw you removed in step two. Replace the computer’s
cover.
Connect the modem to an
analog phone line.
Plug one end of the provided phone cord into the jack
on the modem labeled
and plug the other end into
an analog phone wall jack.
When you are not using the modem, you can use a
telephone on the modem’s phone line. Plug the
telephone’s cord into the modem’s jack labeled
.
Make sure that the Installation CD is still in your CD-ROM drive, then
turn on your computer. Windows will detect your modem and install
its drivers.
Windows 95 and 98 Users
The Modem Installation Assistant will restart and verify that the modem
is properly installed.
If the Assistant detects problems with your modem’s installation, it
will automatically provide troubleshooting advice. For further
troubleshooting information and information on contacting technical
support, see the other side of this Guide.
Windows 2000 Users
Windows 2000 should verify that your modem is properly installed.
For further troubleshooting information and information on contacting
technical support, see the other side of this Guide.
The Installation CD includes the electronic User’s Guide and Reference
for your modem. The
Connections
TM
CD contains a selection of Internet
browsers, ISP offers, and other valuable software.
Windows installs the drivers and
the Modem Installation Assistant
verifies the installation.
Remove the Installation CD and insert the
Connections CD.
The
Connections CD will start automatically once you have
successfully installed your modem. It will guide you through
installing the
Connections program group and registering your
modem. If it does not start automatically, click Windows
Start
and then click
Run
. In the “Run” dialog box, type
D:\setup.exe
. If your CD-ROM drive uses a different letter,
type that letter in place of “D.”
*Note:
If at any time during the installation you are prompted
to select the location of your installation drivers, the following
are the correct locations on the Installation CD (assumes D:
is your CD-ROM drive).
Windows 95/98 drivers:
D:\
Windows 2000 drivers:
D:\Win_2000
Windows NT drivers:
Refer to “Installing Your New Modem
in Windows NT” document included with your modem.
6
Install the
Connections CD and
register your modem.
Prepare for installation.


