
Install battery pack
into tool
Align the base of the power tool
with the notch inside the battery
and slide the battery pack firmly
into the handle until you hear the
lock snap into place.
To turn the power tool on, squeeze
the trigger switch.
To turn the tool off, release the
trigger switch.
Trigger lock safeguards against
inadvertent release of material
!
1
Push trigger lock up. The
tool will not operate with
the switch in the locked
position.
To unlock the trigger
switch: Push the trigger
lock down
Trigger switch &
speed dial
Turn the speed dial to an
appropriate speed for your
application. Then, press the trigger
switch to start the flow of material.
Release the trigger switch to stop
the flow.
2
Plunger rod handle
To adjust plunger rod press & hold
the plunger rod release trigger.
Push or pull plunger rod handle to
desired position. Release plunger
rod release trigger.
3
Removing the
dispenser head
Turn the dispenser head
anti-clockwise to unscrew from
the barrel. Do not pull or cross the
thread as this will render the Gekko
inoperable
.
4
Plunger rod release trigger
Plunger rod release trigger
Trigger
Trigger lock
Battery
Battery
release
button
Speed
dial
Plunger rod handle
Plunger rod
Squeeze
to release
battery
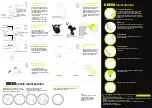
Removing a used
adhesive sachet
Unlock and remove
dispenser head (as in
point 4), and allow
plunger to push out
the used sachet.
Clean out any
adhesive residue in
the barrel. Dispose of
sachet according to
local waste
regulations.
Cut off the sealing clip
Turn dispenser head
clockwise to screw
dispenser head back on to
barrel.
Insert the adhesive
sachet into the barrel
Too slow
Too fast
Just right!
Applying the adhe-
sive
Apply consistent pressure to the
trigger to dispense adhesive.
Releasing the trigger instantly
stops the adhesive flow. Pull the
applicator at a steady pace.
6
Loading/reloading an
adhesive sachet
While squeezing the plunger rod
release trigger, pull back the
plunger completely. Insert the
adhesive sachet into the barrel and
cut off the sealing clip. Turn
dispenser head clockwise to screw
dispenser head back on to the
barrel.
5
UREKA
nozzle maintenance
Replace nozzle after a full day’s use or if it
becomes blocked. Leave nozzle on dispenser
head until you are ready to replace it.
Undo screws and remove nozzle.
Screw new nozzle into place
Clear dispensing hole before attaching new
nozzle
Changing the nozzle
Reducing nozzle dispensing width
Block holes in the nozzle with 4x10 screws until
the required width is achieved
Top Tip
Alternatively you may cover the
required number of holes
securely with masking tape
until the required width is
achieved.
UREKA
maintenance
Storage & transport
When not in use, place Gekko on its side on a stable
surface where it will not fall or caus a trip or fall
hazard. Do no leave unused for more than 15 minutes
because adhesive will begin to skin over setting time
dependent on adhesive being used. Refer to technical
data sheet.
Transport your Gekko empty and with the rack fully closed
Cleaning
Clean barrel and lubricate spreader thread with damp
cloth after each use. Do not use chemicals or similar
which may damage parts. Never immerse tool in liquid
or allow liquid to get inside the tool.
Lubrication
Lubricate barrel with silicone spray after every 10
sachets of adhesive.
Precautions
Never allow dirt and dust to enter the rack
mechanism.
Never use a Gekko with a broken or bent barrel or
rack.
Always check dispenser hole is clear before loading a
new adhesive sachet.
Avoid getting adhesive on battery pack.
CONFORMITY/GEKKO 14.4 VOLT SEALANT APPLICATOR
Is in conformity with the following standards:
EN60745-1:2006, EN55014-1:2006, EN55014-2:1997 + A1:2001 EN61000-3-2:2006, EN6100-3-3:1995 + A1:2001
+A2:2005
EN61000-6-3:2007, EN61000-6-1:2007, EN 60335-2-29: 2004
EN 60335-1: 2002 + A11: 2004 + A1: 2004 + A12: 2006 + A2: 2006 + A13: 2008 EN 62233: 2008
In accordance with the Directives :-
2006/42/EC, 2004/108/EC, 2006/95/EEC
Plunger rod
handle


