background image

Page 4

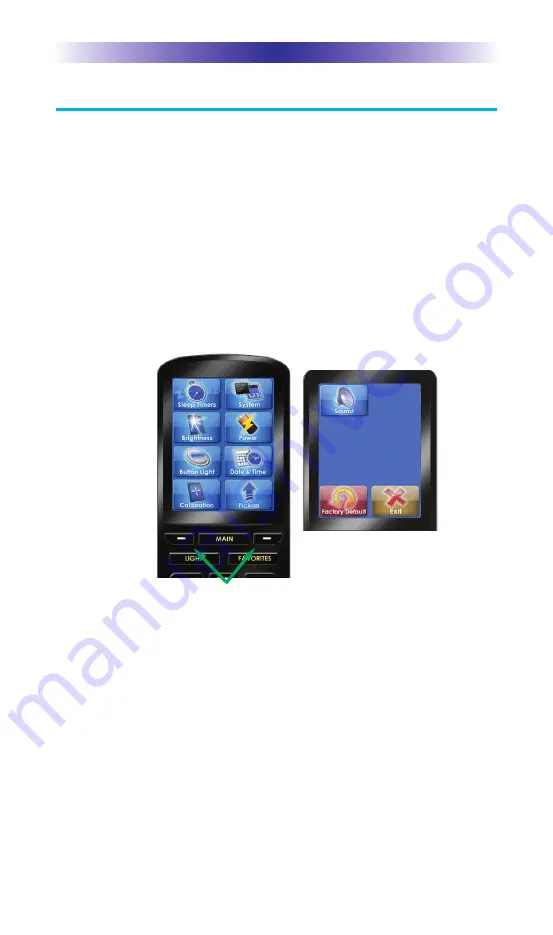
Displaying the Settings Screen

You can enter the Settings menu by pressing and holding the MAIN and
ENT button for three seconds. The MX-1200i will timeout after it is idle for
30 seconds and return to the previous setting or Main screen. There are
two pages of Settings screens. Select a setting by pressing a button on the
LCD screen. Press either of the PAGE buttons to access the other page. To
go back a step or to get out of the settings screen, press the MAIN button.

There are two pages of Settings screen. To access the other page press
either of the PAGE buttons.

MX-1200i C

OLOR

T

OUCH

S

CREEN

Page buttons reveal the
rest of the settings.

Page 2 of the Settings
Screen

Summary of Contents for MX-1200i

Page 1: ...MX 1200i ColorTouch Screen Owner s Manual ...

Page 2: ... effectively customize a remote control for true automated operation Congratulations on your choice MX 1200i Owner s Manual 2012 2013 Universal Remote Control Inc The information in this owner s manual is copyright protected No part of this manual may be copied or reproduced in any form without prior written consent from Universal Remote Control Inc UNIVERSAL REMOTE CONTROL INC SHALL NOT BE LIABLE...

Page 3: ...er 5 Button Light 6 Date and Time 6 Calibration 6 Pickup Settings 6 Sound 7 Factory Default 7 Exit 7 Maintaining Your MX 1200i 8 Specifications 8 Limited Warranty Statement 9 End User Agreement 11 Federal Communication Commission Interference Statement 12 Regulatory Information to the user 13 Declaration of Conformity 14 Precautions and Information Concerning Rechargeable Lithium Ion Batteries 15 ...

Page 4: ...nt and how the system is connected and operated Only a trained and certified professional audio video installer can install an MX 1200i remote control in a timely and efficient manner User interface customizable for any activity Each button is customizable for activities such as Watch TV or Listen to Radio These activities can contain multiple commands macros which enable a single button press to ...

Page 5: ... MAIN button to view your devices or the activities placed here by your custom installation specialist Large systems may have more than one page Press either of the PAGE buttons if you don t see all your devices Gently press any screen button with your finger to select an activity or a device The screen will change to display the buttons you need for that activity device The PAGE buttons may revea...

Page 6: ... into place when aligned properly Replace the cover and snap it into place Using the Charging Base Plug the 5V adapter into a power outlet and into the back of the charging base Gently place the MX 1200i into the cradle of the charging base It automatically aligns itself to the contacts on the charging base The Status light should immediately light Red indicates that it is charging Blue shows that...

Page 7: ... screen There are two pages of Settings screens Select a setting by pressing a button on the LCD screen Press either of the PAGE buttons to access the other page To go back a step or to get out of the settings screen press the MAIN button There are two pages of Settings screen To access the other page press either of the PAGE buttons MX 1200i COLOR TOUCH SCREEN Page buttons reveal the rest of the ...

Page 8: ...the slide bar System The System Information screen displays data about your MX 1200i s operating system memory etc Brightness Adjust the screen brightness by moving the slider Min minimum is the dimmest setting and Max maximum is the brightest setting Power You can display the remaining charge by selecting Power You can also adjust when the low battery warning screen will appear ...

Page 9: ...y the time or date on the touch screen If you need to you can adjust the time displayed by changing the settings on this screen Calibration If you like you can calibrate the screen by running the calibration setting You will need a pen top or PDA stylus to do this Do not attempt to calibrate using your fingers Pickup Settings You can set your MX 1200i to only turn on when touched or every time you...

Page 10: ...er to your desired position Factory Default WARNING Only use this button when instructed to by Technical Support It resets the memory of the MX 1200i to the factory condition All your programming will be lost Exit When you have finished adjusting Settings simply tap the Exit button to return to normal operation ...

Page 11: ...ght leak into the interior Precautions Information Rechargeable Lithium Ion Batteries If you will not be using your remote control for an extended period of time be sure to remove the battery Do not attempt to disassemble alter or apply heat to the battery Use care to avoid dropping the battery or subjecting it to severe impact that could damage the case The battery should not be immersed in water...

Page 12: ... and or the URC software fails to so comply URC shall at its own expense take all reasonable measures to promptly cause such to comply URC equipment purchases from other than an authorized URC dealer or distributor are without warranty THIS LIMITED WARRANT DOES NOT COVER TECHNICAL ASSISTANCE FOR HARDWARE OR SOFTWARE USAGE EXCEPT AS EXPRESSLY PROVIDED FOR HEREIN THE EQUIPMENT SOFTWARE AND DOCUMENTA...

Page 13: ...packaging affording adequate protection to URC at 420 Columbus Avenue Valhalla NY 10595 It is end user s responsibility to backup any macro programming artwork software or other materials that may have been programmed into the unit It is likely that such data software or other materials will be lost during service and URC will not be responsible for any such damage or loss A dated purchase receipt...

Page 14: ...L BE LIMITED TO ACTUAL DAMAGES NOT IN EXCESS OF AMOUNTS PAID BY END USER FOR THE URC EQUIPMENT IN NO EVENT SHALL URC BE LIABLE FOR ANY EVENTS BEYOND ITS CONTROL INCLUDING ANY INSTANCE OF FORCE MAJEURE IN NO EVENT SHALL URC BE LIABLE FOR THE ACTS OR OMISSIONS OF END USER OR ANY THIRD PARTY THE LIMITATIONS OF LIABILITY MAY NOT APPLY TO END USER IN WHOLE OR IN PART WHERE SUCH ARE RESTRICTED LIMITED O...

Page 15: ...hat to which the receiver is connected u Consult the dealer or an experienced radio TV technician for help Warning Changes or modifications not expressly approved by the manufacturer could void the user s authority to operate the equipment Note The manufacturer is not responsible for any Radio or TV interference caused by unauthorized modifications to this equipment Such modifications could void t...

Page 16: ...N 55024 lPower EN 61000 3 2 3 3 Low Voltage Directive lProduct safety EN 60950 1 n Safety instruction for charging internal rechargeable battery of remote control Use only with EN60950 1 approved as Limited power source and double insulation marked power adaptor same ratings described on the product label 5V DC 1 0A n Declaration of Conformity Hereby Universal Remote Control Inc declares that this...

Page 17: ...ssion of the European Community Compliance with these directives implies conformity to the following European Community n EMC Directive l EN 55022 l EN 55024 l EN 61000 3 2 l EN 61000 3 3 n R TTE Directive l EN 60950 1 l ETSI EN 301 489 1 3 l ETSI EN 300 220 1 2 l ETSI EN 300 n Low Voltage Directive l EN 60950 1 List of test reports and or certificate verified compliance with the standards above D...

Page 18: ...lter or apply heat to the battery u Use care to avoid dropping the battery or subjecting it to severe impact that could damage the case uThe battery should not be immersed in water u Risk of explosion if battery is replaced by an incorrect type u Dispose of used batteries according to the instructions u Lithium Ion batteries are recyclable For the address of a recycle drop off location near you ca...

Page 19: ......

Page 20: ...500 Mamaroneck Avenue Harrison NY 10528 Phone 914 835 4484 Fax 914 835 4532 www universalremote com OCE 0113B Rev 03 ...

Reviews: