background image


5.4 Power 

up 

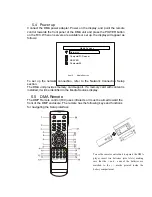
Connect the DMA power adapter. Power on the display, and point the remote 
control towards the front panel of the DMA unit and press the POWER button 
on the R/C. When on servers are available or set up, the display will appear as 
follows: 


To set up the network connection, refer to the Network Connection Setup 
section. 
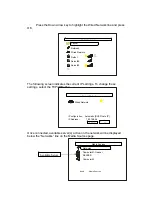
The DMA unit provides memory card support. If a memory card with content is 
installed, it will be identified in the Media Sources display. 

Networks 

Computer01:Owener 

SERVER 

Computer02 

Item 0     Media Sources 

Media Sources


5.5  DMA Remote 

The DMP Remote control (R/C) uses infrared so it must be aimed toward the 
front of the DMP enclosure. The remote has the following keys and functions 
for navigating the Setup interface 


To use the remote control unit to operate the DMA 

player, insert two batteries (size AAA) making 

sure that the + and – ends of the batteries are 

matched to the +/– marks printed inside the 

battery compartment. 


Summary of Contents for DMA 201

Page 1: ...ation 8 5 DMA Setup 11 5 1 Indicators 11 5 2 Cable Connections 12 5 3 Memory Cards 13 5 4 Power up 14 5 5 Remote Control 14 6 Operation Setup Section 15 6 1 Wire Setup 15 6 2 Wireless Setup 17 6 3 Playback Options 18 6 4 Device Setup 19 7 Content Navigation Modes 20 7 1 List Mode 21 7 2 Audio Preview Mode 22 7 3 Photo Preview Mode 22 7 4 Video Preview Mode 22 8 Content Play Modes 23 8 1 Audio Play...

Page 2: ...C The Wireless Multimedia player supports WMA MP3 and AAC MPEG4 music formats and so you have access to all your downloaded songs Share your digital photos Relax on the couch and look at your holiday photos with the whole family or friends Simply store your photo collections centrally on a PC and enjoy them anytime on your TV If you have a high definition TV input on an LCD or plasma TV your digit...

Page 3: ...ternet radio and flickr photo share website 1 2 2 Trick mode support Multi speed FF FR Skip ahead Skip back Pause Play Stop Zoom Rotate on photos 1 2 3 File Search 1 2 4 Photo Slideshow 1 2 5 Music Photo Slideshow Device setup Control over most aspects of device operation Accessed through Setup button on remote control Networking Simple intuitive leads user through initial connect process Prioriti...

Page 4: ...rk Protocols TCP IP stack HTTP streaming UPnP IP Addressing DHCP Static IP Auto IP DLNA v1 0 player control point Works with DLNA compliant Media Servers Tested with Microsoft WMP11 WMP10 WMC2 0 Philips PMM and TwonkyVision Can interoperate with up to 8 servers at the same time 1 3 4 Networks 802 11 WiFi 11g or Super 11g can optionally support 802 11a WEP or WPA2 security 802 3 Ethernet Supports 1...

Page 5: ...r11 setup 1 Click Menu Library click SUBMENU Add to Library 2 Then click Advanced Option Click Here 3 Set skip files small than as 0 KB 4 Click OK to quite 1 4 2 DMA unit operation 1 Select subtitle file Movie001_SRT avi 2 Press Subtitle key to make sure subtitle file be selected 3 Select vedio file MOVIE001 avi to play ...

Page 6: ... 12 character hexadecimal address of an EN device NC No Connection O S Operating System PC Pentium based Personal Computer running XP O S PCA Printed Circuit Assembly PCB Print Circuit Board R C Remote Control infrared RGW Router Gateware WiFi 802 11a b g n Wireless Ethernet 3 DMA Overview Front View Side View Back View ...

Page 7: ...e or Professional Operating system Microsoft Digital Media Server DMS software installed on the PC NTSC or PAL Display TV with Composite video inputs Typical Digital Media Player System Hint Using a wireless connection for both the DMA and the Server PC doubles the media data traffic over the connection While this rate is achievable with 802 11b g technology in ideal conditions it can cause undesi...

Page 8: ...our computer or you have an earlier version the software CD packed with your DMA automatically lets you install Media player 11 Begin the download You must be connected to the Internet If you already have Windows Media player 11 or higher on your computer Go to set up media sharing 1 Let me install Windows Media player now 2 Your browser opens and you are automatically connected to the Microsoft W...

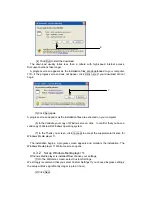
Page 9: ...e your copy of Windows screen click to confirm that you have a valid copy of Microsoft Windows operating system 7 In the Thank you screen click I accept to accept the supplemental license for Windows Media player 11 The installation begins A progress screen appears and monitors the installation The Windows Media player 11 Welcome screen opens 4 3 2 Set up Windows Media player 11 Windows Media play...

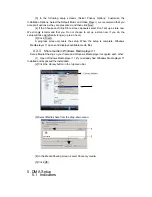
Page 10: ...antly longer up to an hour 5 Click Finish A progress screen monitors the setup When the setup is complete Windows Media player 11 opens and displays available media files 4 3 3 Share media in Windows Media player 11 Set up Media Sharing so your frame and Windows Media player recognize each other 1 Open Windows Media player 11 if you already had Windows Media player 11 Installed and bypassed the in...

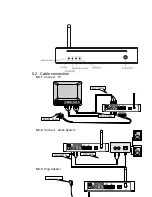
Page 11: ...5 2 Cable connection 5 2 1 Connect TV 5 2 2 Connect Audio System 5 2 3 Plug Adapter L R Cable Optical Wire Adapter SCART Cable YUV Cable RCA Cable ...

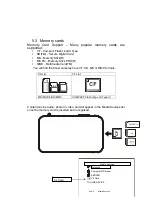
Page 12: ...ck PRO R y MMC Multimedia Card TM You will find that most cameras have CF SD MS or MMC formats SD slot CF slot MS MS Pro SD MMC COMPACT Flash Type I Type II Content can be audio photo or video and will appear in the Media Sources list once the memory card is inserted and recognized Networks Computer01 Owener SERVER CF Card USB DEVICE Media Sources CF Card Item 0 Media Sources ...

Page 13: ...If a memory card with content is installed it will be identified in the Media Sources display Networks Computer01 Owener SERVER Computer02 Item 0 Media Sources Media Sources 5 5 DMA Remote The DMP Remote control R C uses infrared so it must be aimed toward the front of the DMP enclosure The remote has the following keys and functions for navigating the Setup interface To use the remote control uni...

Page 14: ... Cursor down move down one entry 10 HOME Return to main menu 24 RIGHT Cursor right Skip down one page or bottom of last page 11 REPEAT Select repeat mode 25 STOP Stop playing 12 M SLIDE Enable slide show mode 26 OK Confirms selection of an item in the menu 13 SLOW Press SLOW during playback to obtain a slow motion playback 27 VOL Increase volume 14 RESUME Remember where you stopped viewing a media...

Page 15: ...nt IP settings To change these settings select the TCP IP Button Select Network Wired Network IP onfiguration Automatic DHCP Auto IP IP Address 192 168 0 4 TCP IP OK Once connected available server s active on the network will be displayed below the Networks line on the Media Sources page Available Server Networks Computer01 Owener SERVER Computer02 Item 0 Media Sources Media Sources ...

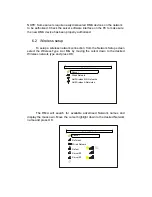
Page 16: ...from the Network Setup screen select the Wireless Type A or B G by moving the cursor down to the desired Wireless network type and press OK The DMA will search for available advertised Network names and display the mass own Move the cursor highlight down to the desired Network name and press OK Select Network Cancel Wired Network List Wireless B G Networks List Wireless A Networks Select Network C...

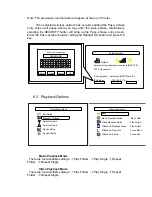
Page 17: ...l 4 IP onfiguration Automatic DHCP Auto IP IP Address 192 168 3 114 TCP IP OK Security PASSWORD Enter WPA Passphrase Shift OK Erase Cancel 6 3 Playback Options Exit Setup Playback Options Select Network Network Setup Device Setup Device Status Setup Main Menu Playback Options Back Music Playback Mode Play Folder Video Playback Mode Play Single Slideshow Playback Mode Play Folder Slideshow Transiti...

Page 18: ...etwork Network Setup Device Setup Device Status Setup Main Menu Back TV Type NTSC TV Display 16 9 HDTV Video Output SCART RGB SPDIF Output Off Screen Save 3 seconds Font Size Normal Restore Factory Defaults Device Setup TV Type There are three available settings Mutisync NTSC PAL TV Display There are three available settings 4 3 Full Screen 4 3 Letter Box 16 9 HDTV Video Output There are two avail...

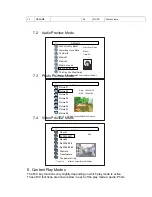
Page 19: ...Once a content source is selected the directory format presented is determined by that source Use the remote control R C cursor keys to navigate through the content directories The content can be displayed in List Mode List Preview Mode or Thumbnail mode These display form at modes are selectable by pressing the DISPLAY key Preview Mode LIST MODE Thumbnail Mode SELECT FOLDER PREVIEW MODE Default A...

Page 20: ...s 16 SUBTITLE 3 VOL Decrease volume 17 ROTATE 4 UP Cursor up Go to previous file 18 ZOOM 5 PLAY PAUS E Play or pause a file 19 SETUP Enter SETUP menu 6 LEFT Skip up one page and select bottom item of this page 20 DISPLAY Toggle time counter on off 7 PREV Back to top of first page BACK Position 21 REV Fast reverse 8 NEXT Go to next file 22 FWD Fast forward 9 DEFAULT Restore setup setting as default...

Page 21: ...ia Connect Music All Music Who s Got My Back Yesterday Once More The Earth Music01 Music02 Where are you Say You Say ME The Day You Went Away Artist Paul Simon Album Track 06 Y 1986 All Pictures Picture01 Picture02 Picture03 Picture04 Picture05 Picture06 Picture07 Picture08 Date 2006 10 05 SIZE 1024x768 Item 14 Media Connect Music All Pictures All Video 0 48 Item 14 Media Connect Music All Video V...

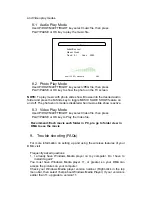
Page 22: ...d when music slide show is active 8 3 Video Play Mode Use UP DOWN LEFT RIGHT key select Video flie then press PLAY PAUSE or OK key to Play the Video file Recommend Each movie each folder in PC pls go to folder view in DMA to see the movie 9 Trouble shooting FAQs For more information on setting up and using the wireless features of your DMA visit Frequently asked questions 1 I already have Windows ...

Page 23: ...erson who set up your network can help you with this information Does your network have security enabled WEP or WPA If so follow the instructions on Page 16 5 I can t find my network computer Why Make sure your router and your computer are on Make sure your computer is on your wireless network See the documentation that came with your router and your computer Is Media sharing enabled in Windows Me...

Page 24: ... on the TV screen Turn the TV on Set the TV to the correct external input Set the video output connection on the rear of the product to the correct position and restart the product Make sure that the TV supports the video signal of the product Press the Default key on the supplied remote control to restore the video output signal to the factory default values 5 No sound signal from loudspeaker of ...

Page 25: ......

Page 26: ......

Reviews: