Device Registration
in the Uplink Dealer Portal
Register your company at
www.uplinkdealers.com
or use your existing
account to login.
Adding preferred monitoring station
Contact your monitoring station and request your Uplink Dealer Code.
• Specify your preferred monitoring station during your initial registration in
the list found in section “Additional Information” > “Preferred Monitoring
Station.”
Provide your Dealer code in the corresponding field,
OR
• Add preferred monitoring station/s after registration from
My Devices > Monitoring Stations > Add CMS
Add a new device and choose cellular service monthly billing method:
Use the device Serial Number and the Config Key provided with this manual.
• Go to My Devices > Devices > Add New Device.
• Select monitoring station (optional)
• Select preferred cellular service monthly billing method.
• From Monitoring Station – You will be billed for cellular service by the
monitoring station.
• From Uplink – You will be billed for cellular service by Uplink.
Uplink 5530M
Universal Cellular Communicator
Quick Installation Manual
v.01-2022-11-05_5000
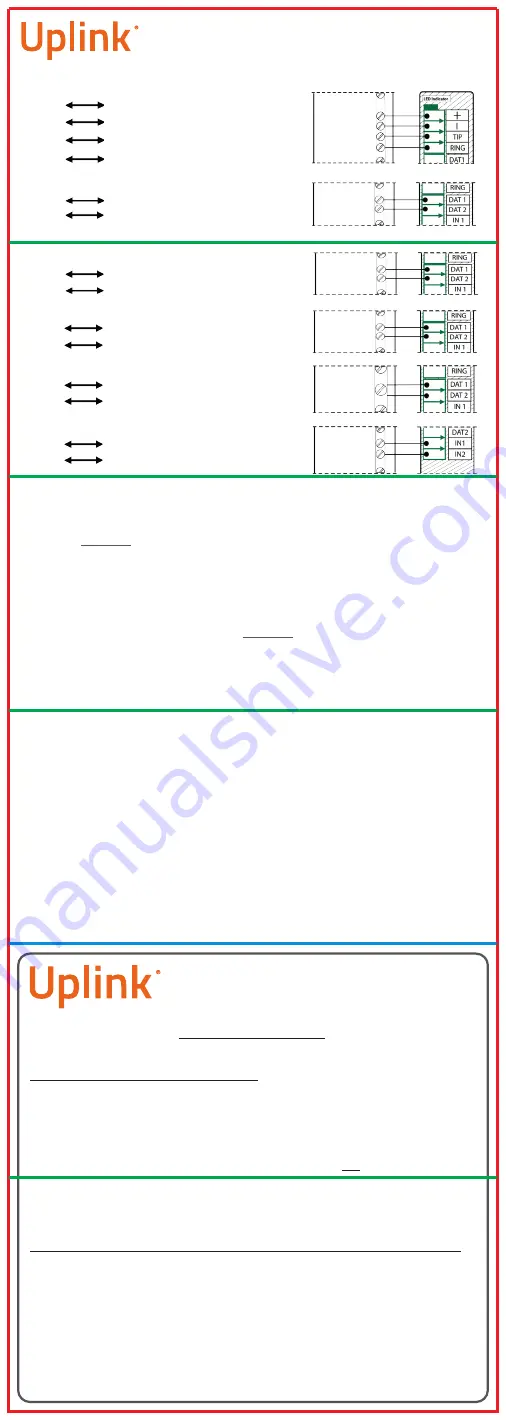
Keyswitch Wiring
(Optional)*
* Optional - wire only if interactive features will be used. Panel compatibility list for Keybus integration is
available at
uplink.com
The Inputs are tripped by applying a negative (GND) signal and are preconfigured as General Alarm.
The inputs can be connected to bell output and will recognize a pulsed voltage as Fire Alarm and
steady voltage as General Alarm. Always use the active bell output.
WARNING: The wiring should be done only when the panel and the communicator are
disconnected from the powerline!
WARNING: PRIMARY USE ONLY – NOT TO BE USED WITH LANDLINE!
Having a phone line connected will damage the unit!
Connect the antenna and place it outside of the alarm panel’s box.
C and – of the communicator to a max of 12V - 15V DC power supply.
Find configuration guides for popular panels at
uplink.com
LED Indication
Slow flashing - trying to establish a connection
Constantly On - connection established at a good signal level
Constantly On, blinking every 5 sec - connection established at a low signal level
Fast flashing - currently transmitting cellular traffic
Configuring the alarm panel
Refer to the panel’s installation manual to configure the following options:
Enable the PSTN dialer of the panel
Select DTMF mode (Tone Dialing)
Select Contact ID Full communication format or SIA
Enter a telephone number for dialing (you can use any number, e.g. 9999999)
Enter a 4-digit account number in the panel
Troubleshooting the DTMF communication
If you have issues receiving the events, try the following additional settings of the panel:
Disable “Telephone line monitoring”
Disable the “Wait for dial tone” option
Use “A” instead of “0” in the account number
If there is more than one partition, enter an account number for each partition.
For certain panels, you might need to also specify an account number for the main
partition 0 (sometimes referred as system account number).
Wiring the Communicator to the Alarm Panel
5530M
Alarm Panel
(+)
12-15 V DC Power Supply
(
-
)
Ground
TIP
TIP terminal of the Alarm Panel
RING
RING terminal of the Alarm Panel
DAT1
Keyswitch Zone on the Alarm Panel
DAT2
Status Output on the Alarm Panel
DAT1
Data Out (Yellow) Panel Terminal
DAT2
Data In (Green) Panel Terminal
Keybus Wiring
(Optional)*
Napco Panels
Honeywell Vista and DSC Power Series Panels
DAT1
TX (Green) Panel Terminal
DAT2
RX (Yellow) Panel Terminal
Interlogix NX Panels
Digital Inputs (Optional)
DAT1
IN1
DATA Panel Terminal
PGM or Bell Out Panel Terminal
DAT2
IN2
DATA Panel Terminal
PGM or Bell Out Panel Terminal
DATA OUT (Yellow)
DATA IN (Green)
+12V AUX
GND
TIP
RING
Keyswitch Zone
PGM
TX (Green)
RX(Yellow)
DATA
PGM or Bell Out
PGM or Bell Out


