© UPLIFT Desk
• 800-349-3839 • [email protected] • upliftdesk.com
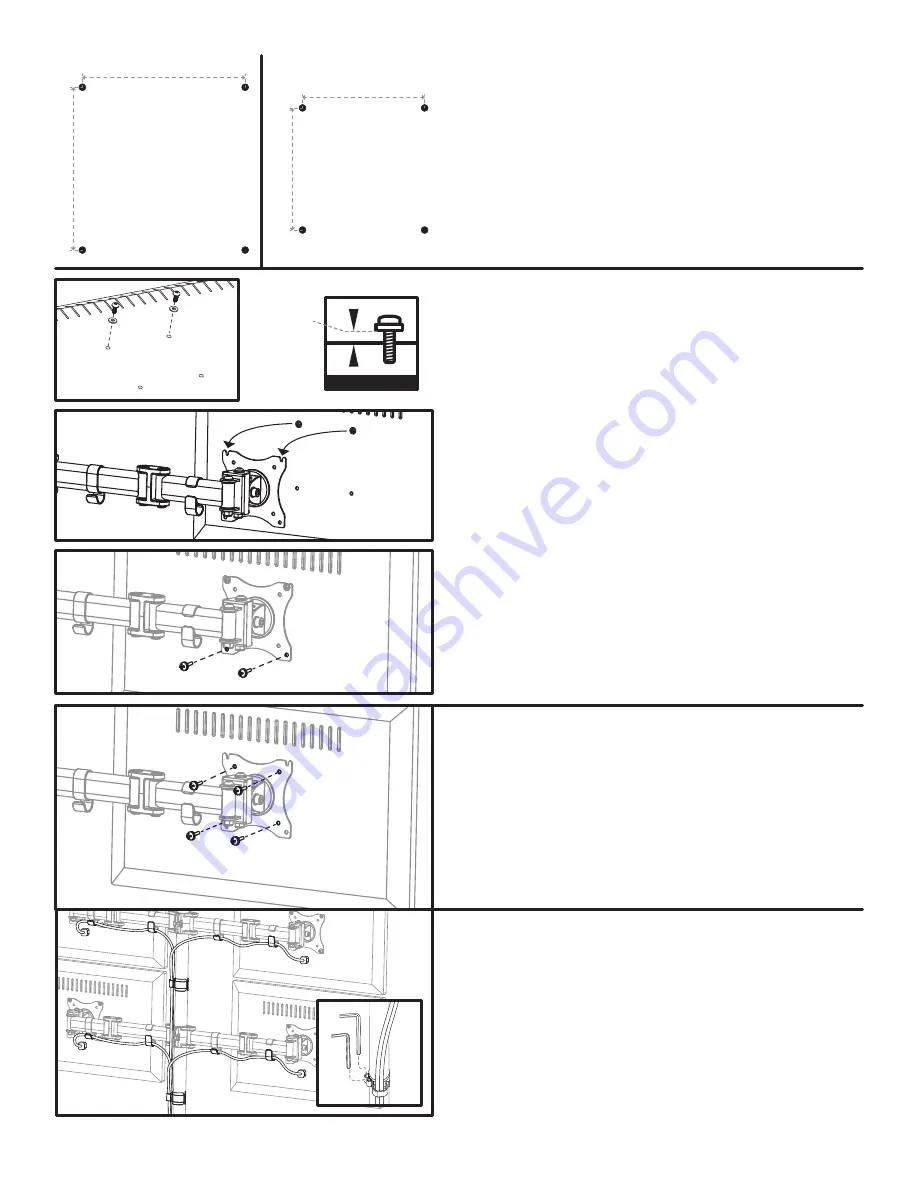
Step 13
Determine whether your monitors have a 100 mm
VESA pattern, or a 75 mm VESA pattern. Each pat-
tern attaches in a different way to the Moontower
Quad Monitor Arm.
100 mm VESA pattern:
If the holes are 100 mm apart
(just under 4”) from each other, proceed to Step 14.
75 mm VESA pattern:
If the holes are 75 mm apart
from each other (just under 3”), skip Step 14 and pro-
ceed to Step 15.
100 mm
75 mm
100
mm
75
mm
100 mm
75 mm
100
mm
75
mm
100 mm VESA pattern
75 mm VESA pattern
Step 14 (100 mm VESA pattern)
A. Take two of the Screws from Step 12 and two
Washers and thread them into the top two holes
of your monitor leaving about a 1/8’’ gap between
the Washer and the back of your monitor.
B. Hold the monitor against the VESA Plate and slide
the two screws into the slots at the top of the
VESA Plate. Make sure the VESA Plate is between
the Washers and the monitor.
C. Before tightening the top Screws, start two more
Screws and Washers through the lower holes of
the VESA Plate and into the back of the monitor.
• Be careful to not dislodge the monitor from the
top two Screws while inserting the lower Screws!
D. Once all four Screws are started, tighten them all
with a Phillips screwdriver to secure the monitor in
place.
E. Repeat this step with the other monitors then skip
Step 15 and proceed to Step 16.
1/8”
1/8”
1/8”
Top
Step 15 (75 mm VESA pattern)
A. Have a friend hold the monitor up to the VESA
Plate and start four Screws from Step 13 and four
Washers through the VESA holes and into the
back of the monitor.
B. Then tighten all four Screws with a Phillips screw-
driver to secure the monitor in place.
C. Repeat this step with the other monitors.
Step 16
A. Plug in your monitors and run the cables through
the Arm Wire Clips and the Cable Clips on the
Pole.
B. The Cable Clips also have a place to hold the 5mm
& 6mm Allen Wrenches to keep them handy for
any future adjustments needed.


