UT9912
Installation
The UT9912 Recoilless Needle Scaler is designed to operate
with 90 PSIG. Lower pressure (below 90 PSIG) will reduce
performance of the tool while higher air pressure (over 90
PSIG) raises the performance of the tool beyond its rated
capacity and could cause serious damage to tool and operator.
Always use clean dry air. Excessive moisture and dirt will
greatly reduce the life of any air tool. We recommend the
installation of an in-line filter-regulator-lubricator as close to the
tool as possible.
A 3/8" air hose is required up to a length of 8 ft. If more length
is required, a 1/2" air hose should be connected to the 3/8"
hose to ensure the tool has the necessary air supply. Be sure
all hoses and fitting are the correct size and tightly secured.
Recoilless Needle Scaler
2
Lubrication
1.
An automatic in-line filter-regulator-lubricator is recom-
mended to increase tool life and keeps the tool operating
properly. The in-line lubricator should be regularly
checked and filled with Marvel air tool oil or equivalent.
Proper adjustment of the in-line lubricator is performed by
placing a sheet of paper next to the tool exhaust ports and
holding the throttle open approximately 30 seconds. (The
lubricator is properly set when a light stain of oil collects on
the paper). Excessive amounts of oil should be avoided as
it will decrease tool performance.
2.
In the event that it becomes necessary to store the tool for
an extended period of time (overnight, weekend, etc.), it
should receive a generous amount of lubrication at that
time. The tool should be run for approximately 30 seconds
to ensure oil has been evenly distributed throughout the
tool. The tool should be stored in a clean and dry environ-
ment.
3.
Recommended lubricants:
Use Marvel Air Tool Oil or any other high grade turbine oil
containing moisture absorbents, rust inhibitors, metal
wetting agents and an EP (extreme pressure) additive.
Operation
After properly setting up the tool, air lines, air supply and work
area, the scaler is ready to use. The UT9912 does not operate
like conventional needle scalers, tool operators should take
time to familiarize themselves with the feel and operation of this
design for best results.
This model operates two to three times higher than the fre-
quency of conventional scalers. The higher frequency results
in smoother operation and a smoother finished surface than
with conventional scalers.
Scaling efficiency depends on the force applied to the scaler.
For efficient material removal on most applications, applying an
intermediate force will give the best results.
Lubricate tool regularly and properly. Always wear safety
equipment during operation. Check condition of tool and
needles before each use. Avoid free air operation of this tool,
always apply tool to work before pressing throttle. This tool is
designed for 1/8" X 7" long needles, although different lengths
will work as well.
Caution
- Never operate scaler without the
needles installed and pressed against the work surface.
Doing so may result in personal injury or damage to the
tool.
Warning
- This tool may produce flying
objects. Always wear eye protection during operation.
Installing Replacement Needles
Before the tool is connected to the air supply, clear the air hose
of accumulated dust and moisture. Before removing a tool for
service or changing accessories, make sure the air line is shut-
off and drained of air. This will prevent the tool from operating if
the throttle is accidently engaged.
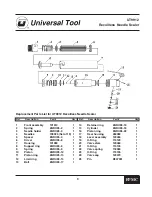
1.
Push in the front assembly (Ref. No. 1) and twist to the
open slot, then pull needle assembly (Ref. Nos. 1-4) out of
housing.
2.
Remove old needles (Ref. No. 4) from holder (Ref. No.
3) and replace with new needles, making sure the needle
heads fit into the countersunk holes in needle holder.
3.
Slide needles through spring (Ref. No. 2) and front
nosepiece (Ref. No. 1). Check that driver (Ref. No. 6) and
spacer (Ref. No. 5) are placed inside housing correctly.
4.
Lubricate entire needle assembly with a light coating
of oil. Reassemble by sliding assembly into the housing, line
up slot, then depress and twist to lock in place.
5.
Lubricate tool through inlet with air tool oil and run in a
protected area to check operation.


