background image

Universal Tool a Division of Florida Pneumatic Mfg. Corp.  

851 Jupiter Park Lane, Jupiter FL 33458

Universal Air Tools Company Ltd.


Unit 8 Lane End Industrial Park, High Wycombe, HP14 3BY, UK


Installation

Cleaning the air hose


A 3/8" air hose is required, with a maximum length of 25 ft. 


Clean the air hose of accumulated dust and moisture 
before connecting it to the air supply.

NOTE:

 If a longer air hose is required, connect a 1/2" 

air hose to the 3/8" air hose to ensure the drill has the 
necessary air supply.

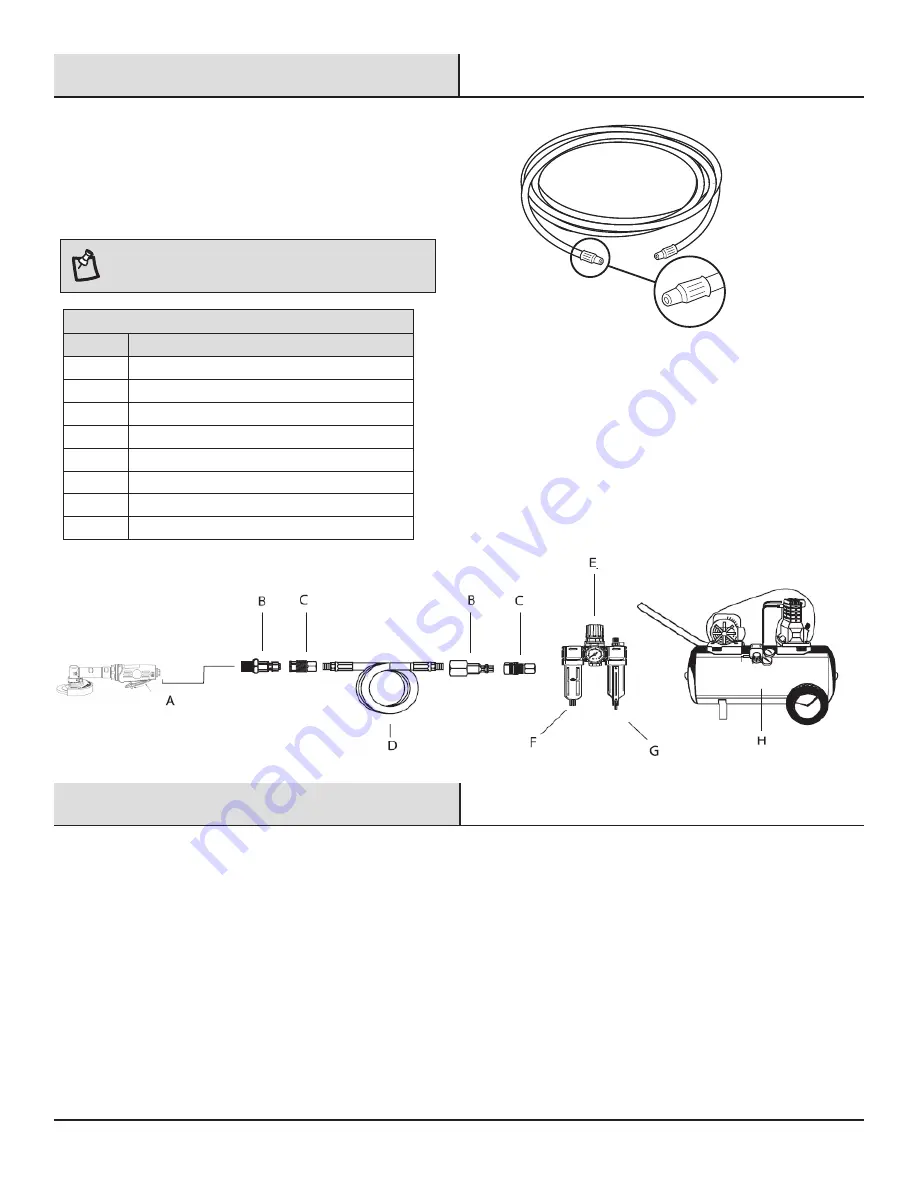
Recommended Air Line Set-Up

Part

Description

A

Air Tool

B

Quick Plug

C

Quick Coupler

D

Air Hose

E

In-line Regulator

F

In-line Lubricator

G

In-line Filter

H

Air Compressor

Ensure the air line is shut-off and drained of air before removing this tool for service or changing sockets. This will prevent the tool from 
operating if the throttle is accidentally engaged.

LUBRICATION


An in-line filter-regulator-lubricator is recommended as it increases tool life and keeps the tool in sustained operation. 


Regularly check and fill the in-line lubricator with air tool oil. Avoid using excessive amounts of oil.


Adjust the in-line lubricator by placing a sheet of paper next to the tool’s exhaust ports and holding the throttle open approximately 30 
seconds. The lubricator is properly set when a light stain of oil collects on the paper. 


If it is necessary to store the tool for an extended period of time (overnight, weekend, etc.), generously lubricate the tool through the air 
inlet. Run the tool for approximately 30 seconds to ensure the oil is evenly distributed throughout the tool. Store the tool in a clean and 
dry environment. 


Recommended lubricants: Air tool oil or any other high grade turbine oil containing moisture absorbent, rust inhibitors, metal wetting 
agents, and an EP (extreme pressure) additive.

Maintenance

Summary of Contents for UT8744

Page 1: ...instructions and warnings before operating any pneumatic tool TABLE OF CONTENTS General Safety Information 2 Air Compressor and Air Tool Safety 2 3 Tool Specifications 3 Installation 4 Maintenance Lubrication 4 Operation 5 Troubleshooting 6 Warranty 6 Service Parts 7 WARNING This product contains chemicals known to the State of California to cause cancer and birth defects or other reproductive har...

Page 2: ...s essential If the pneumatic tool is used in a dust filled environment exhaust air can cause a dust hazard Dusts and fumes generated when using power tools can cause ill health for example cancer birth defects asthma and or der matitis risk assessment of these hazards and implementation of appropriate controls of is essential Risk assessment should include dust created by the use of the tool and t...

Page 3: ...ing the operation 4 Grinding wheels and cut off wheels shall not be used for side grinding Exception grinding wheels designed for side grinding Grinders should not be used over the maximum rated speed of an abrasive product 5 The operator shall pay attention that no bystanders are in the vicinity 6 The personal protective equipment such as gloves apron and helmet shall be used 7 Never operate the ...

Page 4: ...he tool from operating if the throttle is accidentally engaged LUBRICATION An in line filter regulator lubricator is recommended as it increases tool life and keeps the tool in sustained operation Regularly check and fill the in line lubricator with air tool oil Avoid using excessive amounts of oil Adjust the in line lubricator by placing a sheet of paper next to the tool s exhaust ports and holdi...

Page 5: ...hanging accessories 4 Grinding and deburring WARNING You must wear the ANSI approved eye protection during the operation failure to follow this this may result in serious injury or damage to the operator WARNING Hearing protection is strongly recommended A protective respirator is recommended Remove the flange nut with the disc and spanner wrench Mount the grinding wheel on the spindle Replace the...

Page 6: ...and grease the bearing with bearing grease There is moisture blowing out of the tool s exhaust There is water in the tank Drain the tank See the air compressor manual for instructions Lubricate the tool and run it until water is not evident Lubricate the tool again and run for 1 2 seconds Warranty Limited Warranty Universal Tool warrants its tools to be free from defects in material and workmanshi...

Page 7: ... FL 33458 Universal Air Tools Company Ltd Unit 8 Lane End Industrial Park High Wycombe HP14 3BY UK Service Parts Exploded View Drawing 1 2 3 4 5 9 10 15 17 18 19 21 22 23 24 25 18 18 26 27 28 29 30 31 41 32 11 18 34 35 36 37 43 12 13 14 8 7 6 20 46 45 42 47 48 38 39 40 40A 44 49 50 33A ...

Page 8: ...1 5 UK 1 09 9ST30409A HOUSING 1 9ST3041136 3 SHAFT 3 8 24 US 1 10 912012 1 PIN 1 37 9ST70407 KEY 1 11 9ST120A13 LEVER 1 38 9ST80537 3 FACE PLATE 1 12 9OB 04 O RING 1 39 9ST70403A SCREW 4 13 9OB 101 05 1 VALVE STEM 1 40 970401 1 DISC NUT M10 1 5 1 14 9OB 30 SNAP RING 1 40A 970401 3 DISC NUT 3 8 24 1 15 9ST30415 1 CLAMP NUT 1 9ST85456 DISC NUT M10 1 5 1 17 980441 SHROUD 1 9ST85456 1 DISC NUT 3 8 24 ...

Page 9: ...94 883300 Universal Air Tools Company Ltd Unit 8 Lane End Industrial Park High Wycombe HP14 3BY UK sales universal co uk www universal co uk Call Customer Service 8 a m 5 p m EST Monday Friday 1 800 356 3392 Universal Tool a Division of Florida Pneumatic Mfg Corp 851 Jupiter Park Lane Jupiter FL 33458 www Florida Pneumatic com US UK ...

Reviews: