background image

Overview of Erasing

You can erase an individual button with a learned 
command, a macro or a favorite channel. You can 
erase an entire Device’s learned command or macro 
buttons. You can also erase ALL your learned com-
mands on all devices or all your macros or favorite 
channels everywhere. 

If you really want a fresh start, it is possible to reset 
everything to the factory default condition.

Erasing Learned Buttons, Macros or Favs

Enter SETUP mode by pressing and holding both 
MAIN and ENT for three seconds. 

Note:

You have 30 seconds for each step, otherwise the 

Automator will time out automatically. 

Press a PAGE button to display page two of Setup.

Press the ERASE button.

Press either the LEARN, MACRO or FAV button.
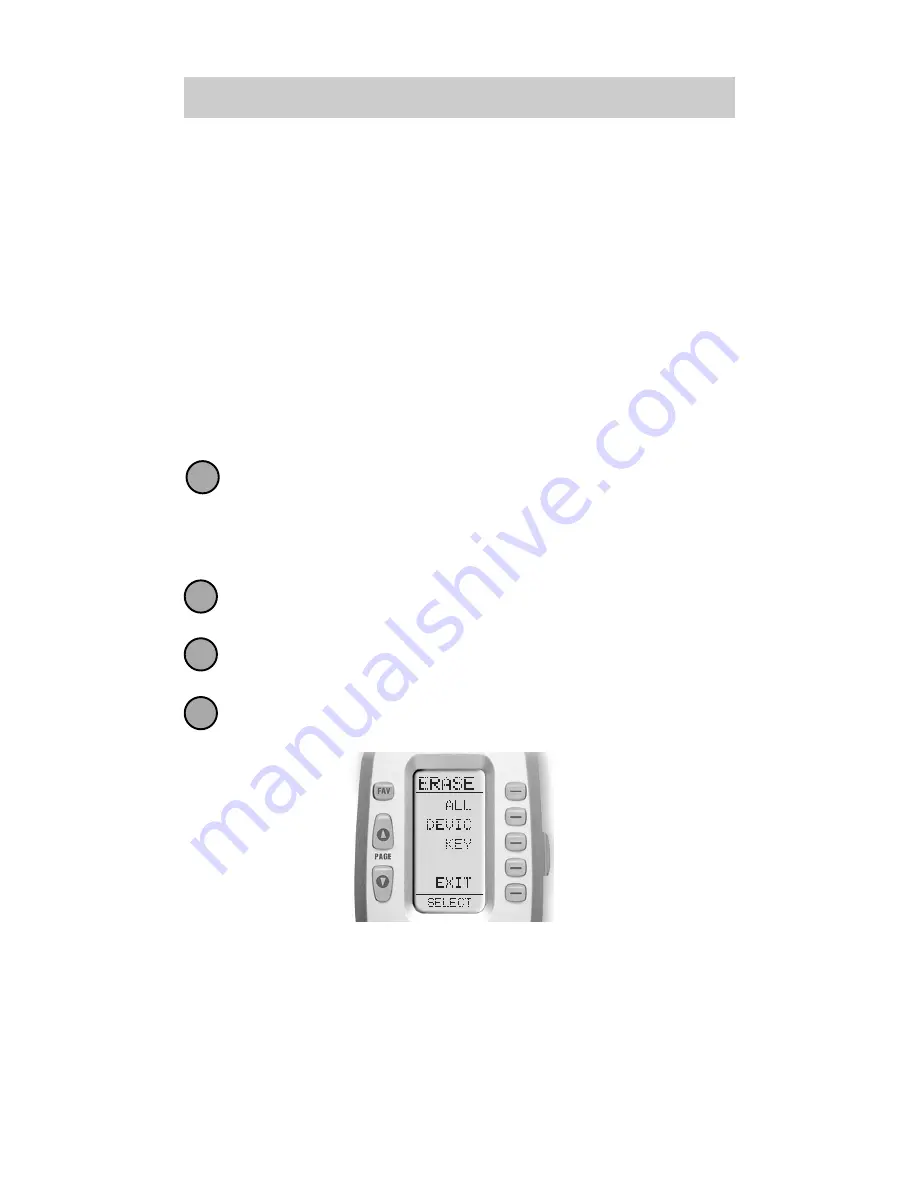
The following screen appears:

26

T h e   A u t o m a t o r

ALL —

DEVICE—

KEY— 

Erases all of the specified (Learned, Macro or

FAV) buttons everywhere in the Automator. 

Erases all Learned or Macro buttons in a Device

(this option doesn’t appear for FAVS)

Erases one button only.

1

2

3

4

Summary of Contents for Automator URC-200

Page 1: ...Owner s Manual ...

Page 2: ...nformation in this manual is copyright protected No part of this manual may be copied or reproduced in any form without prior written consent from Universal Remote Control Inc UNIVERSAL REMOTE CONTROL INC SHALL NOT BE LIABLE FOR OPERATIONAL TECHNICAL OR EDITORIAL ERRORS OMISSIONS MADE IN THIS MANUAL The information in this manual may be subject to change without prior notice Automator is a registe...

Page 3: ...tion 15 Advanced Setup 17 Editing Button Labels 17 Macro Button Setup 20 Favorite Channel Setup 22 Hiding and Adding Pages 24 Erasing Settings 26 Cloning One Automator to Another 28 Recalling Pre Programmed Settings 29 The Optional Expander 30 Pre Programmed Code Notes 32 Pre Programmed Code Tables 33 Frequently Asked Questions 48 Specifications Warranty 49 ...

Page 4: ...a few minutes Basic Setup is described on pages 5 to 14 The Automator s exciting advanced features automate and customize operation in many ways You could use Macro Setup to power on all of your components and start the show with the press of one button With the Automator s unique Favorite Channel capability you can tune in a channel with the press of one button instead of entering the entire chan...

Page 5: ...2 0 0 Button Layout MAIN Button takes you to the MAIN Menu LIGHT Button PAGE Numbers FUNCTION Buttons TITLE FAVORITE CHANNEL Button PAGE Buttons change the page of Display Buttons Screen Labeled Display Buttons ...

Page 6: ...of display buttons already labeled for TV operation To operate another of your components e g VCR DVD etc press the MAIN button to return to the MAIN menu The MAIN menu displays five of your Devices on the screen Simply press one of the screen labeled Device buttons to operate another device If you don t see the device name you want then use the PAGE buttons to display the remaining five devices o...

Page 7: ...ing power off commands Refer to the pre programmed code tables on pages 33 47 and write down the code numbers listed for your A V component The code numbers are listed by categories of devices then by brand See page 33 for a category list Press and hold both the MAIN and ENT Enter buttons for approximately three seconds The top of the display will show SETUP You are in SETUP mode now Note You have...

Page 8: ... like to setup Use the cursor UP or DOWN buttons to change the flashing name When it is correct press the SELECT button For Example I wanted to setup the TV Device button first so I pressed the cursor UP or DOWN until TV was flashing in the display The bottom of the display will flash FROM TABLE 4 5 P PRO Button Press a Page button to display the other five Device names UP SELECT DOWN First Five D...

Page 9: ... Players See page 33 for a list of component types each Code Table contains Point the Automator at the component then enter the first three digit code number from your notes using the numbered buttons After you enter each three digit number look at the component to see if it turned off Continue to enter code numbers until the component powers off For Example I have a Sony TV I found the code numbe...

Page 10: ...ds in the table by alternately pressing the UP or DOWN and POWER OFF buttons When the component turns off save the code number you entered by pressing the SAVE button that appears on the screen Exit SETUP mode by pressing the MAIN button two times 8 9 SAVE Button Code Number You Entered MAIN Button Scan Up to the next Code Number Scan Down to the previous Code Number ...

Page 11: ...39 However the number buttons didn t work when I tested them So I repeated steps one to ten using other code numbers and eventually discovered that when code number 185 is set all the buttons work perfectly Repeat steps one through nine for each of your devices In most systems you can finish basic setup in just a few minutes and put all your old remote controls away If you are still missing comman...

Page 12: ...o inches apart Press and hold the MAIN and ENT Enter buttons at the same time for approximately three seconds The top of the display will show SETUP You are in SETUP mode now Note You have 30 seconds to perform a step while you are in SETUP mode If you don t press a button within that time the Automator will time out and return to normal operation Press the LEARN button The top of the screen will ...

Page 13: ...evice button Press any button you want to teach a command to Note If you don t see the display button you would like to teach use the PAGE buttons The only buttons you can t teach are the PAGE and MAIN buttons Once you press a button the top of the display will change from LEARN to READY 4 5 6 Press any of the Device Buttons Press any Button ...

Page 14: ...he display try to teach the same button in Automator once again by repeating steps 6 8 Continue to teach any commands from any of your remote controls by repeating steps 5 9 to go back to step five press MAIN once Once you completed teaching all the buttons return to normal operation by pressing the MAIN button twice Test all your new commands If any of them don t work try learning again using the...

Page 15: ... Through to set the Automator s volume buttons to always control the sound in your system That way when the Automator is set to VCR or DVD the volume up down and mute buttons will work perfectly without switching back to AUDIO or TV Here s how Enter Setup mode by pressing and holding both MAIN and ENT for three seconds The top of the display shows that you are in SETUP mode now Note You have 30 se...

Page 16: ...play will flash SAVED Repeat steps 3 5 until all your devices operate the volume perfectly Press the MAIN button twice to return to normal operating mode and test your Punch Through settings Note The Punch Through feature is not limited to volume and can also be applied to channel or other functions If you find yourself switching to a particular device frequently to use a group of controls conside...

Page 17: ...this extends battery life press the ON button that appears on the screen The ON will change to OFF Press the SAVE button Exit the setup mode by pressing the MAIN button The FAV Button When you press the FAV button the display changes to a list of your favorite TV channels Each button can be set to instantly select the channel on your TV There are eight pages of five favorite channel buttons for a ...

Page 18: ...ter press both the MAIN and cursor DOWN buttons at the same time Transmitting Busy Signal Icon When a command is being transmitted an icon will appear in the top right corner of the display It is a useful aid when setting up Macros and FAVs since it flashes with every step of a sequence of commands Contrast set low Cursor Up Down Buttons MAIN Button Contrast set high ...

Page 19: ...buttons including Favorite Channels by following these steps Press and hold both the MAIN and ENT Enter buttons for approximately three seconds The top of the display will show SETUP You are in SETUP mode now Note You have 30 seconds to perform a step while you are in SETUP mode If you don t press a button within that time the Automator will time out and return to normal operation Press the EDIT b...

Page 20: ...a DEVICE button press the Page Up button twice The top of the display changes to MAIN and you can navigate to MAIN page 1 or page 2 before going on to Step 5 Press the button you wish to edit The first character of your button label blinks 5 4 Blinking Character EDIT flashes at the bottom of the screen DOWN Cursor button deletes the currently blinking character UP Cursor button deletes ALL text LE...

Page 21: ...e finished editing the button press the button you edited and SAVED will flash at the bottom of the display To change any other button labels on the same device press the next button then repeat steps 6 8 If you wish to edit a button on another device press the MAIN button once then repeat Steps 4 8 Once you ve finished editing buttons press the MAIN button four times to return to normal operation...

Page 22: ...s the MACRO button The top of the display will show MACRO The bottom of the display will flash SELECT Navigate to the Device and Page where there is a button you would like to set as a Macro button using the MAIN DEVICE and PAGE buttons Advanced Options If you wish to set one of the DEVICE buttons as a macro on step 3 press the Page Up button twice The top of the display changes to MAIN and you ca...

Page 23: ...another Macro step is counted and displayed at the bottom of the screen Don t worry about the number of steps Each macro button can store up to 190 steps so you are not likely to run out of steps Note You can program delays in between commands by pressing the PAUSE button Each press adds half a second to the delay Press the LIGHT button to end your macro A new screen displays three choices Press t...

Page 24: ...or each step otherwise the Automator will time out automatically Press the FAV display button The top of the display will show FAV The bot tom of the display will flash SELECT Use the Page buttons until you can see the name i e ABC CBS NBC of the favorite channel you wish to setup Press the favorite channel button you wish to setup The top of the screen changes to show the channel name The bottom ...

Page 25: ...ses the delay by a half second Note Some brands of television require an ENT Enter command after the channel numbers Press the LIGHT button after you enter the channel number A new screen appears To save the channel you entered press the SAVE button The UNDO button lets you erase the last entry The EXIT button erases all entries for this button When you are finished setting up Favorite Channel but...

Page 26: ...ide pages on devices OR on your favorite channel pages using this simple process Note Be sure to program your Macros before you hide pages with potential macro in them You can t access hidden pages during macro setup However after you finish Macro setup you can hide pages without affecting operation of your macros Enter SETUP mode by pressing and holding both MAIN and ENT for three seconds Note Yo...

Page 27: ...ed When you would like to change a page s visibility press the LIGHT button You can continue to ADD or HIDE pages on other devices by repeating Steps 4 and 5 When you are finished adding and hiding pages press the MAIN button four times to return to normal operation 4 5 6 7 DEVICE Buttons MAIN Button PAGE Buttons FAV Button This page is hidden To ADD it press the LIGHT button This page is visible ...

Page 28: ...asing Learned Buttons Macros or Favs Enter SETUP mode by pressing and holding both MAIN and ENT for three seconds Note You have 30 seconds for each step otherwise the Automator will time out automatically Press a PAGE button to display page two of Setup Press the ERASE button Press either the LEARN MACRO or FAV button The following screen appears 26 T h e A u t o m a t o r ALL DEVICE KEY Erases al...

Page 29: ...ve to navigate to the Device and Page you want using the MAIN DEVICE and PAGE buttons Press a button to erase it The bottom of the display will flash ERASE twice then ERASED To return to normal operating mode press the MAIN button four times Erasing the Entire Automator To erase EVERYTHING press and hold both the MAIN and the STOP buttons for 10 seconds After 10 seconds the RESET screen appears Pr...

Page 30: ...a PAGE button to display page two of Setup Press the CLONE button Align the two Automators head to head about an inch apart Press the RECV display button on the new Automator you would like to setup by cloning Press the SEND display button on the Automator you previously setup Press the START button on the new Automator and then press the START button on the Automator you previously setup Note Clo...

Page 31: ...utton Press the RECAL button The display changes to the recall screens The screen automatically switches between four screens alternately flashing page one devices and code numbers then those for page two Note Pay attention to the page numbers on the bottom of the screen Page 1 code numbers are the ones setup for the Page1 Devices Page 2 code numbers are the ones setup for the Page 2 Devices Write...

Page 32: ...e Since the Expander picks up the Automator s radio signals from any direction regardless of distance the Automator doesn t have to be pointed Nothing has to be done to the Automator for this feature to work Every time you press a button on the Automator it sends both a standard infrared command AND a radio signal If you install the Expander kit the MRF 100 will receive the Automator s radio signa...

Page 33: ...ds radio signal to the Expander which is a radio receiver Self adhesive flashers included in the Expander kit affix to the front panels of your components The flashers relay infrared com mands to components out of sight of the MRF 100 front blaster The flashers plug into the MRF 100 rear flasher line output jacks Each flasher has a 10 cable to easily reach components on nearby shelves ...

Page 34: ...32 T h e A u t o m a t o r Pre Programmed Code Notes Record the code numbers for your system here TV CABLE DVD VCR AUDIO SAT CD VCR2 DVR AUX ...

Page 35: ...r you to try Just circle the correct row and refer to it while you setup step by step instructions for using Pre Programmed codes are found on page 5 TVs Plasmas Projectors and Monitors Cable TV Descramblers Tuners DVD Players and Laser Disc Players VCRs and TV VCR Combo Amps Preamps and A V Receivers Satellite Receivers CD Players and Changers Digital Video Recorders TiVo Replay Tape Decks Lighti...

Page 36: ...43 DREAMVISION 235 DWIN 177257 DYNASTY 043 DYNATECH 062 EIKI 187 ELECTROHOME 143024076196 EMERSON 028048043155005197004047050051076096143151153154 FISHER 007057 FUJITSU 198246 FUNAI 028043 FUTURETECH 043 GE 160144165073197008009034056074130155161004091157 GOLDSTAR 113116102004106112119127143 HALLMARK 004 HITACHI 011163166004009010012023075143158072 INFINITY 164 INFOCUS 230 JBL 164 JCPENNEY 0040241...

Page 37: ...LAND 004143 PROSCAN 144160161165167 PROTON 004131058143171173193 QUASAR 034056092 RADIOSHACK 019004143043127 RCA 160165065156144161197004024056152023074 REALISTIC 007019043047 ROCTEC 186 RUNCO 168169178179180181182183073157 SAMPO 197058004202 SAMSUNG 050089101105004127143160228229 SANYO 166007020053057082187 SCOTT 028043004048143 SEARS 015030004007028057143094160082165166 SELECO 189200205227 SHARP...

Page 38: ...9 ANTRONIX 014 ARCHER 005007014 BELLSOUTH 099 CENTURION 092 CENTURY 007 CITIZEN 007 COMBANO 080081 COMSAT 074 COMTRONICS 030 COXDIGITALCABLE 074 DIGICABLE 101 EAGLE 020030040 EASTERN 057066 ECHOSTAR 106 ELECTRICORD 032 GEMINI 008054 GENERALELECTRIC 072 GENERALINSTRUMENT 103074104 GNC 099 GOLDENCHANNEL 030 HAMLIN 049050055 HITACHI 103055 JERROLD 103002003004008009010069074 MAGNAVOX 0100120640790950...

Page 39: ...042043045046 SIGNAL 030 SIGNATURE 103 SLMARX 030 SONY 096108 SPRUCER 047078 STARCOM 002004008009 STARGATE 008030097104 TADIRAN 030 TIMELESS 030 TIMEWARNER 043 TOCOM 039040056 TOSHIBA 052 UNIKA 007014 UNITEDCABLE 004053 UNIVERSAL 005007014032035 VIEWSTAR 012015018086087088089 ZENITH 052060093100 AIWA 146 ALPINE 098 APEXDIGITAL 087111115 DENON 007080 FUNAI 143 GE 026027 GOVIDEO 137 HARMANKARDON 0841...

Page 40: ...7 RCA 026027 SAMSUNG 056070119 SANSUI 154 SANYO 147 SHARP 094 SONY 033118145 SYLVANIA 143 SYMPHONIC 143 TATUNG 102 THOMPSON 026027 TOSHIBA 035034130141 VENTURER 149 YAMAHA 042089 ZENITH 057074091 DENON 206207 FUNAI 120 KENWOOD 152013 MAGNAVOX 032121 MARANTZ 211 MITSUBISHI 121 NAD 121 OPTIMUS 049013 PANASONIC 113 PHILIPS 032 PIONEER 106117121 RADIOSHACK 120 RCA 002 REALISTIC 049 RUNCO 127 SANYO 075...

Page 41: ...RMANKARDON 012045 HITACHI 004026150018034043063137160013 INSTANTREPLAY 031 JCL 031 JCPENNEY 012013015040066101 JENSEN 043 JVC 048043130150055060012031050152166 KENWOOD 014048034047 LG 101106114013020012123 LLOYD 034 LXI 034003009017106 MAGIN 040 MAGNAVOX 067031034068041156164 MARANTZ 067069012031156 MARTA 101 MATSUI 027030 MEI 031 MEMOREX 101003010014031034053072102134139 MGA 045046059 MINOLTA 013...

Page 42: ...49054031159165 SHINTOM 024 SIGNATURE 034 SONY 056057058077052003078076031149154 SOUNDESIGN 034 STS 013 SYLVANIA 031034059067 SYMPHONIC 034 TANDY 010034 TATUNG 039043 TEAC 034039043 TECHNICS 031070 TEKNIKA 031019034101 THOMAS 034 TMK 006 TOSHIBA 112131079008059047082013042081 TOTEVISION 040101 UNITECH 040 VECTORRESEARCH 012 VICTOR 048 VIDEOCONCEPTS 012034046141 VIDEOSONIC 040 WARDS 0030130170240310...

Page 43: ...1349350 EIGER 149 ELAN 057290 ENLIGHTENEDAUDIO 099098 ESCIENT 368 FANFARE 352 FISHER 047214180182297 FLEXTRONICS 378 FOSGATE 062231 FOSGATEAUDIONICS 342 GE 056260 GOLDSTAR 008 HAFLER 174 HARMANKARDON 231233254153154118121227277317318365 HITACHI 020 IMERGE 371 INKEL 197 INTEGRA 354 JBL 263 JCPENNEY 076216 JEFFROWLAND 206 JENSEN 058 JVC 240163191114266279291 KENWOOD 026066145146181190197192182199151...

Page 44: ...033039044045050069159168116035078198 POLKAUDIO 029 PROCEED 144268 RCA 010048117156067288 REALISTIC 019056073075095 REQUEST 351 REVOX 162 ROTEL 074083085 SAMSUNG 016 SANSUI 040048110119065228 SANYO 047059 SCOTT 019091 SEARS 076 SHARP 026094131175181 SHERWOOD 024038055102103105106051030 SONY 018093223247248160166015101184218271353369372 SOUNDESIGN 036 SOUNDMATTERS 375 SOUNDSTREAM 084088 SSI 068 SUMO...

Page 45: ...PHILIPS 152153156068154136108117 PROSCAN 151106150 RADIOSHACK 148 RCA 151106150 SAMSUNG 123155163 SKY 164 SONY 103 STARCHOICE 148 TOSHIBA 127068154157158 UNIDEN 136 ZENITH 159 ADCOM 062042 AIWA 059065088089105122170187 AKAI 085195202 AMC 231232 AMEND 118 ARCAM 238 AUDIOACCESS 119147 AUDIOEASE 165 AUDIOTECHNICA 046 BSR 037057 CALIFORNIAAUDIO 103008 CAPETRONIC 063 CARRERA 057080 CARVER 1850410440500...

Page 46: ...4107 MITSUBISHI 179 MITSUMI 153 MODULAIRE 182 MONDIAL 147 MYRYAD 244155 NAD 006005067178 NAKAMICHI 217218219095 NEC 014062 NIKKO 046 NSM 044107 ONKYO 030038039168169 OPTIMUS 010050057058081082083085093195 PANASONIC 103201172008068248 PARASOUND 233240 PHILIPS 041044107246253 PIONEER 010020025056174175176 PROCEED 239 PROTON 044107228 QUASAR 103008 RADIOSHACK 182 RCA 017042150 REALISTIC 0420500511021...

Page 47: ...VECTORRESEARCH 080 VICTOR 004022114124 WARDS 185033 YAMAHA 024046054186183245 YORX 182 ECHOSTAR DISH 122 HUGHES 108117 JVC 122 PHILIPS 108090117 RCA 109 REPLAYNETWORKS 075 SONY 104105 TIVO 090117 AIWA 015071100114 CARVER 006008027024036 DENON 105227229 FISHER 064 GOLDSTAR 011 HARMANKARDON 233 JVC 106116239240 KENWOOD 005013023026064145146181190 LINN 124 LUXMAN 035137139 MAGNAVOX 027 MARANTZ 014027...

Page 48: ... 152 AIWA 164 ARCHER 155 AURORAMULTIMEDIA 220 AUTON 191 CELADON 221 CRESTRON 213214215216217218 DMX 156 DRAPERSCREEN 204 DREAMVISION 097 DWIN 080253 EVERQUEST 206 EXTRON 151 FAROUDJA 184 FUJI 209 HUNTERDOUGLAS 219 JERROLD 153 JVC 185 KENWOOD 185 LITE TOUCH 208257 LUTRON 158159077 MAKITA 186201 MINDPATH 205 NILES 160187 NSM 161 PIANODISCPLUS 085 POLKAUDIO 162 RUSSOUND 081 SCIENTIFICATLANTA 163156 S...

Page 49: ...47 BRAND CODE NUMBERS AUX continued Custom Installation Products TURBOSCAN 167 VELODYNE 203 X 10 183093 XANTECH 168169170171172188189 ...

Page 50: ...f those buttons one at a time the Automator enables you to setup one button that does it all automatically with one press For more information on how and why you should setup macro buttons watch the Quick Setup DVD tutorial or read pages 20 21 If the batteries run out will I lose my settings No The Automator stores all of your settings in non volatile FLASH memory You could remove the batteries fo...

Page 51: ...ucts that have been modified or incorporated into other products Products purchased more than 12 months ago Units purchased from unauthorized dealers or companies Specifications Learning Capability 720 IR commands at standard frequencies 15kHz to 100kHz Macro Capability 472 Macros of up to 190 steps each IR Range Line of Sight via Infrared 30 50 feet depending on the environment RF Range radio fre...

Page 52: ...M E M O ...

Page 53: ...M E M O ...

Page 54: ...M E M O ...

Page 55: ......

Page 56: ...OCE 0024A Rev 03 ...

Reviews: