background image

 
Hashi User Manual 

 12


1.


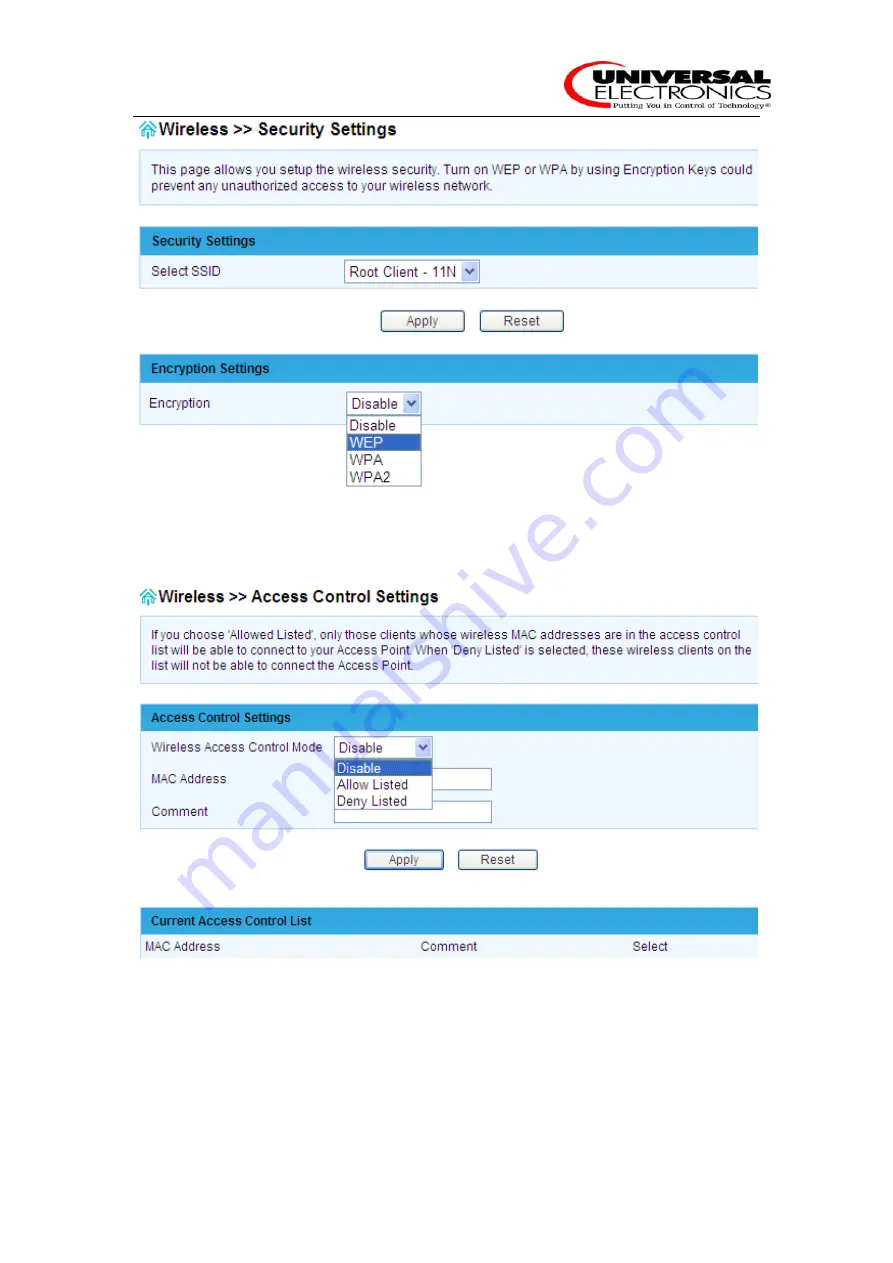
Select SSID: Select the SSID which you want to set as Encryption mode. 

2.


Encryption: Set the encryption mode at the SSID which you select. 


¾


Access Control 


1.


Wireless Access Control Mode: 

You can choose one of the strategies. 

2.


MAC Address: 

Type the MAC Address. For example: 00e1a2b3c456 


¾


WDS 

    WDS is commonly used in areas requiring multiple APs, where wiring is not possible or costly 

and for providing back-up paths between APs. You must set Hashi and AP in the same channel, 

Summary of Contents for Hashi

Page 1: ...Hashi User Manual FCC ID MG3 7010 Ver1 0 ...

Page 2: ...mmary 2 2 Key feature 2 3 Using the Configuration Menu 3 3 1 Preparation 3 3 2 Setup Wizard 6 3 3 Wireless 9 3 4 LAN 15 3 5 QOS 16 3 6 Security 16 3 7 Service 19 3 8 Management 22 3 9 Status 25 4 Wireless Basics 27 5 Wireless Modes 28 ...

Page 3: ...e reset button and the Wi Fi protected setup WPS function The Hashi supports the Bridge pattern the prolong network coverage range In general the best location to place the Hashi is at the center of your wireless coverage area within all wireless stations Ensure all stations are within the service range of the Hashi 2 Key feature Comply with IEEE802 11n Draft 2 0 and IEEE 802 11b g n Supports Infr...

Page 4: ...rnet cable to connect one of the Lan ports of Hashi to the Ethernet Port of your Setup box G Connect your tablet Smartphone to the same Home WIFI wireless broadband router as Hashi H Install Nevosmart on your tablet Smartphone 3 1 Preparation First of all please connect the cables and power adapters as below before configuring Hashi software interface Step 1 Use the attached power adapter to conne...

Page 5: ...anual 4 Step 5 Choose Internet Protocol TCP IP and click Properties Step 6 Please choose Obtain an IP address automatically to specify IP addresses automatically Please click the OK button after your configuration ...

Page 6: ... 1 55 in the Address band The Hashi s default IP Address is shown below Step 8 Please enter the User name and Password The factory default User name and Password are admin Step 9 Click on a menu item you can configure it The menu contains the following sub menu Wizard Wireless LAN QOS Security Service Management Status ...

Page 7: ...Wizard The wizard setting will guide you to configure the Hashi Please follow the wizard setting step by step Step 1 Please begin by clicking on Next Step 2 Please click Scan and select the wireless router which you want to connect ...

Page 8: ...Hashi User Manual 7 Step 3 Please enter the password of your wireless router and click Next Step 4 Please select Client as your DHCP mode and click Finished ...

Page 9: ...t wireless WIFI broadband network via Hashi now Step 6 Please open IE again to test this input www yahoo com and you can see yahoo website is opened Now Hashi is correctly configured and you can unplug the Ethernet cable between Hashi and your PC You can also power off Hashi now All the configuration you have done just now has already be stored inside Hashi ...

Page 10: ...is configured in mix mode of 802 11g and 802 11n 2 4 GHz B G N Select it if your wireless router is configured in mix mode of 802 11b 802 11g and 802 11n 2 Mode AP you can use Hashi as access point in this mode Client you can configure Hashi connect to the wireless router it is default mode WDS you can configure Hashi connect to the wireless router in WDS mode the wireless router should configure ...

Page 11: ...ou can change the channel number from 1 to 9 7 Channel Number The channel can be changed to fit the channel setting for an existing wireless network or to customize the wireless network 8 Broadcast SSID Enabled Choose Enabled to broadcast the SSID across the network Disabled Choose Disabled if you do not wish to broadcast the SSID over the network 9 WMM The default setting of Wi Fi MultiMedia is e...

Page 12: ...reate higher data loss 5 IAPP The default setting of Inter Access Point Protocol is enabled 6 Protection The default setting of BG protection is disabled 7 Aggregation If it is enabled the packets will be aggregated before they are forwarded The default setting of Aggregation is enabled 8 Short GI Enabled it can reduce the guard interval time therefore increasing the data capacity However it s les...

Page 13: ...hich you select Access Control 1 Wireless Access Control Mode You can choose one of the strategies 2 MAC Address Type the MAC Address For example 00e1a2b3c456 WDS WDS is commonly used in areas requiring multiple APs where wiring is not possible or costly and for providing back up paths between APs You must set Hashi and AP in the same channel ...

Page 14: ...ddress of other AP which you want to communicate with in the table 1 MAC Address Specify the MAC address of the destination access point 2 Data Rate The default setting is Auto WPS The WPS settings are valid when Hashi works in AP mode ...

Page 15: ...art PBC button on the configuration menu or press WPS button on Hashi After started PBC mode press PCB button on Wireless Network card 2 Client PIN You can type the PIN Number of Wireless Network card at Client PIN Number blank and click Start PIN button After started PIN mode configure PIN mode on Wireless Network card Site Survey ...

Page 16: ...ows the equipment information of AP which Hashi can connected to it displays BSSID Channel etc you can select the wireless router which you want to connect 3 4 LAN 1 IP Address The IP address of LAN 2 Subnet Mask The subnet mask of LAN ...

Page 17: ...a time when the recovery of connectivity after an outage within a minute or so is considered adequate performance 8 Clone MAC Address Some service providers require you to register a MAC address in order to access the Internet The Clone MAC Address screen lets you use the MAC address of a device that has already been registered with your service provider by copying that MAC address to the device 3...

Page 18: ...olicy to apply to If it is only a single port that you want the policy applied to then enter the same port number in the Port Range blank 3 Protocol Select the protocol type to allow or deny certain ports MAC Filtering 1 Enable MAC Filtering Select it to apply the MAC filtering policy 2 MAC Address Enter the MAC address which you want to set For example 00e2a3b34c156 ...

Page 19: ...elect it to apply the IP filtering policy 2 IP Address Enter the IP address which you want to set 3 Protocol Select the protocol type to allow or deny certain types of IP address URL Filtering 1 Enable URL Filtering Select it to apply the URL filtering policy ...

Page 20: ...nial of service prevention 3 7 Service DMZ The DMZ Demilitarized Zone screen allows you to expose one network user to the Internet for use of a special purpose service such as Internet gaming or video conferencing DMZ hosting forwards all the ports at the same time to one computer You should assign IP address to the destination computer before you use this feature ...

Page 21: ...ty risks The option is only recommended as a last resort 2 DMZ IP Address Specify the IP address of the computer on the LAN that you want to have unrestricted Internet communication Virtual Server The Hashi can be configured as a virtual server when it work in Gateway mode so that remote users accessing Web or FTP services via the public IP address can be automatically redirected to local servers ...

Page 22: ...eful when you are hosting your own website FTP server or other server behind the device 1 Enable DDNS Select it to enable DDNS When an IP address is automatically assigned by a DHCP server DDNS automatically updates the DNS server 2 Service Provider Choose your DDNS provider from the drop down menu 3 Domain Name Enter the Host name that you registered with your DDNS service provider 4 User Name En...

Page 23: ...down menu 3 Enable NTP client update Select it to enable updating NTP client 4 NTP Server NTP is short for Network Time Protocol NTP synchronizes computer clock times in a network of computers You can select it or enter a NTP server manually This will only connect to a server on the Internet 3 8 Management Operation Mode ...

Page 24: ...local hard drive only clicking Save button The saved file or any other saved setting file created by the Hashi can be uploaded into the unit 2 Upload Configuration The saved file or any other saved setting file created by the Hashi can be uploaded into the unit To reload a system settings file click on browse to search the local hard drive for the file to be used then click Upload button when fini...

Page 25: ...ed for the update Upgrading the firmware or bootloader will not change any of your system settings but it is recommended that you save your system settings before doing a firmware upgrade Password The Password screen allows you to change the factory default user name and password of Hashi It is strongly recommended that you change the factory default username and password of the Hashi All users wh...

Page 26: ... events are retained The System log allows you to view the Hashi logs You can also click Clear button to the current log 3 9 Status Status This Status page displays the Hashi s current status and configuration All information is read only 1 System Status It displays the current system information for the Uptime Firmware Version Kernel version Configuration file version Build Time 2 Wireless Status...

Page 27: ...anual 26 Statistics It displays the current Wireless LAN interface and LAN port packet message for the Wireless LAN Sent Packets Wireless LAN Received Packets Ethernet LAN Sent Packets Ethernet LAN received Packets ...

Page 28: ...sers Wireless users can use the same applications they use on a wired network Wireless adapters and desktop systems support the same protocols as Ethernet adapter cards Under many circumstances it may be desirable for mobile network devices to link to a conventional Ethernet LAN in order to use setup box TV DVD servers printers or an Internet connection supplied through the wired LAN A Hashi is a ...

Page 29: ... Remote control the Infrared Ray devices TV setup box DVD through your tablet Smartphone z Gets rid of the cables around the house z Simple and easy to use Small Office and Home Office z Stay on top of everything at home as you would at office z Remote control the Infrared Ray devices z Share Internet connection and printer with multiple computers z No need to dedicate office space 5 Wireless Mode...

Page 30: ...ce will not occur in a particular installation If this equipment does cause harmful interference to radio or television reception which can be determined by turning the equipment off and on the user is encouraged to try to correct the interference by one or more of the following measures Reorient or relocate the receiving antenna Increase the separation between the equipment and receiver Connect t...

Reviews: