background image


14.  WARNING: The appliance must be switched off before replacing the lamp to 

avoid the possibility of electric shock. 


15.  WARNING: Do not allow anyone other than qualified service personnel to carry out 

maintenance or repairs as this will void the warranty. 


16.  WARNING: Fire Risk if cleaning instructions are not followed as stipulated in the 

manual. 


17.  WARNING: To avoid the risk of electrical hazards, install the screws or fixing device 

as per the instructions set out in this manual. 


18.  To avoid damaging the connecting wires, only use the screws supplied with the unit 

and the pre-drilled holes to install. 


19.  The installation height of the hood must NOT be less than 65cm. 


20.  WARNING: Fire Hazard! Clean the filter screen regularly 


21.  Damaged supply cords must be replaced by the manufacturer, approved service 

agents or a qualified electrician. 


Summary of Contents for U600SC

Page 1: ...600mm 900mm Chimney Cooker Hood Instruction Manual U600SC U900SC ...

Page 2: ...n and maintenance of your appliance Please take the time to read this User Manual before using your appliance and keep this book for future reference ALL SPECIFICATIONS ARE SUBJECT TO CHANGE WITHOUT PRIOR NOTICE IMPORTANT Keep this Instruction Manual safe for future reference CONTENTS SAFETY WARNINGS 3 UNPACKING 5 INSTALLATION 6 OPERATION 9 CLEANING MAINTENANCE 10 WARRANTY 11 ...

Page 3: ...re hazard Constant supervision is required when frying food 10 Disconnect the electrical plug prior to cleaning maintenance or repairs 11 The cooker hood must be installed above a hob with no more than four plates or burners 12 When the range hood and other appliances supplied by energy other than electricity are in operation simultaneously the negative pressure in the room must not exceed 4 Pa 4x...

Page 4: ... stipulated in the manual 17 WARNING To avoid the risk of electrical hazards install the screws or fixing device as per the instructions set out in this manual 18 To avoid damaging the connecting wires only use the screws supplied with the unit and the pre drilled holes to install 19 The installation height of the hood must NOT be less than 65cm 20 WARNING Fire Hazard Clean the filter screen regul...

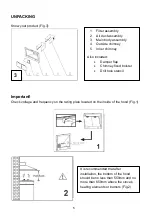
Page 5: ... 1 Filter assembly 2 Air duct assembly 3 Main body assembly 4 Outside chimney 5 Inner chimney Also included Damper flap Chimney fixed bolster Drill hole stencil It is recommended that after installation the bottom of the hood should be no less than 550mm and no more than 650mm above the stove s heating elements or burners Fig 2 5 3 ...

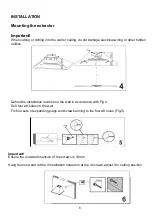
Page 6: ...ilities Define the installation location on the wall in accordance with Fig 4 Drill four ø8 holes on the wall Fix four sets of expanding plugs and screws aiming to the four ø8 holes Fig 5 Important Ensure the outside dimension of the screws is 10mm Hang the hood and let the 4 installation holes aim at the 4 screws adjust it to setting position 6 ...

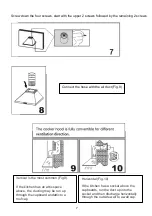
Page 7: ... 9 If the kitchen has an attic space above the ducting may be run up through the cupboard andattic to a roof cap Horizontal Fig 10 If the kitchen has a socket above the cupboards run the duct up into the socket and then discharge horizontally through the outside wall to a wall cap 7 Connect the hose with the air duct Fig 8 ...

Page 8: ...equired to install the chimney hood Fig 13 Install the chimney fixed bolster on the corresponding position on the wall Fig 14 Use the screw ST4 10 to connect the chimney fixed bolster and the upper chimney 8 Position the outer chimney on the windowsill Fig 11 attach it to the air chamber with a Phillips head screwdriver ...

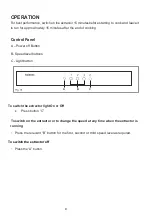
Page 9: ... of cooking Control Panel A Power off Button B Speed level buttons C Light button To switch the extractor light On or Off Press button C To switch on the extractor or to change the speed at any time when the extractor is running Press the relevant B button for the first second or third speed level as required To switch the extractor off Press the A button 9 ...

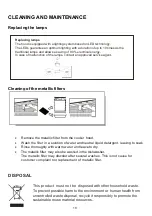
Page 10: ...ic filter from the cooker hood Wash the filter in a solution of water and neutral liquid detergent leaving to soak Rinse thoroughly with warm water and leave to dry The metallic filter may also be washed in the dishwasher The metallic filter may discolor after several washes This is not cause for customer complaint nor replacement of metallic filter DISPOSAL This product must not be disposed with ...

Page 11: ... material or in respect of defective workmanship only Univa authorized service agent shall have no liability if in its opinion the defect or fault was caused through faulty installation accidental damage incorrect usage misuse or abuse failure to follow the operating instructions fire flood civil disturbances or any Act of God The company shall not be responsible for damages caused by insect and o...

Page 12: ...ll Park Bekker Road Vorna Valley Midrand Gauteng South Africa P O Box 1482 Halfway House Gauteng 1685 Sales and Marketing Tel 27 11 315 0015 Email sales univa co za Service and Spares Tel 27 11 315 0015 Email support univa co za www univa co za ...

Reviews: