background image

39

10 On Demand

Introducing On Demand

On Demand provides access to VoD (Video on Demand) movies and 
programs. You can pause, rewind or fast forward during viewing.

To Access

Press 

Menu

 on the remote control. Use the 

Arrow Keys

 to highlight 

On 

Demand

. Press 

OK

.

Getting Around On Demand

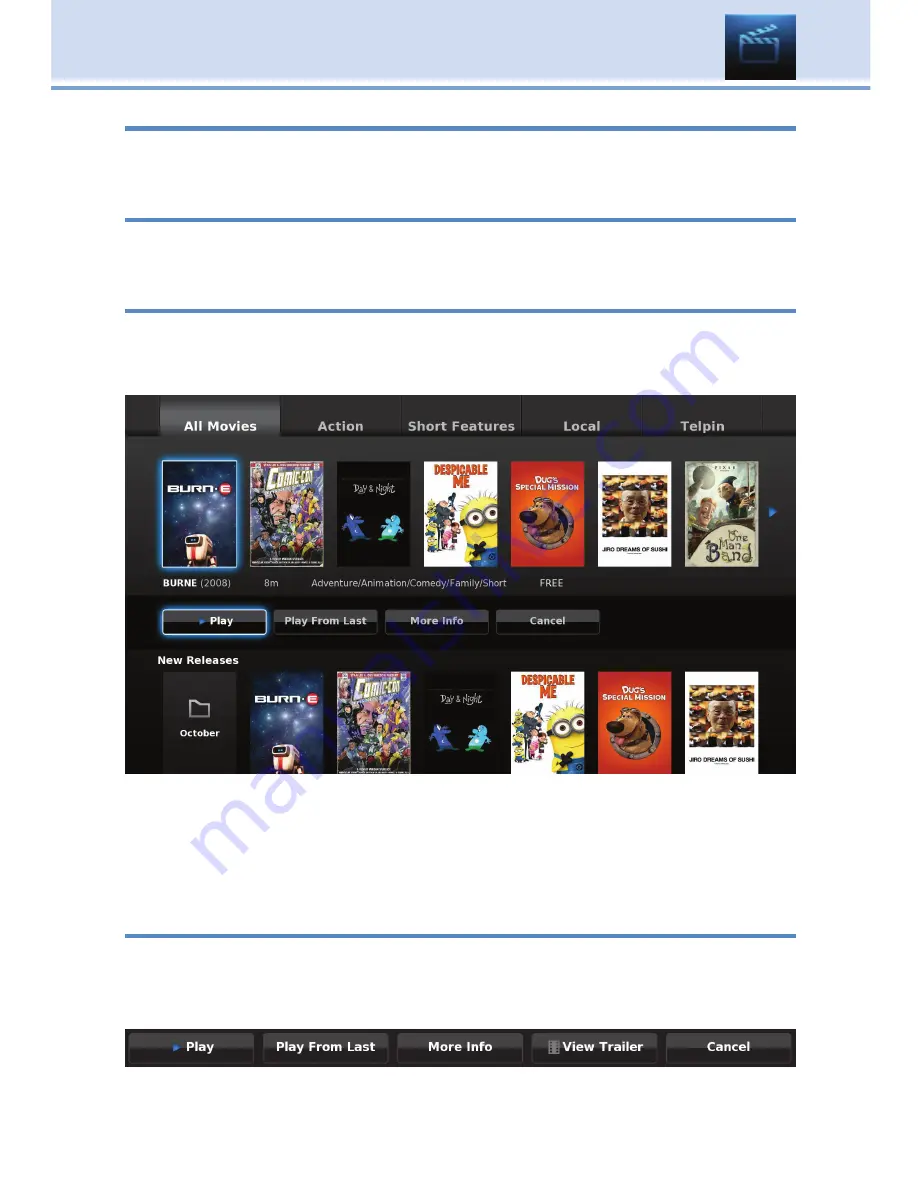
Rentals are grouped into categories for easier navigation. The main 
category selections are on the top of the screen and the listings of that 
category are displayed below.

Using your 

Arrow Keys

, select a main category by highlighting its tab at 

the top, and press 

OK

.

Use the 

Arrow Keys

 to highlight a rental listing within that category. 

Information for that listing will be displayed below its title.

Bringing Up the Play Menu

Bring up the 

Play

 menu options by pressing 

OK

 on your remote. 

Play


options may vary by rental listing.
If the program is free or already paid for, the following options can appear: 

Summary of Contents for ADB 2500

Page 1: ...THE FUTURE NOW SHOWING Digital Video User s Guide ...

Page 2: ...ATCH Digital TV User s Guide Copyright 2005 2014 MS Communications IPG screen images Copy right 2010 Minerva Networks Inc Used with permission All rights reserved Portions Copyright Advanced Digital Broadcasting ADB Amino Communications Ltd Entone Inc and Universal Electronics Inc Used with permission All rights reserved All other images copyright and or trademark of their respective owner s Dolby...

Page 3: ...g The Infobar 11 Go To The Infobar 11 Infobar Layout 12 Using the Infobar 13 4 Menubar 14 Introducing the Menubar 14 Go To the Menubar 14 Understanding the Menubar 14 5 Guide 16 Introducing Guide 16 Go To Guide 16 Getting Around Guide 16 Favorites List in Guide 16 HDTV Programming 16 Guide Layout 17 6 Guide Alerts Recording 18 Introducing Guide Recording 18 Setting a Reminder Autotune or Recording...

Page 4: ...g Recordings 31 Recorded Programs Locking or Unlocking a Recording 31 Recorded Programs Deleting a Recording 32 Recorded Programs Stopping a Program Currently Recording 32 To Record 32 To Record Sort Future Recordings 33 To Record Canceling a Future Scheduled Recording 33 Schedule Priority 33 Schedule Priority Changing Schedule Priority 33 Schedule Event 34 Schedule Event Editing a Schedule Event ...

Page 5: ...ing PPV Events 44 Go To PPV 44 Introducing Reminders 45 Go To Reminders 45 Cancel a Reminder or Autotune 45 Introducing Messages 46 Go To Messages 46 Reading a Message 46 Introducing Caller ID 47 Go To Caller ID 47 Deleting a Caller ID Entry 47 12 Settings 48 Introducing Settings 48 Go To Settings 48 Activating Parental Control 48 Selecting Parental Control Settings 48 Turning Parental Controls On...

Page 6: ...mail 64 17 Widgets Coming Soon 65 Introducing Widgets 65 Go To Widgets 65 Using Widgets 65 Stocks Widget 65 Weather Widget 66 Twitter Widget 67 Suggestions Widget 68 18 Cloud TV Coming Soon 71 Cloud TV 71 Introducing YouTube 71 Go to YouTube 71 Using YouTube 72 Settings YouTube 73 Using Settings YouTube 73 Search YouTube 74 Using Search YouTube 74 Introducing MetaChannels 75 Go To MetaChannels 75 ...

Page 7: ...ide Option 85 Managing Your Scheduled Recordings 85 Managing Your DVR Recordings 86 Manage your account settings 86 Changing Your Password 87 Renaming Your DVR Set Top Boxes 87 Signing Out 87 Stream Management Coming Soon 88 Set Top Box 89 ADB 2500 Set Top Box 89 ADB 2721 W WX Set Top Box 90 ADB 3721 WN Set Top Box 91 ADB 3800 Set Top Box 92 ADB 5721 WNX Set Top Box 93 ADB 5810 Set Top Box 94 Movi...

Page 8: ......

Page 9: ...OK Enter a choice you have made Back Tune to the previous channel Function Buttons For future use DVD Send commands to the DVD player Power Turn a selected device on or off Shift Used to program your remote control Number Pad Enter a channel number or PIN Keyboard Displays an on screen keyboard Prog Change the chan nel in Guide jumps listing one screen ahead back Action Displays Guide Info Display...

Page 10: ...ggle audio on or off Number Pad Enter a channel number or PIN WWW For future use INPUT Access Devices PHONE Display Caller ID Log POWER Turn a selected device on or off Playback Controls Control playback of DVD DVR or VOD RECORD Begin DVR recording INFO Display the Info Bar OK Enter a choice you have made EXIT Close any screen and return to TV PG Jump Guide 1 page up or down CH Change the channel ...

Page 11: ... screen DAY DAY Jumps Guide 1 day ahead or back Number Pad Enter a channel number or PIN SWAP For future use Power CBL Turn set top box on or off Playback Controls Control playback of VOD and recordings LIVE For Future Use INFO Display the Infobar OK SEL Enter a choice you have made EXIT Close any screen and return to TV CH Change the channel LAST Return to previous channel C Use when red button i...

Page 12: ... FAV For future use Number Pad Enter a channel number or PIN Keyboard Display on screen keyboard Hot Keys For future use POWER Turn a selected device on or off Playback Controls Control playback of DVD DVR or VOD REC Begin DVR recording INFO Display the Infobar EXIT Exit the Menubar PAGE Jump Guide 1 page back or forward OK Enter a choice you have made Arrow Buttons Move the highlight CH Change th...

Page 13: ...ber GUIDE will display Guide so you can find a program you like If the program is on now you tune to the channel showing it If not you can set a scheduled event to remind you when it does come on If your set top box supports recording you can schedule a recording for the program For more information on Guide see section 5 Guide For more information on setting Reminders Autotunes and Recordings see...

Page 14: ...TWICE This is the gray remote that says UEI on the backside of it ADB Potenza Remote page 2 of this guide book press and hold the RCU SETUP button until the TV button blinks TWICE This is the black remote ADB Polaris Remote page 3 of this guide book press and hold the SETUP button until the TV button blinks TWICE This is the gray remote that says United Telephone on the bottom of it ADB Titan Remo...

Page 15: ...RCU SETUP button ADB Polaris Remote page 3 in this guide book the SETUP button ADB Titan Remote page 4 in this guide book the SETUP button The TV button will blink twice signaling that the code for your TV is now programmed Step 8 Now press the POWER button on the ADB Focus Remote ADB Potenza Remote or the TV button on the ADB Polaris Remote and your TV should turn on ...

Page 16: ...ngs may display icons based on settings for a particular program Program Attributes New Episode not a re run Program in High Definition Autotune Reminder Record Series Record Series Record Episode Skipped Closed Captioned Dolby Digital Audio Favorite Alert Symbol Lock Program Live TV Whole Home DVR Record and Series Record only appear if your set top box supports recording All menubar icons and ex...

Page 17: ... and features are the same This User s Guide uses the NuBlu skin and your United Turtle Moutain Digital TV onscreen program guide displays a different skin BlueShadow You can change the BlueShadow skin to match the NuBlu in the guide BlueShadow United Turtle Mountain s onscreen default theme Guide Menu NuBlu as shown in this User s Guide Guide Menu 2 How To Use This Book ...

Page 18: ... to select the NuBlu Step 3 Scroll down to Submit and press OK A message will appear saying that your settings were successfully updated Press OK Another message will state that a resource change has been detected which requires a reboot Press OK Your television system will go through the transition Your TV screen will be black with an active daisy wheel indicating changes are occurring It will ta...

Page 19: ...o To The Infobar There are three ways to make the basic Infobar appear Press INFO on your remote control Press the Up or Down Arrow Keys on your remote control The basic Infobar will also appear any time you change channels Once the Infobar is active press INFO again to display the detailed Infobar It adds information on directors actors and the name of the next program ...

Page 20: ...that the Emergency Alert System is active Program Name Program Start Time End Time Rating Program Summary Additional Program Information Indicates the type of program movie sports etc Closed Captioning Dolby Digital audio and year of original release Current Favorites List Director Stars Coming Up The detailed Infobar will list the director and stars of a program along with the name of the next pr...

Page 21: ... rather watch on another channel press OK to tune to that channel Step 2b See What s On Later Press the Right Arrow Key to scroll ahead to upcoming programs for the channel listed on the Infobar Press OK while viewing info on a future program to bring up these options Press the Left Arrow Key to scroll back to the current channel listing To exit the Infobar completely press Exit on your remote Not...

Page 22: ...nformation on Guide please see section 5 Guide To record or edit a recording please see section 6 Guide Alerts Recording PPV jumps directly to the Pay Per View channels in the program guide For information on PPV please see section 9 Pay Per View DVR allows you to watch existing recordings access a list of scheduled recordings and edit and sort both You can also create a recording Schedule Event a...

Page 23: ...with a user name and password For information on user accounts see User Settings in section 12 Settings Favorites allows you to choose edit create or delete a favorite channel list For information on Favorites see section 14 Favorites Search allows you to search program listings or Video on Demand rentals by title or key words For information on Search see section 15 Search Web Email coming soon a...

Page 24: ...f your TV screen To view the program full screen press OK again Continuing to press the Guide key on your remote will switch the Favorite list to All Subscribed HD and any Favorites lists that you create This causes Guide to only display the channels included on each list Cycling to All will display all available programming Press EXIT to leave the Guide Favorites List in Guide A Favorites list al...

Page 25: ...uide Highlight Indicates what program listing is currently in focus Program Listings Shows channel number channel abbreviation and program listings for each channel Program listings may include icons to indicate a setting or feature for a particular program Listing Date Time Shows the date and time divided into 30 minute increments for the programs currently shown in Guide 5 Guide Guide Layout ...

Page 26: ... number time type of timer Recording Reminder or Autotune and frequency of the event See 7 Recording and 8 DVR for more details on Schedule Event Setting a Reminder Autotune or Recording Step 1 Pick a Program Pull up the Guide and find the future program you want Highlight its listing and press OK A pop up menu will appear Note The pop up may appear different depending if your STB is DVR enabled o...

Page 27: ... will appear on your screen telling you that you have a Reminder Press INFO to display the Reminder Highlight the button showing the program name and press OK to watch the program Highlight Cancel and press OK to ignore the Reminder Step 4b Your Autotune Just before the program begins a message will display giving you the option to tune in or cancel 6 Guide Alerts Recording ...

Page 28: ...when the recording begins or ends This ensures nothing is missed in case the broadcaster s time doesn t precisely match up with yours Step 1 Pick an Upcoming Recording Locate the program to be recorded Highlight its listing and press OK Step 2 Edit Recording From the options shown for this program highlight Edit Recording and press OK Step 3 Select Start End Times Arrow Up or Down to choose Start ...

Page 29: ...de of a favorite program Step 1 Pick a Program Find any episode of the series you want to record Highlight the program listing and press OK Step 2 Set the Recording Highlight Record Series and press OK Step 3 Return To Guide Once you have set the series recording you will be returned to Guide The program listing now shows an icon next to the program s name Series Recording set Every upcoming episo...

Page 30: ...ck a Series Recording Locate any program in the series to be recorded Highlight its listing and press OK Step 2 Edit Series Recording From the options shown for this program highlight Edit Series Recording and press OK Step 3 Adjust Series Recording Options Arrow Up or Down to choose an option and press OK Once you see arrows above and below the options setting box Arrow Up or Down to adjust that ...

Page 31: ...thing other than all the system will delete the oldest recorded episode of the series once the limit is reached Once you have adjusted the series settings highlight OK and press OK to save your changes Skipping an Episode Once you have created a series recording you can manually skip any episode Step 1 Pick the Episode Locate the episode in the series you want to skip Highlight its listing and pre...

Page 32: ... event you are canceling your options will be or Highlight the option you wish to cancel and press OK A Yes or No confirmation screen will appear Highlight Yes and press OK to confirm Step 3 Return to Guide After you press OK you will return to the Guide Additional Information on Canceling Events A list of your Reminders and Autotunes is located in 11 My Library Reminders and can be canceled from ...

Page 33: ...he program is currently on recording will begin immediately The program will be recorded until it is scheduled to finish To manually stop the recording before it is finished press STOP If the program comes on in the future your system will record the program for you automatically General Guidelines About Recordings Your TV can even be turned off and recording will take place You can record one pro...

Page 34: ... of the program The PLT bar appears whenever you pause rewind or fast forward live TV The center area indicates the amount of TV saved The I bar shows where you are within that range The far left box indicates the current playback function The far right box indicates the current time DVR Playback Controller Any time you press one of the Playback Control Buttons while watching a previously recorded...

Page 35: ...le Event option from the pop up menu The Schedule Event screen is populated from the channel you were watching and will change when you select a future program in the Guide Option 2 Press MENU on your remote control navigate to DVR then scroll down to Schedule Event and press OK Configuring the Schedule Event Screen The information the date program name channel time and frequency of recording is l...

Page 36: ...on the Schedule Event screen and press OK on your remote You will be returned to DVR menu Press Exit to return to the Guide See 8 DVR Schedule Event for details on editing the Schedule Event screen Record By Search Navigate to the Menubar by pressing the Menu button highlighting the Search icon and press OK See 15 Search for complete details on Search Once the Search topic is found navigate to the...

Page 37: ...o Record lists all Recording events you have scheduled and allows you to sort or cancel any future recording events VIEW FUTURE RECORDINGS Schedule Priority allows you to give priority for one series recording over another in the event of a scheduling conflict Schedule Event allows you to create a Recording Reminder or Autotune event for individual or recurring programs Record History is a log of ...

Page 38: ...ng Highlight Play Recording and press OK Step 3 Watch the Recording You will exit to your recording as it begins playing The Infobar will appear for a few seconds with a green icon to the right to indicate you are playing a recording While watching your recording you can use any of the Playback Control Buttons on your remote just as you would if watching a videotape or DVD DVR Playback Controller ...

Page 39: ... press the Left Arrow Key to shift the highlight to the left Highlight the category you want to use to sort and press OK For example if you highlight Date and press OK your recordings will be sorted by the date recorded with oldest at the top and newest at the bottom You can reverse the sort order for any category by pressing OK again on that category Using the above example pressing OK again on D...

Page 40: ...2 Delete the Recording Highlight Delete Recording and press OK Step 3 Confirm Delete Highlight Yes and press OK to confirm or No if you change your mind Step 4 Recording Deleted Once you confirm the deletion the entry for that recording is removed from the list Note Once a recording has been deleted there is no way to get it back Recorded Programs Stopping a Program Currently Recording Step 1 Pick...

Page 41: ... event the entry for that recording event is removed from the list Schedule Priority When you create series recordings for different programs that may be scheduled for the same time Schedule Priority allows you to pre determine which program you want to be recorded instead of another To go to Schedule Priority highlight Schedule Priority and press OK Schedule Priority Changing Schedule Priority Sc...

Page 42: ... the edit When all screens are completed press OK on the screen to enter your information Record History Record History is a log of all events related to your recordings such as recording started recording completed or recording canceled Scroll down the DVR listings and highlight Record History and press OK Record History Reviewing Record History Press the Up and Down Arrow Keys on the remote to s...

Page 43: ... functions for all the non DVR set top boxes See 6 Guide Alerts Recording and 7 Recording for more details about recording You cannot control Pause Live TV from a non DVR set top box Non DVR Set Top Box Recordings List To view the list of Whole Home DVR recordings go to the Menubar select the DVR icon and press OK on your remote Recorded Programs appears as the first listing under DVR Select it an...

Page 44: ...rding highlighted or Delete this Recording Click OK on the highlighted Keep this Recording You will then be returned to the DVR screen and the video will now be available in other rooms Step 2 Go to the bedroom s TV turn it on bring up the Menubar and scroll to DVR The first heading under DVR is Recorded Programs Arrow over to the recording you had been watching and push OK A screen will appear gi...

Page 45: ...long lines big crowds expensive concessions and seats in the nose bleed section Go To Pay Per View Using the Arrow Keys on your remote scroll the menubar to PPV then press OK The PPV list will appear on the Guide menu Buying Pay Per View Step 1 Pick the Program Highlight the Pay Per View program you want to buy in Guide and press OK Step 2 Buy PPV Highlight Buy PPV and press OK ...

Page 46: ...e PPV and press OK For more information on Share PPV see section 12 Settings Finally highlight the Buy button and press OK Step 4 Watch Your Pay Per View You can now watch your Pay Per View program If you purchased your Pay Per View program in advance you can schedule an Autotune or Reminder so that you don t miss it For more information on setting Reminders and Autotunes see Setting a Reminder Au...

Page 47: ...he main category selections are on the top of the screen and the listings of that category are displayed below Using your Arrow Keys select a main category by highlighting its tab at the top and press OK Use the Arrow Keys to highlight a rental listing within that category Information for that listing will be displayed below its title Bringing Up the Play Menu Bring up the Play menu options by pre...

Page 48: ...Program Add It to My Library Once you begin a program it will also be temporarily added to your Video playlist under the My Library icon see 11 My Library Go To Rented Videos for more information Rent a Program To rent a movie highlight the program and press OK on your remote This will bring up the programs play options Highlight the price button example 1 99 2 day and press OK A window will appea...

Page 49: ...Options The yellow button and green button will change functions depending on which menu screen you are on When you begin browsing On Demand programs the yellow button will say Search and the green button will say Free Only Press the yellow button on your remote to bring up the on screen keypad Using your Arrow Keys enter a topic to be searched When complete Arrow to Search and press OK The menu s...

Page 50: ...and is accessed by pressing the green button on your remote When you toggle these options the On Demand menu screen itself will change and show Free Movies and then All Movies which include paid movies Stop a Video and Exit On Demand If you wish to exit the video press STOP on your remote to return to the last On Demand menu screen viewed To exit the On Demand menu screen and return to live progra...

Page 51: ...m here you can cancel a Reminder or Autotune Messages allows you to view any messages about your service Messages may inform you of promotional offers upcoming Video on Demand events service upgrades or billing alerts Caller ID offers access to a log of all calls you have received through Caller ID You can review Caller ID entries and delete individual entries Go To My Library Press MENU on your r...

Page 52: ...e already watched part of the program and want to pick up where you left off highlight Play From Last and press OK Introducing PPV Events PPV Events allows you to view a previously purchased program Go To PPV Arrow down to your topic and press OK All purchased Pay Per View programs are listed to the right Highlight the event you want to watch and press OK for information and viewing options 11 My ...

Page 53: ...t Reminders and press OK A list of your Reminders and Autotunes appears to the right Cancel a Reminder or Autotune Step 1 Pick the Program Highlight the Reminder or Autotune you want to cancel and press OK Step 2 Cancel the Autotune or Reminder Highlight Cancel Autotune or Cancel Reminder depending on the type of event you are canceling and press OK 11 My Library ...

Page 54: ...our screen Press INFO on your remote to display the message or press EXIT to ignore the alert and view the message later Go To Messages Highlight Messages and press OK A list of all available messages appears to the right Reading a Message Highlight the message listing you want to read The full message will be displayed in the Info Area in the upper right hand corner of your screen 11 My Library ...

Page 55: ...r you receive a call an alert will appear in the upper corner of your screen This alert will be removed after a few seconds Go To Caller ID Highlight Caller ID and press OK A list of received calls appears to the right Highlighting a Caller ID log entry will display the name and number of the caller and the date and time of the call Deleting a Caller ID Entry Highlight the Caller ID listing you wa...

Page 56: ...tings Preferences and Users Both are used for setting up parental controls Activating Parental Control Arrow to Parental Control under Main Preferences and press OK to check the box Arrow to Submit and press OK You will be returned to live TV Navigate back to Settings and enter your account password Selecting Parental Control Settings Arrow Down to Users and press OK Arrow Right and highlight Pare...

Page 57: ...Available on Master Account Block Unrated allows or blocks any program that does not have a rating To turn Block Unrated on or off highlight the check box and press OK Content Rating To block a particular type of content highlight the check box to the left of that item and press OK Turning Parental Controls On and Off Once you have finished your selections Arrow Down to Submit and press OK Parenta...

Page 58: ...unts must log in to watch programs Enable Caller ID Enable Caller ID turns on or off screen alerts for incoming Caller ID To turn Enable Caller ID on or off highlight the check box and press OK Caller ID Timeout Caller ID Timeout determines how long Caller ID notifications remain on the screen To set Caller ID Timeout highlight the option box to the right of Caller ID Timeout and press OK Then pre...

Page 59: ...Channel Blocking list will appear To block unblock a channel highlight the channel entry and press OK To go to the next screen of channels press the Up or Down Arrow Key When complete Arrow to update and press OK Autotune Alert Autotune Alert determines how early an Autotune will be shown once you set an Autotune To set Autotune Alert highlight the option box to the right of Autotune Alert and pre...

Page 60: ...hese different pre set styles are called skins To get to Theme highlight and select the Settings icon on the main menu bar then scroll over to Theme There are several choices in the drop down menu for Theme Here are some examples of the different Guide and Menu screens Pink Shadow 5 4 5 6 Guide Menu Bumblebee 5 6 Guide Menu ...

Page 61: ... Working With Settings Users User accounts allows you to have separate parental controls purchase limits and themes for different family members Users Settings allows you to add a user account edit an existing user account change parental controls for a user account or delete a user account ...

Page 62: ...ccount Adding a User Account To create a new user account highlight the Add button and press OK Highlight New Login to enter the name for the new account and press OK An on screen keyboard appears Use the Arrow Keys to highlight a letter or number and press OK to add it to the login name Once you have entered the desired name highlight Done and press OK to return to the Create New User screen ...

Page 63: ... of programs that can be purchased per month for the new account Use the Number Pad on your remote to enter a whole dollar amount e g 200 to limit the account to 200 00 Highlight the Enable Caller ID check box and press OK to enable or disable Caller ID alerts to appear on the screen for this user account Highlight Enter PIN to enter the master account s PIN as a further way of verifying the maste...

Page 64: ...nlock Timeout or Block Unrated setting Once you have entered the settings for the new account highlight Submit and press OK Editing a User Account To edit a user account highlight the user account and press OK then highlight the Edit button and press OK Note The master account is the first account listed and is shown in yellow rather than white Using the Number Pad on your remote enter the current...

Page 65: ... the Number Pad on your remote to exactly re enter the password Highlight PIN and enter the account s existing PIN Highlight New PIN and enter a new PIN for this account Highlight Confirm PIN to re enter the new PIN Highlight the Enable PIN check box and press OK to enable or disable the need to use a PIN Once you have made all changes to this account highlight Submit and press OK ...

Page 66: ...ton on the remote Scroll the menubar to the Sign Out icon and click OK You will then be signed out of your account and the Sign In screen will appear Highlight the Name entry box and press OK Use the Up Down Arrows Keys to select the name for the desired account Then highlight the Password entry box and enter the password used for the desired account highlight Sign In and press OK When a new user ...

Page 67: ...st Option 1 Favorites From the Menubar Follow the steps above in Go To Favorites then highlight Choose and press OK Then highlight the Favorites list you want and press OK Option 2 Favorites From Guide While in Guide you can cycle through your Favorites lists by pressing GUIDE repeatedly Each press will activate the next Favorites list Cycling to All will display all available programming The name...

Page 68: ...3 Choose Your Favorite Channels Arrow Up and Down and select the channels to add or remove from your Favorites list and press OK A channel included in the Favorites list shows a heart icon to the right of the channel info To save your Favorites list Arrow Right and highlight Update and press OK To cancel your Favorite list without saving it highlight the Cancel button at the bottom right of your s...

Page 69: ...e highlight will be on the Search text box Press OK and a keyboard will appear to the right of the screen Usually the first three or four letters in the name will be enough to find your program Use the Up Down Left Right arrows to highlight the letters on the on screen keyboard to enter your search keyword If you enter a wrong letter highlight Delete and press OK to go back one space If you need t...

Page 70: ... and press OK and a menu will appear enabling you to 1 Schedule an Event recording see 8 DVR 2 Watch or record a program if it s on now 3 Set a Reminder or Autotune for a program if it comes on later see 6 Guide Alerts Recording and 7 Recording 4 View Expanded Info 5 Cancel from this menu Note You cannot set a Reminder Autotune or Recording for Video on Demand rentals The only options that come up...

Page 71: ... THE INPUT BUTTON TO BRING UP THE ON SCREEN KEYBOARD The INPUT button is located on your remote Use the on screen keyboard and Arrow keys to select the letters or numbers you want to enter If your remote does not have an INPUT button to bring up the on screen keyboard use the 0 9 keys to type in letters or numbers instead You may need to hold the key down until it toggles to the correct character ...

Page 72: ... to select the letters or numbers you want to enter If your remote does not have an INPUT button to bring up the on screen keyboard use the 0 9 keys to type in letters or numbers instead You may need to hold the key down until it toggles to the correct character When the user s name is complete scroll to Enter on the on screen keyboard and press OK Use the same process to complete your password Wh...

Page 73: ...scroll to Finance News or Sports on the Widget menubar and click OK current information on that topic appears Use your Right Arrow to scroll to additional information screens Use Exit on your remote to close the information screen and return to the menubar Stocks Widget This widget allows you to view stock specific stock quotes Follow these steps to operate the Stocks widget Step 1 Bring up the St...

Page 74: ...h with the newest stock quote listed at the bottom Weather Widget This widget allows you to view weather information of a given city or by zip code Step 1 Bring up the Weather Widget Select the Weather widget from the widget menubar and press OK A weather graphic appears Step 2 Bring up Weather by Zip Code Arrow to the Enter Zip Code text box Use either the Number Pad on your remote or press OK to...

Page 75: ...ng the Arrow Keys select a letter or number and then press OK Repeat this until you ve entered your Twitter Username Use the Arrow Keys to highlight Done and press OK on your remote Use the Arrow Keys to highlight Password and repeat this process to enter your Twitter password Then use the Arrow Keys to highlight Submit and press OK on your remote to bring up your Tweets Step 3 Navigate your Twitt...

Page 76: ...topic Step 6 Sign Out of your Twitter Account Depending on the screen you are viewing either arrow to Sign Out and press OK on your remote or arrow to My Account and press OK to bring up the Sign Out button Once you ve highlighted Sign Out and press OK you will be returned to the Widgets Menu Bar Suggestions Widget With this Widget you can send suggestions to your service provider for new widgets ...

Page 77: ...e the text box is selected and press OK on your remote to bring up the Keypad Step 3 Using the Keypad Using the Arrow Keys select a letter or number then press OK Repeat this until you re done entering the suggestion then select Done and press OK The Keypad will disappear Step 4 Submit your Suggestion Once the suggestion is successfully entered arrow down to SUBMIT and press OK on your remote 17 W...

Page 78: ... asking you a little about yourself one asking for your gender and another asking for your age Answering these is optional Use the Arrow Keys to highlight the answer you would like to give then press OK A Thank You screen will then appear after the process is complete 17 Widgets Coming Soon ...

Page 79: ...ity You can watch upload and share videos through your digital television service Go to YouTube Scroll down to YouTube and press OK on your remote to see the YouTube Menu screen You can Arrow Up and Down to select videos from Featured Most Popular Today Most Popular This Week Most Popular All Time Top Rated Top Favorites The small arrow at the bottom of the list indicates there are additional menu...

Page 80: ...ress OK to view the YouTube video When a video is played the Infobar will appear at the bottom of the screen Press Info once for additional information and twice to remove the Infobar When your YouTube video ends a Suggestions list of similar videos will be displayed To view one of these highlight and press OK on your remote Return to the previous YouTube listings by pressing the Left Arrow Key on...

Page 81: ...g up the YouTube Settings Screen The Username text box will be highlighted Press OK on your remote to bring up the on screen keypad Using the Arrow Keys on your remote select a letter or number on the keypad and then press OK To switch from capital letters to lower case Arrow to the Aa key on the bottom of the keypad and press OK To switch the keypad to symbols press the sign next to the Aa key He...

Page 82: ...wn to Cancel and press OK on the remote you will return to the YouTube menu screen Search YouTube Search is the convenient way to locate videos on YouTube Using Search YouTube While in the YouTube main menu scroll to Search and press OK on your remote to bring up the Search screen The Search text box will be highlighted Press OK on your remote to bring up the keypad Using the Arrow Keys on your re...

Page 83: ...gest index of syndication ready Web video shows This list of MetaChannel categories will periodically change and not all service providers will carry the same listings That means the listings in this User s Guide may not match the listing on your TV screen under MetaChannels Go To MetaChannels Press Menu on your remote control and using your Arrow Keys scroll to Cloud TV then press OK Arrow Down t...

Page 84: ...isode and press OK to view When a video is played the Infobar will appear at the bottom of the screen Press Info once for additional information and twice to remove the Infobar When the selected video ends a Suggestions list of similar videos will be displayed To view one of these highlight and press OK on your remote Return to the previous MetaChannels listings by pressing the Left Arrow Key on y...

Page 85: ...selections Introducing Picasa Picasa gives you access to publicly uploaded photos Featured Photos and Recent Photos You can login to your Picasa account to view your personal photos privately on your TV or search Picasa for photos on a specific topic Go To Picasa Press Menu on your remote and using your Arrow Keys scroll to Cloud TV then press OK Scroll down to Picasa and press OK to see the Picas...

Page 86: ...ow mode Press Stop again to exit to the Picasa main menu To then exit to live TV press the Exit button Settings Picasa Settings provide the ability to save your credentials the Picasa web account username and password giving you access to the accounts web profile My Photos and People To see your own photos you will have to open a Picasa web account and upload your pictures You will be able to view...

Page 87: ...witch the keypad to symbols press the sign next to the Aa key Here you will find the symbol for entering an email address When your user name is complete highlight Done and press OK Then Arrow Down on your remote to highlight the password text box and press OK Then repeat the process to enter your password The keypad will disappear when you push Done Arrow Down to Save and press OK A screen will a...

Page 88: ...en My Photos People The directions that follow apply to both My Photos and People Scroll down to My Photos and press OK on the remote to bring up the My Photos album listings Scroll to the album listing you wish to view and press OK on the remote to bring up the photo s See the earlier description in Using Picasa Recent Photos and Personal Photos for full operational details These same directions ...

Page 89: ...on your remote to bring up the keypad See Cloud TV YouTube Search for operation of keypad Use the steps from Using Picasa for viewing albums and photos Introducing Cloud Search The Cloud Search operates the same as the individual Searches described under each menu listing see Search under YouTube MetaChannels and Picasa The individual Searches are limited to their category whereas the Cloud Search...

Page 90: ...r logging in you ll see the tabs Home Guide To Record Recording Account and Sign Out used to schedule and manage recordings or account settings Home A row of popular programs are displayed Clicking on a program photo will display a list of upcoming episodes which you can choose to record Guide Displays guide information from which you can select a program to record To Record Displays the list of p...

Page 91: ...coming episodes which you can choose to record Click the program you want to record and the area will then be highlighted Click Record Program to record that specific episode or click Record Series to record all episodes of the program A message saying Series recording has been scheduled will appear Then click on Close After you have scheduled this future recording you can see it on both the To Re...

Page 92: ...tion will display then move your cursor down to the Record Program and Record Series buttons Click on the recording preference for that program and a message confirms your recording has been successfully scheduled Again click on Close The program will be added to your To Record list on the web On your TV on screen program guide a single episode or a series episode depending on your selection will ...

Page 93: ... or Record Series for recording the selected program Your TV on screen guide will show a single episode or series recording next to the program indicating the program will be recorded Managing Your Scheduled Recordings When you click on the To Record tab a list of scheduled recordings is displayed You can delete a show by clicking on the red x next to the show You can cancel a scheduled single rec...

Page 94: ...on the x next to the program you want to delete You can either delete that specific recording or delete all recordings of that program Manage your account settings To manage your account settings click on the Account tab Here you can change your username password email address or rename your DVR set top boxes 19 Remote Scheduling Coming Soon ...

Page 95: ...nished click Save Changes Renaming Your DVR Set Top Boxes You can rename your STB by clicking on DVR Boxes or the word Manage to the right Next type in what you wish to rename your STB no spaces You can change the set top box name by number or change the name for convenience example livingroom Click Save Changes when complete Signing Out To sign out of your account session click on Sign Out 19 Rem...

Page 96: ... tunes to the channel you wanted and interrupts the other STB from its current channel viewing Cancel the message window closes and no video will stream on the channel You must go to Guide or Menu or press OK to display the Stream Management options again If the Interrupt this Channel option is selected this is the message other TVs that have been interrupted in the household will see Note If you ...

Page 97: ...F Connects the set top box to a home theater system to provide surround sound audio provides audio only 5 S Video Connects the set top box to your TV to provide high quality video provides video only 6 Video Stereo Audio R L Video Audio Left Audio Right Connects the set top box to your TV or VCR to provide good quality video and stereo audio 7 TV Out Connects the set top box to your TV using a sta...

Page 98: ...ality video and stereo audio 2 HDMI High Definition Media Interface Connects the set top box to your HDTV using an HDMI cable provides audio and video 3 Ethernet Connects the set top box to the video service using a CAT5 Ethernet cable 4 USB Universal Serial Bus Connects the set top box to technician s equipment and other devices 5 S PDIF Connects the set top box to a home theater system to provid...

Page 99: ... box to your TV or VCR to provide high definition quality video and stereo audio 5 HCNA Coax Port Connects the set top box to a HCNA wall socket using coax wiring 6 RF Modulated Output to TV Connects the set top box to your TV using a standard coax cable provides audio and video 7 Ethernet Connects the set top box to the video service using a CAT5 Ethernet cable 8 S PDIF Connects the set top box t...

Page 100: ...DTV HDMI High Definition Media Interface Connects the set top box to your HDTV using an HDMI cable provides audio and video 6 Ethernet Connects the set top box to the video service using a CAT5 Ethernet cable 7 HDTV Pr Pb Y Component Video Connects the set top box to your TV to provide very high quality video provides video only 8 SDTV S Video Connects the set top box to your TV to provide high qu...

Page 101: ... box to your TV or VCR to provide high definition quality video and stereo audio 5 HCNA Coax Port Connects the set top box to a HCNA wall socket using coax wiring 6 RF Modulated Output to TV Connects the set top box to your TV using a standard coax cable provides audio and video 7 Ethernet Connects the set top box to the video service using a CAT5 Ethernet cable 8 S PDIF Connects the set top box t...

Page 102: ...ing a standard coax cable provides audio and video 7 S Video Connects the set top box to your TV to provide high quality video provides video only 8 TV Video Connects the set top box to your TV to provide good quality video 9 TV Audio R L Audio Left Right Connects the set top box to your TV to provide good quality stereo audio 10 S PDIF Connects the set top box to a home theater system to provide ...

Page 103: ...e violence nudity sensuality language or other contents but does not quite fit within the restricted R category Any drug use content will initially require at least a PG 13 rating R Restricted An R rated film may include hard language or tough violence or nudity within sensual scenes or drug abuse or other elements or a combination of some of the above so that parents are counseled to take this ad...

Page 104: ...am contains some material that many parents would find unsuitable for children under 14 years of age TV MA TV Mature Audience Only This program is specifically designed to be viewed by adults and therefore may be unsuitable for children under 17 Content Ratings Content Ratings are shown just below the program rating FV Fantasy Violence only applied to TV Y7 For those programs where fantasy violenc...

Page 105: ...97 Notes ...

Page 106: ...98 Notes ...

Page 107: ...99 Notes ...

Page 108: ...617 Main Ave West P O Box 238 Rolla ND 58367 701 477 1101 Bottineau Office 538 11th St W Suite 2 located in North Central Electric Building Bottineau ND 58318 701 228 1101 To report trouble 701 256 1125 Report toll free 800 844 9638 www utma com This institution is an equal opportunity provider and employer ...

Reviews: