background image


64 


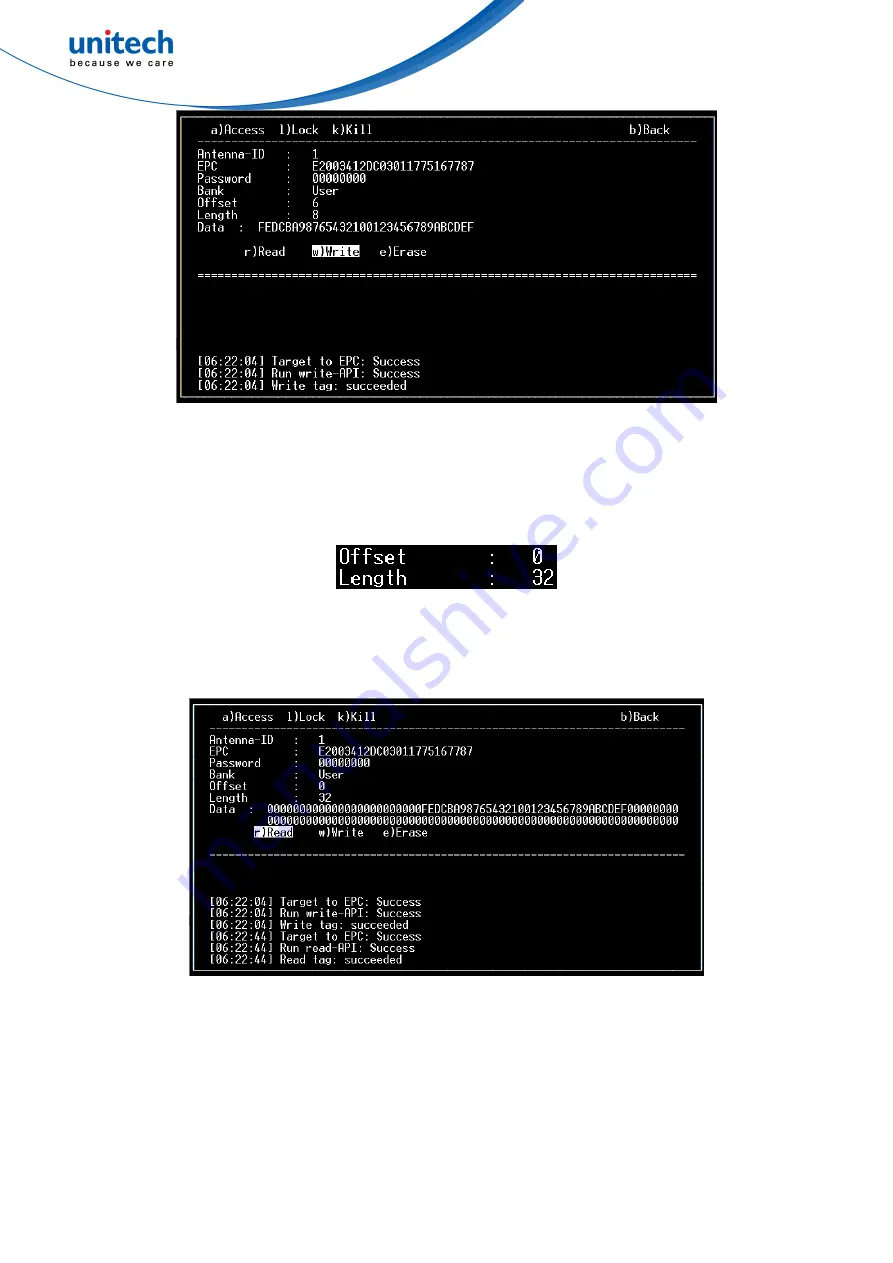
Fig. 105. The Write option 

d.


Read the User bank: 

Set Offset to zero and Length to 32, as shown in Fig. 106. 


Fig. 106. Set Offset and Length of the data to read 

Trigger the Read option to read the User bank of the tag, as shown in Fig. 107


Fig. 107. The Read option 

e.


Quit the application: 

“Back” from Tag-operation 

 ” Back” from Tag-operation of Inventory 

 “Back” 

from Inventory 

 “Quit” the app. 

Summary of Contents for RS804

Page 1: ...Unitech RS804 Indy embeddedapp User Manual Ver 1 1 1 ...

Page 2: ...The description of the timer at P 17 is changed 2020 09 02 1 0 0 Matching the Indy embeddedapp ver 1 0 0 0 2020 09 14 1 0 1 Hint the steps of disable LLRP WebAPI service 2020 12 25 1 1 0 Introduce Smart Tuner in Configuration Matching the indy embeddedapp v1 3 0 0 2020 01 13 1 1 1 Matching the indy embeddedapp v1 3 2 0 ...

Page 3: ...2 Installation 5 1 3 Uninstallation 6 1 4 Preparation 6 1 5 Execution 7 1 6 Control 8 2 Menu 9 2 1 Information 9 2 1 1 Version 9 2 1 2 Radio identity 10 2 2 Options 10 3 Configuration 11 3 1 General 12 3 1 1 Profile 14 3 1 2 Region 15 3 1 3 Channel 16 3 1 4 LBT 16 3 1 5 Enable antennas 16 a ...

Page 4: ...pulation 20 3 2 2 Session 20 3 2 3 Target 20 3 2 4 Algorithm 21 3 2 5 Q value 21 3 2 6 Selected 21 3 2 7 Toggle Target 21 3 2 8 Tag dead time 22 3 2 9 Anti stall 22 3 3 SmartTune 22 3 3 1 Apply 24 3 3 2 Cancel 24 3 3 3 Detail 24 3 3 4 Error 25 3 4 Load default 27 4 Inventory 28 4 1 Start 30 4 1 1 Stop 31 4 1 2 Error 32 4 2 Export 35 b ...

Page 5: ...1 5 1 4 Bank 41 5 1 5 Offset 42 5 1 6 Length 42 5 1 7 Data 43 5 1 8 Operations 43 5 2 Lock 46 5 2 1 Antenna ID 48 5 2 2 EPC 48 5 2 3 Password 48 5 2 4 Field 48 5 2 5 Privilege 48 5 2 6 Operation 49 5 3 Kill 50 5 3 1 Antenna ID 51 5 3 2 EPC 51 5 3 3 Password 51 5 3 4 Kill password 51 5 3 5 Operation 51 5 4 Errors 52 c ...

Page 6: ...d 5 4 1 Memory 52 5 4 2 Security 53 5 5 Back 54 6 About 55 7 Quit 56 8 Scenarios 58 8 1 Get an inventory 58 8 2 Access a tag in the inventory 62 ...

Page 7: ...ule for instance get an inventory of tags do several tag operations and enjoy a little history of Unitech 1 1 Environment This section is going to assist you in preparing an environment for Indy embeddedapp 1 1 1 Hardware 1 1 1 1 RS804 First you need an RS804 RFID reader that has already connected to an Ethernet if you haven t got one please contact Unitech we have a great team to support you Fig ...

Page 8: ...g or the display might be glitchy Both Linux and macOS has their built in terminal that supports SSH client It is easy to connect to the SSH server and emulate a terminal of RS804 by applying the SSH command below ssh root the IP address of RS804 For example Fig 2 indicates the SSH command in Ubuntu 16 04 Fig 2 An example of the SSH command As for Windows we recommend you to use TeraTerm which inh...

Page 9: ... Enter the user name of RS804 i e root in the User name column as shown in Fig 4 then click OK Fig 4 User name in TeraTerm c The terminal is now ready for use as shown in Fig 5 You can also change the font and its size in Setup Font Font 3 ...

Page 10: ...se make sure you set the Remote character Set to UTF 8 and check the Enable VT100 line drawing even in UTF 8 mode box in Configuration Window Translation You could also turn on the OpenSSH feature of Win10 and then apply the SSH command in PowerShell though ...

Page 11: ...anagers should have the FTP client feature in which we use the Windows Explorer on Windows as shown in Fig 6 Fig 6 The upload folder on the FTP server of RS804 b Install Indy embeddedapp to RS804 by the following command as shown in Fig 7 opkg install home ftp upload indy embeddedapp_ version _ arch ipk Fig 7 The installation of Indy embeddedapp 5 ...

Page 12: ...dedapp 1 4 Preparation To prevent the interference while Indy embeddedapp is using the RFID module we suggest you disable the LLRP WebAPI service of RS804 with the following steps as shown in Fig 9 uci set RFID RFID 0 Server NONE uci commit etc init d rfid service stop Fig 9 The steps of disabling LLRP WebAPI service If you got any confusion about this procedure please refer to RS804_EmbeddedSDK f...

Page 13: ...u need to do is type the following command in the terminal of RS804 as shown in Fig 10 After that the application will start to display as Fig 11 indy embeddedapp Fig 10 The command to execute Indy embeddedapp Fig 11 The screen of Indy embeddedapp 7 ...

Page 14: ...e in Table 1 Table 1 Description of the control of Indy embeddedapp Key Description Arrows Move the cursor which is being standout to the option you want Enter Access the option or enter a parameter into the option Number Type in a parameter of an option Alphabet Type in a parameter of an option 8 ...

Page 15: ...on Menu provides options to access all functions of this application and shows some very essential information Fig 12 The Menu of Indy embeddedapp 2 1 Information 2 1 1 Version Menu gives you the version of the app SDK and module in the right bottom of its screen as shown in Fig 13 Fig 13 The version information in Menu 9 ...

Page 16: ...as shown in the red dot line boxes in Fig 15 as described in Table 2 The following chapters would further introduce you to these functions 錯誤 錯誤 錯誤 錯誤 錯誤 Fig 15 Options of Menu Table 2 Description of options of Menu Index Name Description Hotkey 1 Configuration Configure the radio module and application c 2 Inventory Get an inventory of all tags nearby i 3 Tag operation Access a tag and do some op...

Page 17: ...ting of this application After this it would automatically save all your settings and then recover them at every time you execute this application While you are going to enter the parameter in Configuration the angle brackets will hint you the available range of the current option If you are not sure about what parameter to type in leave the parameter blank and then press Enter key directly this w...

Page 18: ...iguration and it has sixteen options to configure the module and application as shown in the red dot line boxes in Fig 17 as described in Table 3 Fig 17 Options of the General part of Configuration 1 4 5 6 7 8 9 10 11 12 13 14 15 16 17 3 2 12 ...

Page 19: ... the radio 6 Region Select the regulatory region 7 Channel Set the certain channel to stay on 8 LBT Enable the LBT 9 Enable Ant 1 Enable antenna 1 10 Enable Ant 2 Enable antenna 2 11 Enable Ant 3 Enable antenna 3 12 Enable Ant 4 Enable antenna 4 13 Detect Ant Automatically enable all available antennas 14 Power level Set the power level of all antennas 15 Dwell time Set the dwell time of all anten...

Page 20: ... Index 0 1 2 3 4 R T Modulation DSB ASK PR ASK PR ASK DSB ASK PR ASK Tari us 25 00 25 00 25 00 6 25 12 08 X 1 0 5 0 5 0 5 0 5 PW us 12 50 8 25 8 25 3 13 6 04 RT calibration us 75 00 62 50 62 50 15 63 30 21 TR calibration us 200 00 85 33 71 11 20 00 33 33 Divide ratio 8 00 21 33 21 33 8 00 21 33 TRExt 1 1 1 1 1 T R Modulation FM0 Miller 4 Miller 4 FM0 Miller 2 LF kHz 40 250 300 400 640 Data rate kb...

Page 21: ...the available range of Dwell time and then bounds the value into this range Table 5 gives the complete picture of the descriptions above Fig 19 Configuring Region Table 5 Regulatory region Model Region Maximum dwell time Available Channels Frequency of first available channel Bandwidt h LBT US 200 ms 1 50 CH1 902 75 Mhz 500 kHz Disable default TW 200 ms 1 12 CH1 922 25 Mhz 500 kHz Disable default ...

Page 22: ...le brackets and Table 5 Fig 20 Configuring Channel 3 1 4 LBT The option of LBT allows you to enable or disable the LBT feature from its sub options This option would restrict to On for JP4 and JP6 region according to the regulation showing in Table 5 Fig 21 Configuring LBT 3 1 5 Enable antennas The four Enable Ant options allow you to switch the status of the four antennas by pressing the Enter ke...

Page 23: ...er level of all antennas in units of dBm as shown in Fig 26 Moreover if the entered value is over the limitation of the hardware which shows in the angle brackets the option will limit it to the range Fig 26 Configuring Power level 3 1 8 Dwell time The Dwell time option allows you to globally configure the dwell time of all antennas in milliseconds as shown in Fig 27 In addition this option restri...

Page 24: ...s of all antennas as shown in Fig 28 As we mentioned in section 3 1 8 this option will also ignore the input zero if the dwell time is now zero Fig 28 Configuring Inventory cycles 3 1 10 FPS The FPS option allows you to configure the frame per second of this app as shown in Fig 29 Fig 29 Configuring FPS 18 ...

Page 25: ... General Go to the General part of Configuration g 2 SmartTune Perform SmartTuner for proper parameters s 3 Load default Set all configurations to its default setting l 4 Back Back to Menu b 5 Tag population Select the population of tags 6 Session Select the session of the tag inventory 7 Target Select the target of the tag inventory 8 Algorithm Select the algorithm of the tag inventory 9 Q value ...

Page 26: ... Q value this option changes all your setting of these options to match the setting in Table 7 simultaneously Fig 31 Configuring Tag population Table 7 Settings of the tag population Tag populatio n User Small Middle Large Session As you wish 1 2 2 Target As you wish A A A Algorithm As you wish Fixed Q Fixed Q Fixed Q Q value As you wish 2 4 6 3 2 2 Session The option of Session allows you to sele...

Page 27: ...tion of Q value allows you to configure the Q value of the current algorithm of the inventory as shown in Fig 35 Fig 35 Configuring Q value 3 2 6 Selected The option of Selected allows you to select the desired selected flag of the tag inventory in its sub options as shown in Fig 38 Fig 36 Configuring Selected flag 3 2 7 Toggle Target The option of Toggle Target allows you to enable or disable the...

Page 28: ...e module cycles its antennas Fig 38 Configuring Tag dead time 3 2 9 Anti stall The Anti stall option allows you to decide whether the application disables the failed antenna automatically while doing the inventory instead of stopping the process and waiting for your call as shown in Fig 39 Fig 39 Configuring Anti stall 3 3 SmartTune The SmartTune is a part of Configuration that providing you the p...

Page 29: ... Tuner has tuned the proper settings it provides three options for you to decide what to do with these settings as shown in the red dot line boxes in Fig 41 as described in Table 8 3 2 1 Fig 41 The screen after SmartTune has tuned the proper settings ...

Page 30: ...ich introduced in section 3 1 and 3 2 The Apply option helps you keep all these tuned settings and then update the display of corresponding options Now you can enjoy the high reading rate of our RFID reader 3 3 2 Cancel The Cancel option allows you to discard the tuned settings and recover to your current settings 3 3 3 Detail The Detail option shows you the detail of changed settings as shown in ...

Page 31: ...r uses profile 5 as the profile of the maximum data rate If the profile 5 is mismatched Smart Tuner will ask you to overwrite the current content of the profile 5 and then keep tuning as shown in Fig 43 If an error occurs while updating the profile 5 Smart Tuner will stop the entire tuning process as shown in Fig 44 Fig 43 The profile 5 is mismatched Fig 44 Failed to update the profile 5 25 ...

Page 32: ...e tuning process as shown in Fig 45 You would have to check or disable the failed antenna using the four Enable antenna options as the description in section 3 1 5 Fig 45 Antenna failed while tuning 3 3 4 3 Others If any other error happens Smart Tuner will stop the tuning process and give you an error code 26 ...

Page 33: ...efault is a part of Configuration which allows you to retrieve the default setting of all options in Configuration Since this operation is unrecoverable this application would ask you to confirm the operation as shown in Fig 47 Fig 47 Load default of Configuration 27 ...

Page 34: ...4 Inventory The Inventory as its name suggests gives you an inventory of tags and provides you five options to the relative functions as shown in Fig 48 as described in 28 ...

Page 35: ...ntenna status gives you the status of each antenna and the channel they are currently using The reader status gives you the amount of tag the total reads and the reading rate of the inventory where the reading rate is the number of reads in one second Moreover under the bottom of the inventory there would be left and right angle bracket symbols indicating you that you can go to the previous and ne...

Page 36: ... 1 Start The Start option allows you to inventory tags until you stop it with the only sub option Stop as shown in Fig 49 In the inventory the ID column shows the sequence of the appearance of tags The EPC column shows the EPC of tags in hex string that ups to 24 characters The Ant1 to Ant4 columns show the reads of tags of each antenna respectively In addition on the left side of the inventory th...

Page 37: ... the application to stop inventorying tags then wait for it as shown in Fig 50 Once Inventory stopped successfully the screen returns to its main page and shows the average reading rate as shown in Fig 51 Fig 50 Stopping Inventory 31 ...

Page 38: ... antennas ceases to function In this case the application will tell you the index of the failed antenna and ask you to disable it as shown in Fig 52 Second all antennas are broken down In this case the application will tell you the situation and stop the inventory without disables the last antenna as shown in Fig 53 Besides if you have enabled the Anti stall function in Configuration and you are f...

Page 39: ...Once the temperature of the radio module is over its threshold the application automatically forcefully suspends the inventory and gives you a notification as shown in Fig 54 Surely you can start the inventory again with the Start option but do ensure the temperature is cool enough 33 ...

Page 40: ... overheating 4 1 2 3 Others If any other error happens the application will also stop the inventory but give you only an error code without any further information as shown in Fig 55 Fig 55 The module is encountering an error ...

Page 41: ... Fig 57 If you enter a blank filename the application will save the inventory with the default name indyAppInventory txt By the way the folder home ftp rfid data on RS804 is easily accessible by the link ftp the IP of RS804 rfid data to its FTP server as shown in Fig 58 Fig 56 The Export of Inventory Fig 57 The exported file in the folder on RS804 35 ...

Page 42: ...and reset the timer as shown in Fig 59 After you cleared the inventory the screen will be like the first time you access Inventory as shown in Fig 48 What s more this individual Clear option means that the application would reserve the inventory until you use this option or even quit the app Fig 59 The Clear of Inventory ...

Page 43: ...ration part of Indy embeddedapp And the preset of the Antenna ID option and the EPC option of Tag operation is now the most read antenna of the tag and the EPC value of the tag respectively as shown in Fig 61 Moreover the Back option in Fig 60 a sub option of the Tag operation of Inventory allows you to leave the operation and go back to the main page of Inventory Furthermore the Back option in Fi...

Page 44: ...Fig 61 The Tag operation of Indy embeddedapp accessed from Inventory 38 ...

Page 45: ...ccess Tag operation As the previous description in section 4 4 both Inventory and Menu can access Tag operation The difference is the preset value of the Antenna ID option and the EPC option and the behavior of Back Fig 62 The Tag operation of Indy embeddedapp 5 1 Access The Access is a part of Tag operation and it has thirteen options to configure the operation and then access the tag as shown in...

Page 46: ...enna to use 5 EPC Set the EPC value of the tag in a hex string 6 Password Enter the access password of the tag in a hex string 7 Bank Select a bank of the memory of the tag 8 Offset Set the offset of data in the memory bank in 2 bytes word 9 Length Set the length of data in the memory bank in 2 bytes word 10 Data The data read from write into the memory in a hex string which allows up to 128 chara...

Page 47: ...PC value of the desired tag in a hex string that ups to 24 characters as shown in Fig 65 If this Tag operation is accessed from Inventory the default parameter of this option is the EPC value of the selected tag Fig 65 Setting the EPC option 5 1 3 Password The Password option allows you to enter the access password of the desired tag in a hex string with eight characters as shown in Fig 66 Fig 66 ...

Page 48: ...the Offset option Fig 69 The memory with two words offset 5 1 6 Length The Length option allows you to set the length of the operating data in the memory bank in 2 bytes word as shown in Fig 70 and Fig 71 The range indicates within the angle brackets is actually the valid size of the buffer of the Data option That means the real maximum length which is mostly smaller is also restricted to the size...

Page 49: ...o a read operation to the tag and then the tag returns its memory to the option of Data as shown in Fig 73 In the instance of Fig 73 you can see that the tag returns its memory of the User bank with two words offset and six words length to the buffer of the Data option which has 24 zero characters in this case In addition the Log section under the bottom gives three successful messages in the proc...

Page 50: ...uffer of the Data option into the corresponding memory of the tag as shown in Fig 74 Fig 75 shows the data that read back from the User bank as you can see the six words length data has correctly existed in the memory with two words offset Fig 74 The Write operation 44 ...

Page 51: ...ion allows you to do the erase operation to the part of the memory bank as shown in Fig 76 Fig 77 shows the data that read back from the User bank as you can see the second to the fifth word of the memory which is the eighth to twentieth character is now correctly erase to zero 45 ...

Page 52: ...the data after the erase operation 5 2 Lock The Lock is a part of Tag operation and it has nine options to configure the operation and then secure the tag as shown in the red dot line boxes in Fig 78 as described in Table 11 9 8 7 2 3 4 5 6 1 46 ...

Page 53: ...ll part of Tag operation k 3 Back Back to the previous location b 4 Antenna ID Set the index of the antenna to use 5 EPC Set the EPC value of the tag in a hex string 6 Password Enter the access password of the tag in a hex string 7 Field Select a field of the memory of the tag 8 Privilege Select a privilege of the field of the tag 9 SetLock Lock the field of the memory of the tag with the privileg...

Page 54: ... The Field option allows you to select the field of the memory bank of the tag in its sub options as shown in Fig 79 Fig 79 Selecting the Field option 5 2 5 Privilege The Privilege option allows you to select the privilege of the field of the tag in its sub options as shown in Fig 80 Fig 80 Selecting the Privilege option 48 ...

Page 55: ...5 2 6 Operation The Set option is the only operation in the Lock part of Tag operation which allows you to set the privilege to the field of the tag as shown in Fig 81 Fig 81 The Lock operation 49 ...

Page 56: ...of Kill of Tag operation Index Name Description Hotkey 1 Access Go to the Access part of the tag operation a 2 Lock Go to the Lock part of the tag operation l 3 Back Back to the previous location b 4 Antenna ID Set the index of the antenna to use 5 EPC Set the EPC value of the tag in a hex string 6 Password Enter the access password of the tag in a hex string 7 Kill Password Enter the kill passwor...

Page 57: ...ord The Kill Password option allows you to enter the kill password of the desired tag in a hex string with eight characters as shown in Fig 83 Fig 83 Entering the kill password 5 3 5 Operation The Kill option is the only operation in the Kill part of Tag operation which allows you to kill the tag permanently as shown in Fig 84 51 ...

Page 58: ... the Log section would also show other errors as well 5 4 1 Memory Like the descriptions in section 0 and 5 1 6 the size of the memory bank of a tag has its limitation For instance when the application attempts to read the memory out of the size of the EPC bank the Log section returns the error message ERROR BACKSCATTER 0x3 Memory location doesn t exist as shown in Fig 85 52 ...

Page 59: ...or instance when the application attempts to write data to the TID bank whose privilege is AlwaysUnaccessible the Log section returns the error message ERROR BACKSCATTER 0x4 Memory location is locked as shown in Fig 86 Fig 86 Memory location is locked 53 ...

Page 60: ...mentioned in section 4 4 both Inventory and Menu can access Tag operation Therefore this Back option of Tag operation returns you to where you came from instead of returning you to Menu as all other Back options do 54 ...

Page 61: ...y of Unitech to you as shown in Fig 87 and gives you the necessary information to contact Unitech as shown in Fig 88 However it is highly recommended to go to the website of Unitech https www ute com for further information Fig 87 A little history of Unitech 55 ...

Page 62: ...application as shown in Fig 89 After you triggered the Quit option the application would disable the user interface turn off the radio module close the module library and shut down itself sequentially Moreover the Ctrl C magic would do the same procedure to close this application at any screen of it forcefully 56 ...

Page 63: ...Fig 89 The Quit of Indy embeddedapp 57 ...

Page 64: ...ventory and access a tag of the inventory 8 1 Get an inventory a Start Indy embeddedapp Type the command below in the terminal as shown in Fig 90 indy embeddedapp Fig 90 Typing the command to start the application The application would start and show the screen as Fig 91 Fig 91 The first screen of Indy embeddedapp 58 ...

Page 65: ...ation General Detect Ant to enable all available antennas as shown in Fig 92 Then Back to Menu Fig 92 Enable antennas c ally select the option Inventory Start to start the inventory as shown in Fig 93 Start the inventory Sequenti Fig 93 Start the inventory 59 ...

Page 66: ...d Stop the inventory Select the Stop option to stop the inventory once you got the tags you want as shown in Fig 94 and Fig 95 Fig 94 Stopping the inventory Fig 95 Stopped the inventory 60 ...

Page 67: ...you want as shown in Fig 96 Fig 96 Export the inventory ation g the following link ftp the IP of RS804 rfid data filename f Quit the application Back from Inventory and then Quit the applic Get the text file of inventory Download the text file from the FTP server of RS804 with 61 ...

Page 68: ...a to 8 1 0 does The application should now have a screen as Fig 97 Fig 97 The Inventory b Select a tag Select the Tag operation option and then use the Arrow key and Page keys to select the tag you want as shown in Fig 98 Fig 98 Selecting a tag in Inventory 62 ...

Page 69: ...ength as shown in Fig 100 Fig 101 Fig 102 and Fig 103 respectively Fig 100 Setting the Password Fig 101 Selecting the Bank Fig 102 Setting the Offset Fig 103 Setting the Length Third type the data in the Data option as shown in Fig 104 Fig 104 Typing in the Data Final Write the data from the Data option to the User bank of the tag as shown in Fig 105 63 ...

Page 70: ...as shown in Fig 106 Fig 106 Set Offset and Length of the data to read Trigger the Read option to read the User bank of the tag as shown in Fig 107 Fig 107 The Read option e Quit the application Back from Tag operation Back from Tag operation of Inventory Back from Inventory Quit the app ...

Reviews: