Unitech MP300 Product Reference Manual Download Page 7

Copyright 2008 Unitech Electronics Co., Ltd. All rights reserved. Unitech is a registered trademark of Unitech Electronics Co., Ltd.

12

Copyright 2008 Unitech Electronics Co., Ltd. All rights reserved. Unitech is a registered trademark of Unitech Electronics Co., Ltd.

13

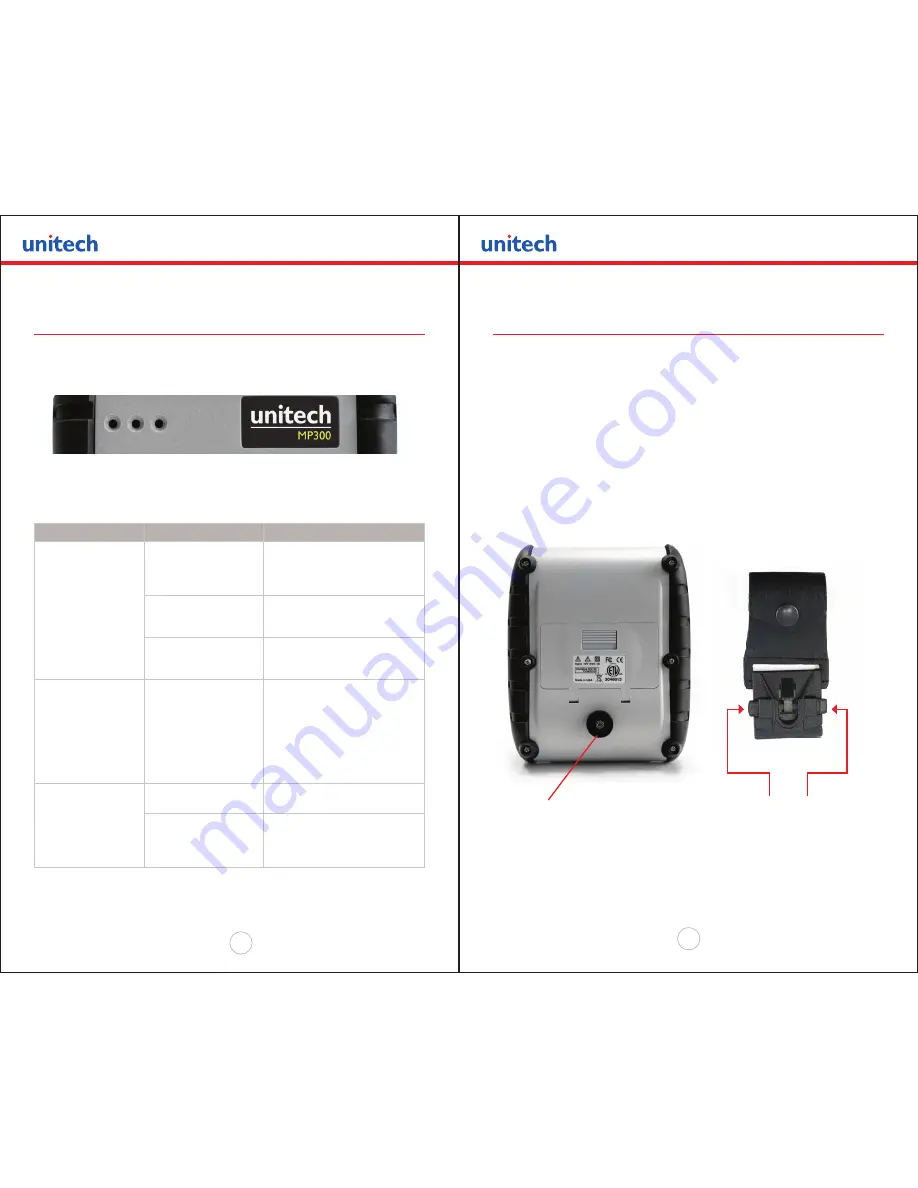
Reading the LED Status

The illustration below points out the location of the LED indicators.

This table explains the LED indicator status. For the exact locations of the on/off button,


feed button and the AC adapter port, refer to “A Tour of the MP300” on page 8.

LED Indicator

State

Status

LED 1

Purple or Orange

Low Power Mode 

(In Bluetooth mode the LED is 

purple. In RS232 mode the LED 

is orange).

Green

Indicates that power is on and 

that the printer is in RS232 or 

IrDA mode.

Blue

Indicates that power is on and 

that the printer is in Bluetooth 

mode.

LED 2

Yellow

The battery charger is charging 

the battery at a fast rate. If the 

battery is below 5V, the battery is 

being “trickle-charged” until the 

battery voltage reaches 5V, and 

then the fast-charge rate starts. 

The LED will turn off when the 

battery is fully charged.

LED 3

Green

Indicates that the MSR is ready 

to accept data.

Red

Indicates a fault condition or a 

printer error, and the printer is 

not ready to accept data.

The printer is out-of-paper.

Attaching the Belt Clip

The belt Clip consists of two parts:

   •  A knob located on the back part of the printer just above the battery door.
  •  A strap with a click-on connector.

To attach the strap to the knob, insert the knob located at the bottom of the printer into 

the slot on the connector. Pull down until you hear a click. The printer is now secure. 

The loop is then placed over your belt. Allow the printer to hang down either the left or 

right hip.

•  To release the printer, press down on the two latches on the connector, and pull the 

    knob clear of the slot.


    NOTE:

 Do not force or pull the printer from the connector without pressing down on the two latches.  

Knob

Connection

Release Latches

Summary of Contents for MP300

Page 1: ...MP300 Mobile Printer Product Reference Guide Rev A Copyright 2008 Unitech Electronics Co Ltd All rights reserved Unitech is a registered trademark of Unitech Electronics Co Ltd...

Page 2: ...ans such as photocopying recording or information storage and retrieval systems The material in this manual is subject to change without notice Copyright 2008 Unitech Electronics Co Ltd All rights res...

Page 3: ...Line Draw Character Set 23 Printer Graphic Commands 23 Table of Contents Notices General Precautions Before using this product be sure to read through this manual After reading please keep the manual...

Page 4: ...5 Trouble Shooting 29 Chapter 6 Printer Supplies 30 Chapter 7 Specifications Printer 31 Supply 32 Chapter 8 Regulatory Notes and Warranty FCC Part 15 Class B 33 Warranty 33 Warranty and or Repair Ser...

Page 5: ...6 10 9 Declaration of Conformity The MP300 conforms to the following regulations or standards FCC Part 15 Subpart B Class B CE EN60950 EN55022 Class B EN61000 3 2 EN61000 3 3 EN50024 Supplementary In...

Page 6: ...into the AC adapter port as shown below Plug the AC adapter output cable into the appropriate AC line voltage socket The yellow amber charging LED will illuminate indicating that the battery is being...

Page 7: ...ast rate If the battery is below 5V the battery is being trickle charged until the battery voltage reaches 5V and then the fast charge rate starts The LED will turn off when the battery is fully charg...

Page 8: ...e bottom as shown below Position the paper supply between the print head guides Make sure some supply 2 3 extends beyond the top of the paper supply well Shut the paper supply cover and press close NO...

Page 9: ...st few lines of the self test show the printer firmware version the current printer settings for example IrDA or Serial mode and a list of any optional or special features installed Connecting the Pri...

Page 10: ...ake effect the printer s power must be reset Communication The MP300 has two serial communication UARTs It is able to support two modes of communication simultaneously either RS232 and IrDA If DIP swi...

Page 11: ...n the on position Adjust settings to match the Bluetooth module in your computing device The printer can be powered up by pressing the power on off button Pressing the power on off button again will t...

Page 12: ...ape EXTEND 1C 28 Extended print EXTEND OFF 1D 29 Extended print off Normal print Printer Font Commands Courier Character Set Font Name Character Size W x H Command String 24 CPI Normal 8 x 23 ESC k 5...

Page 13: ...out of the SCR ESC M nn 8 Cr Select SCR in PassThru mode with BT or IrDA on UART1 nn is the auto timeout of the SCR Graphic Logo and Bar Code Commands Command String Printer Action ESC L G n Prepare p...

Page 14: ...able into the appropriate AC line voltage socket The yellow LED will illuminate indicating that the battery is being charged The battery will be fast charged and after 180 minutes the LED will turn of...

Page 15: ...tery intensive printing sessions Certain operations for example printing receipts with a lot of bar codes and graphics drain the battery more quickly than others Dispose according to your local regula...

Page 16: ...ilable from Unitech e mail supportengineering ute com Windows 95 98 NT 2000 XP Vista drivers Printer Supplies Chapter 6 Printer Specifications Problem Action Height 2 27 Width 5 01 Length 6 14 Weight...

Page 17: ...ning the equipment off and on the user is encouraged to try to correct the interference by one or more of the following measures Reorient or relocate the receiving antenna Increase the separation betw...

Page 18: ...rvice A Return Merchandise Authorization number must be issued before a unit is returned to Unitech for repair Once a unit has been properly returned to Unitech Note The customer is responsible for en...

Reviews: