Unite U10074 User Manual Download Page 8

Unite U10074 Audio Amplifier User Guide 


Page 8 of 14  


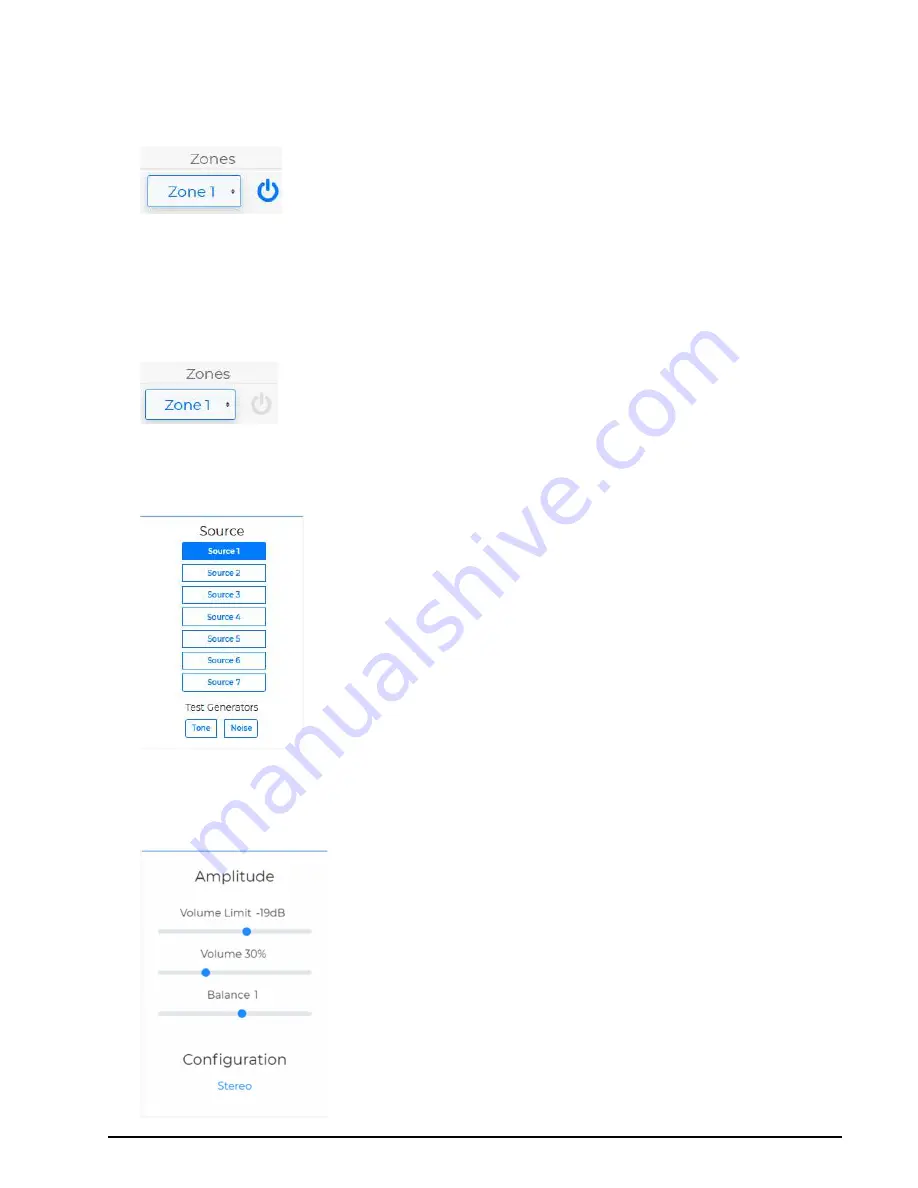
There  is  a  separate  page  for  each  Zone.  The  individual  Zones  are  selected  via  the 
UP/DOWN arrows in the ZONE selection box: 


The name of each Zone will be displayed. Note that the Zone names can be changed 
to suit a particular installation. The defaults are Zone1, Zone2 … Zone4 (Zone6 for 6-Zone 
variants). 

The ON icon next to the Zone name MUST be ON (Blue) for the Zone to be enabled and 
active. If the Zone is not enabled the ON icon will be greyed-out as shown below: 


To  select  a  particular  Source  for  a  given  Zone,  select  it  directly  from  the  SOURCE 
selection  boxes.  Note  that  the  Source  names  can  be  changed  to  suit  a  particular 
installation. The defaults are Source1, Source2 … Source7. 


In the example shown above, Source 1 has been selected. 

For the selected Source, the Amplitude settings need to be configured. This includes 
the Volume that is also able to be set via the front panel controls. 


Summary of Contents for U10074

Page 1: ...UniteU10074 AudioAmplifier UserGuide Unite Audio Nexus Audio Visual Pty Ltd 15 19 Villas Road Dandenong South Victoria Australia 3175...

Page 2: ...Introduction 3 Installation 3 Equipment 3 Amplifier Front Panel Features 4 Amplifier Rear Panel Features 5 Web Interface 6 Amplifier Configuration 7 Settings 9 Amplifier Use 10 Specifications 13 Docu...

Page 3: ...outputs feature internal 4th order High Pass filter to remove very low frequencies and protect the line drivers The term Source refers to a particular signal source connected to the amplifier inputs E...

Page 4: ...tors on the right hand side and a full colour screen on the left hand side LED indicators The U10074 LED indicators show the power boot status network connection status and alert status Display The U1...

Page 5: ...as required Connect the amplifier to the internet via a patch cable to the LAN socket If hardware controls such as Mute and PTT are not required there is no need to make any connections to these inpu...

Page 6: ...r Web browser most browsers http unite local Option2 If the browser does not connect using option1 method then enter the IP address into your Web browser in the following format http aaa bbb ccc ddd W...

Page 7: ...de the following Sources Input gain setting Sources 1 and 2 Volume settings Volume Limit Volume and Balance Equalisation settings High HighMid Mid LowMid and Low Unite Bass The amplifier also can also...

Page 8: ...t to the Zone name MUST be ON Blue for the Zone to be enabled and active If the Zone is not enabled the ON icon will be greyed out as shown below To select a particular Source for a given Zone select...

Page 9: ...gs The Settings page shows the current configuration of the amplifier The Connected Device will show the MAC of the target device This can be verified from the front display panel with the last 4 digi...

Page 10: ...trols are available The User cannot change other settings These settings need to be configured by a Manager Front Panel Status and Control The U10074 has a 2 5 inch full colour status display and four...

Page 11: ...screen and control following power up Each front panel control has direct control over its respective zone Rotate the controls clockwise to increase the Zone s volume counterclockwise to decrease Zon...

Page 12: ...able Zones muting them and powering them down Each Zone can be individually powered down Rotate the Zone s control clockwise to activate counterclockwise to power down Control Off This function disabl...

Page 13: ...20W Standby Power 115Vac 4 2W 230Vac 7 8W Fuse Rating T3AL Time Lag 115Vac 5A 230Vac 3A Ambient Temperature 0 to 50C Maximum Humidity 85 Non Condensing Maximum Altitude 2 000m Cooling Fan forced therm...

Page 14: ...3 5mm 2 5 diagonal full colour display 240 x 320 Dot Matrix 36 72 x 48 96 W x H Active Display Area Status Indication 3 x Status LEDs Power boot status Network connection status Alert status Control 4...

Reviews: