background image


7


Getting started 

The UniAmp instruments are powered from the PC through the USB cable and are operated through 
the Unisense UniAmp service in the 

Notification Area 

(Figure 2). Just connect the UniAmp to the PC 

and settings for the connected sensors will be available in the UniAmp service window. 

7.1


Connecting sensors with automatic settings  

Sensors are connected to the UniAmp by plugging in the 10-pin UniAmp connector. Amperometric 
sensors (O

2

, N

2

O, H

2

, H

2

S, NO, STOX) must be connected to pA-channels, pH and redox sensors to 

mV-channels, oxygen optodes to Op-channels and temperature sensors to T-channels. The E

2

PROM 

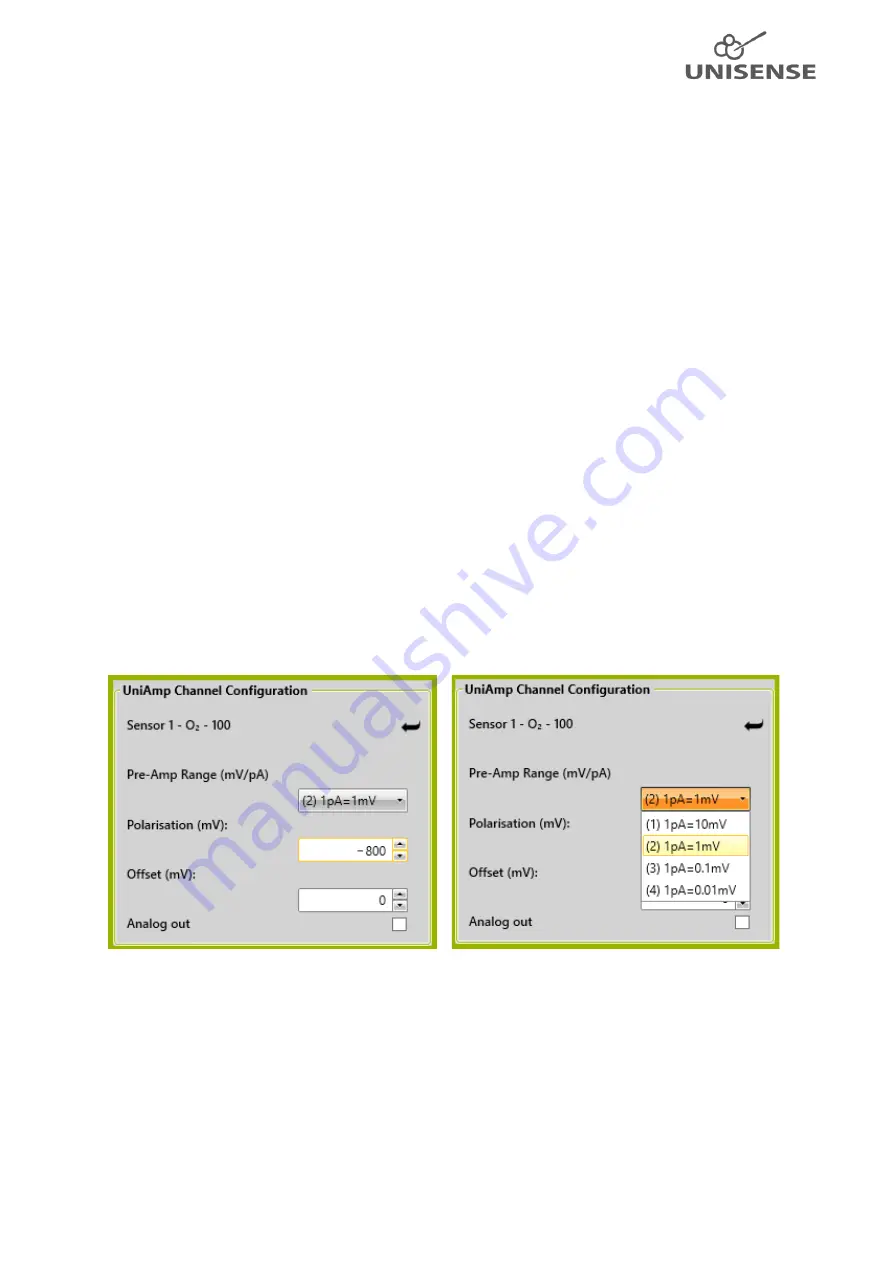
in the sensors will automatically set up the UniAmp for working correctly with the connected sensor 
(Figure 3) except for the N

2

O sensor where a manual pre-polarization must be performed (see 

7.3 

Manually setting the sensor polarization

).  

 
The green light on the UniAmp will turn off for 0.1 second when a sensor is connected, indicating 
that the E

2

PROM has been read.  


7.2


Manually setting the Pre-amplification  

The Pre-Amp Range determines how the sensor signal in pico ampere (pA) is converted into a signal 
in millivolt (mV). This is set by the E

2

PROM in the sensor, when the sensor is plugged in, but can be 

changed manually. Simply select the Pre-Amp Range you want from the drop-down menu (Figure 3).  
 
The default setting of 1 pA = 1 mV works in most cases. However, if you work with a custom sensor 
with either a very low or high signal, it may 

be beneficial to change this. Also, for sensors that don’t 

have the 10 pin UniAmp connector and that are connected through an adaptor, it may be necessary 
to select the Pre-Amp Range manually.   


Figure 3: UniAmp Channel Configuration window. Here an O

2

 sensor is connected and the preset values loaded from the 

E

2

PROM are shown to the left. The dropdown menu for the Pre-Amp Range setting is shown to the right. This window is 

opened as described in Figure 2. The 

Pre-Amp Range

 and 

Polarization

 boxes are not available for pH and redox 

microelectrodes. 

7.3


Manually setting the sensor polarization 

All amperometric sensors (O

2

, N

2

O, H

2

, H

2

S, NO, STOX) must be polarized and the correct polarization 

depends on the sensor type. This is set by the E

2

PROM in the sensor, when the sensor is plugged in, 

but it can also be set manually. Simply enter the value you want in the 

Polarization

 box (Figure 3).  


Summary of Contents for UniAmp fx-6

Page 1: ...Unisense UniAmp Multichannel Systems User Manual UNIAMP MULTICHANNEL SYSTEM MANUAL Copyright Unisense A S Version 1 1 August 2020...

Page 2: ...ting the sensor polarization 6 7 4 Adjusting the offset 7 7 5 Setting STOX sensor parameters 7 7 6 Polarizing amperometric sensors without a PC connected 8 8 Sensor connections and compatibility 8 8 1...

Page 3: ...ation For further information please see the document General terms of sale and delivery of Unisense A S as well as the manuals for the respective products 3 Support ordering and contact information I...

Page 4: ...fication Area also called System tray in the lower right hand area of the screen Using this pop up you can adjust channel settings such as pre amplification offset sensor polarization etc 5 Operating...

Page 5: ...e drivers needed for connection will automatically be installed The Unisense UniAmp service is installed together with the SensorTrace Suite Click on the UniAmp service icon to open a window with a fr...

Page 6: ...sor signal in pico ampere pA is converted into a signal in millivolt mV This is set by the E2 PROM in the sensor when the sensor is plugged in but can be changed manually Simply select the Pre Amp Ran...

Page 7: ...revent O2 from reaching the measuring O2 sensor The measuring signal with the front guard on is thus the signal for zero oxygen The measuring signal with the front guard off is thus the signal for O2...

Page 8: ...or Manual To be downloaded at https www unisense com manuals 8 Sensor connections and compatibility 8 1 Sensors connectors and adaptors Sensors for the UniAmp meters must have the 10 pin UniAmp connec...

Page 9: ...is used in the liquid 8 3 Software The UniAmp instruments require the latest version of the SensorTrace Suite software Check the version of your software in any of the applications Logger Profile Rat...

Page 10: ...ure that you enter manually The input from a temperature sensor This sensor must be selected from the dropdown menu on the calibration window for each amperometric sensor The temperature correction of...

Page 11: ...Update Microsoft Windows Update may interfere with logging for longer periods of time Windows may force installation of updates and restart the PC This will obviously stop any logging of data in Sens...

Page 12: ...et and that it is not running on battery In the power saving settings on you PC disable all power saving options Please note that it may be necessary to disable power saving options both in Windows se...

Page 13: ...this type will often be periodic e g noise emitted when equipment is switching on or off If such problems occur try switching nearby equipment off one by one to identify which equipment is generating...

Reviews: