background image

PART IV: MAINTENANCE

37

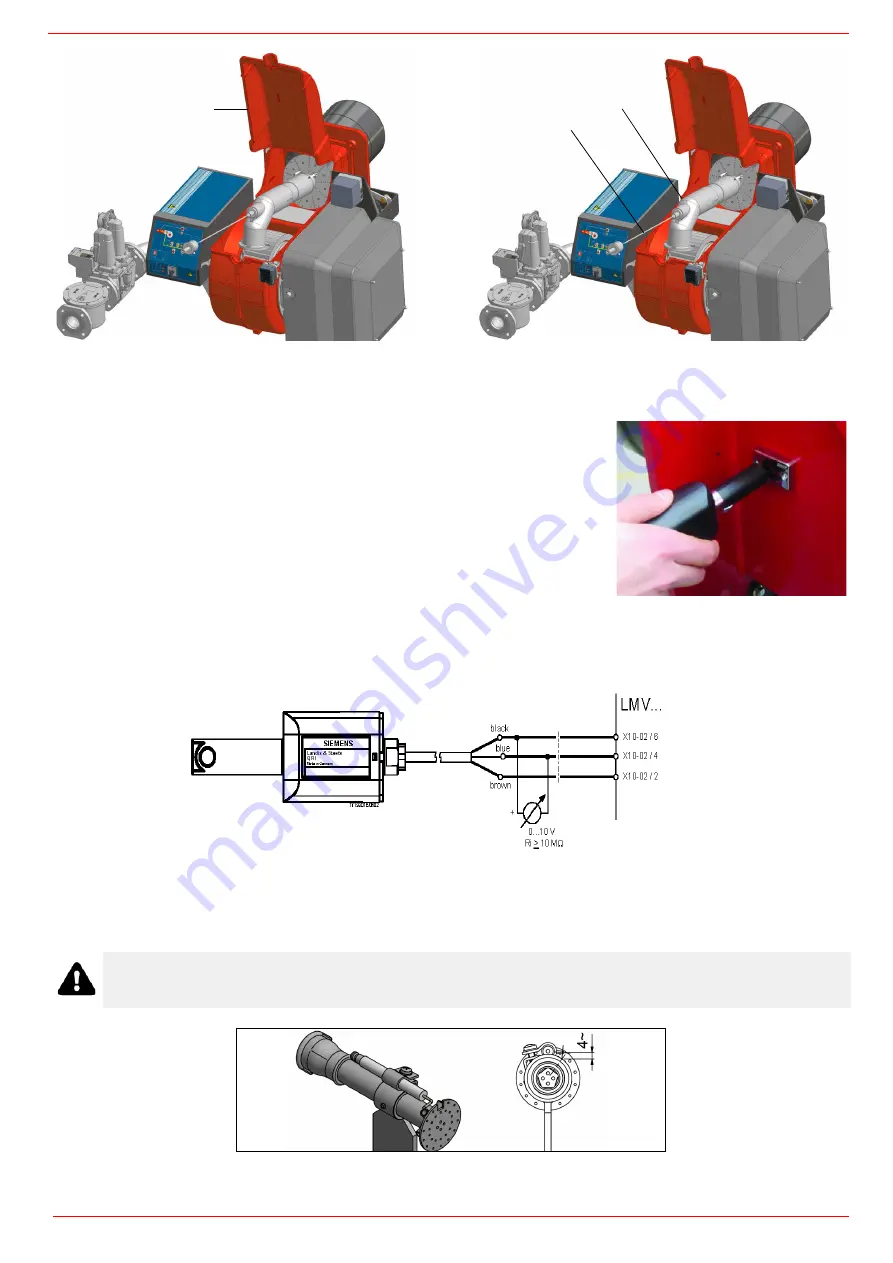
Ignition pilot electrode positions (if provided)

ATTENTION: 

avoid


the ignition and detection electrodes to contact metallic parts (blast tube, head, etc.), otherwise the boi-

ler’s operation would be compromised. Check the electrodes position after any intervention on the combustion head. 

C

AR

G

Flame detection probe

To clean/replace the detection photocell, proceed as follows:
1 Disconnect the system from the electrical power supply.
2 Shut off the fuel supply;
3 remove the photocell from its slot (see next figure);
4 clean the bulbe if dirty, taking care not to touch it with bare hands;
5 if necessary, replace the bulb;
replace the photocell into its slot.

Checking the detection current

To check the detection signal follow the scheme in the picture below. If the signal is less than the value indicated, check the position of

the detection electrode or detector, the electrical contacts and, if necessary, replace the electrode or the detector.
Minimum detection signal: 3.5Vdc

Fig. 12 - Detection with detector QRI... 

Summary of Contents for TLX2020

Page 1: ...M039571CA 0 1 11 2019 BURNERS BRUCIATORI BRULERS BRENNER QUEMADORES Microprocessor controlled MANUAL OF INSTALLATION USE MAINTENANCE LMV5x Gas burners TLX2020 TLX2030 TLX2040...

Page 2: ...e employed exclusively for the use for which it was designed Before connecting the burner make sure that the unit rating is the same as delivery mains electricity gas oil or other fuel Observe caution...

Page 3: ...ixtures DIRECTIVES AND STANDARDS Gas burners European directives Regulation 2016 426 UE appliances burning gaseous fuels 2014 35 UE Low Tension Directive 2014 30 UE Electromagnetic compatibility Direc...

Page 4: ...quipment of machi nes EN 60335 2 Electrical equipment of non electric appliances for house hold and similar purposes Safety requirements Burner data plate For the following information please refer to...

Page 5: ...e Fuel and comburent are routed into separated ways as far as the zone of flame generation combustion chamber The air comburent and fuel gas are forced into the combustion chamber The gas coming from...

Page 6: ...Panel on board Y Special G Separate control panel and onboard junction box 7 EQUIPMENT 1 2 gas valves gas proving system 8 2 gas valves gas proving system maximum gas pressure switch 8 GAS CONNECTION...

Page 7: ...DN80 100 DN100 100 DN100 125 DN125 150 DN150 150 DN150 Operating temperature C 10 50 Storage Temperature C 20 60 Working service Continuous Note1 All gas flow rates are referred to Stm3 h 1 013 mbar...

Page 8: ...395 395 395 395 395 1 1 1 7 395 215 1847 1337 550 275 275 160 256 5 256 5 160 730 465 232 5 232 5 365 365 80 160 109 634 P14 425 395 395 160 1043 698 2405 425 850 473 1373 702 425 425 425 395 395 850...

Page 9: ...30 425 425 395 395 395 395 395 1 1 1 7 395 215 1826 550 275 275 160 256 5 256 5 160 730 465 232 5 232 5 365 365 80 160 109 634 P14 395 395 698 500 2265 850 473 1353 883 425 395 395 850 1468 465 80 16...

Page 10: ...aragraph Adjusting the combustion head the minimum output point is reached setting the combustion head to its MIN position During the first ignition the combustion head is set in order to find a compr...

Page 11: ...is chapter The values in the diagrams refer to natural gas with a calorific value of 8125 kcal Stm3 15 C 1013 mbar and a density of 0 714 kg Stm3 The values in the diagrams refer to GPL with a calorif...

Page 12: ...ues o pressure in combustion chamber surveyed by means of the pressure gauge or taken from the boiler s Technical specifications Measuring gas pressure in the combustion head In order to measure the p...

Page 13: ...urner to the stud bolts by means of the fixing nuts according to the picture below 7 After fitting the burner to the boiler ensure that the gap between the blast tube and the refractory lining is seal...

Page 14: ...ion chamber are included in the burner performance curve otherwise the choice of the burner must be revised consulting the burner manufacturer To choose the blast tube lenght consider the following ru...

Page 15: ...x 10 Copper tube 6 mm x 1 5 mt Nut for male elbow fitting 6 mm x 10 mm Burner air pressure switch Air conduct Copper tube connection 6 mm Drill the air duct with hole from 10 mm Fit sleeve A 10 mm an...

Page 16: ...ore executing the connections to the gas pipe network be sure that the manual cutoff valves are closed ATTENTION it is recommended to mount filter and gas valves to avoid that extraneous material drop...

Page 17: ...UCIATORE 185 501939 PGMAX PGCP PGMI EV1 EV2 S EV2 EV1 PGMAX PGMIN VD R PGCP VD V VD V VD R PS PS pressure sensor Gas filter Example of gas train MBE A A C B B C 1 Mount flange into pipe systems Use ap...

Page 18: ...pressure switches set to 20 of the setpoint 2 Mounting on pipe Sensor position 5x DN according to MBE Pipe fitting with female thread size mount sensor with seal observe torque 3 The pressure sensor i...

Page 19: ...n SA SA TP D BS SKP1 SKP2 SIEMENS VGD Mounting positions TP Siemens VGD con SKPx Example of gas train Gas filter PGCP PGMIN PGMAX T VR Performance range mbar neutral yellow red Spring colour SKP 25 0...

Page 20: ...to the gas supply network must be carried out Once the gas train in installed execute the electrical connections for all its items gas valves group pressure switch DANGER Incorrect motor rotation can...

Page 21: ...without a neutral for the flame detection it is necessary to connect the RC circuit Siemens between the terminal 2 terminal X3 04 4 in case of LMV2x LMV3x LMV5x LME7x of the base and the earth termina...

Page 22: ...re switch sse scheme on pag 13 that pressure between EV1 and EV2 is at 0 mbar If pressure increases it means that EV1 leaks and LMV locks out Reset LMV see related manual and check the gas valves 5 Th...

Page 23: ...DJUSTING AIR AND GAS FLOW RATES Adjusting air and gas flow rates Adjustments brief description The air and fuel rates adjustments must be performed at the maximum ouptput first high flame see the LMV5...

Page 24: ...eet the values requested by the boiler utilisation Siemens VGD valves group remove cap T and act on the VR adjusting screw to increase or decrease the pressure and consequen tly the gas rate screwind...

Page 25: ...enu provides the following items Normal operation by selecting this item and pressing the ENTER key the main page is showed press ESC to go back to the main menu Status Reset it shows system errors or...

Page 26: ...ceed as follows From the main page enter the main menu by pressing the ESC key twice by means of the arrow keys select Params Display press ENTER the system will ask you to enter the proper password b...

Page 27: ...ESC to exit the set point programming mode Once the temperature set point W1 is imposed set the Switch on SDon and the Switch off SDoff point of the 2 position controller To set these values select th...

Page 28: ...o exit without changing Press the ESC key until the following menu is shown scroll this menu down until the tiem AZL is reached confirm by pressing ENTER Times it sets the Summer SUM Time Winter WIN T...

Page 29: ...rmal shock CSTP If the generator cannot suffer thermal shocks the CSTP Cold Start Thermal Schock function can be enabled This function is already set by the Technical service access by reserved passwo...

Page 30: ...rner in stand by If the BurnerOn mode is choosen the burner does not follow the modulator and probe settings but operates at the set load For further details see the LMV5x annexed manuals SetLoad Auto...

Page 31: ...slightly move the combustion head backwards turning clockwise the knob VRT Fasten VB screw when the adjustment is accomplished Depending on the boiler application it is possible to act on the holes f...

Page 32: ...nts do not exceed a value that creates a hazardous condition to the burner Adjusting output pressure for positive pressure systems requires PS 10 40 or PS 50 200 Outlet pressure MIN 10 25 50 75 MAX PS...

Page 33: ...ose the valve or counterclockwise to open To perform gas pressure adjustment act on the pressure governor as follows see next picture 3 remove the cap T to increase the gas pressure at the outlet use...

Page 34: ...re switch With the burner operating at maximum power increase the regulation pressure by slowly turning the control knob clockwise until the burner stops taking care it does not go into lockout and th...

Page 35: ...TIONS ON THE BURNER MUST BE CARRIED OUT WITH THE MAINS DISCONNECTED AND THE FUEL MANAUL CUTOFF VALVES CLOSED ATTENTION READ CAREFULLY THE WARNINGS CHAPTER AT THE BEGINNIG OF THIS MANUAL DANGER Incorre...

Page 36: ...case of scale scrape it off by a scratchbrush Note to replace the combustion head reverse the procedure described above having care to place correctly the O ring OR between burner and gas manifold Fi...

Page 37: ...ystem from the electrical power supply 2 Shut off the fuel supply 3 remove the photocell from its slot see next figure 4 clean the bulbe if dirty taking care not to touch it with bare hands 5 if neces...

Page 38: ...ombustion head To replace the ignition electrode proceed as follows 1 Remove the burner cover 2 Disconnect the electrode E cable CE 3 Remove the combustion head see par Removing the combustion head 4...

Page 39: ...itch functions and links Burner control damaged Replace burner control BURNER LOCKS OUT WITHOUT ANY GAS FLOW Gas valves don t open Check voltage on valves if necessary replace valve or the burner cont...

Page 40: ...a L Galvani 9 35011 Campodarsego PD ITALY Tel 39 049 9200944 Fax 39 049 9200945 9201269 web site www cibunigas it e mail cibunigas cibunigas it Note specifications and data subject to change Errors an...

Page 41: ...d an earth external wire for the motor ground The cable for the 4 20mA signal that controls the VSD must be shielded only LMV5x side ends connected to the equipotential terminal If the VSD is not insi...

Page 42: ...Annex1 Example for motor cable...

Page 43: ......

Page 44: ...Annex 2 Example for sensor cable...

Page 45: ......

Page 46: ......

Page 47: ...E Power supply Line voltage Gas L1 High Voltage Transformer N M Power supply Line voltage FE X73 Speed sensor VSD Fan Motor Separate conduit shielded line voltage cable X70 X10 02 X9 01 X4 02 Separate...

Page 48: ...ion and current fuel throughput The LMV52 system uses an O2 sensor QGO20 an external O2 module and the standard components of the LMV51 sys tem The PLL O2 module is a detached measuring module for the...

Page 49: ...defined system cables AGG5 641 and AGG5 631 result from the points of intersection in the graph 50 48 46 44 42 40 38 36 34 32 30 28 26 24 22 20 18 16 14 12 10 8 6 4 2 0 0 5 1 25 2 3 5 7 8 AGG5 631 AG...

Page 50: ......

Page 51: ...CAN bus cable 100 m Whenever the distance between the LMV5 and the last actuator exceeds 20 m or if more than one SQM48 is used on the burner refer to sizing chart Determination of maximum cable leng...

Page 52: ...N F T4 AC2 12 V 5 5 3 Not used M L Power trafo 2 AGG5 2 No bus termination No bus termination Bus termination 5 5 5 5 No bus termination No bus termination Installation in the control panel actuator...

Page 53: ...owered by a sec ond transformer to be located near the actuators and the O2 module Connect the power supply line from that transformer to the O2 module PLL52 in ex ample 3a SA6 in example 3b Auxiliary...

Page 54: ...n facility 18 8 1 Inputs and outputs Mounting panel shielding connection Communication and power supply for LMV52 Mounting panel shielding connection Communication and power supply Temperature sensor...

Page 55: ...l o w e d t o j o i n t h e f l u e g a s e s o n t h e i r w a y f r o m t h e b u r n e r t o t h e d e t e c t o r D F l o w v e l o c i t y 1 1 0 m s F l u e g a s t e m p e r a t u r e a t t h e...

Page 56: ...e p o u r B 1 B 2 B 2 T e n s i o n d e t h e r m o c o u p l e M U 3 S i g n a l d e l l m e n t d e c p m p e n s a t i o n d e t e m p r a t u r e G 2 A l i m e n t a t i o n d e l l m e n t d e c...

Page 57: ...k s i t i s r e c o m m e n d e d t o l e a v e t h e m e a s u r i n g s y s t e m Q G O a n d R P O s w i t c h e d o n D u r i n g t h e h e a t i n g u p p h a s e t h e d e t e c t o r c o u l d...

Page 58: ...A G O 2 0 0 0 2 A A R a u c h g a s e i n t r i t t B R a u c h g a s a u s t r i t t C K e r b e D F l a c h d i c h t u n g b e i l i e g e n d L 1 8 0 m m f o r A G O 2 0 0 0 1 A L 2 6 0 m m f o r...

Page 59: ...r h Transport DIN EN 60 721 3 2 Climatic conditions class 2K2 Mechanical conditions class 2M2 Temperature range 30 70 C Humidity 95 r h Operation DIN EN 60 721 3 3 Climatic conditions class 3K5 Mecha...

Page 60: ...GND SHIELD 12VAC1 12VAC2 CANH CANL GND SHIELD AZL5 x FE FE SQM4 LMV52 Brown brn White wh Yellow yl Green grn Black blk Brown brn White wh Yellow yl Green grn Black blk Flue gas temperature PLL52 PLL5...

Reviews: