background image

PART IV: MAINTENANCE

29


At least once a year carry out the maintenance operations listed below. In the case of seasonal servicing, it is recommended to carry
out the maintenance at the end of each heating season; in the case of continuous operation the maintenance is carried out every 6
months.


6.0  ROUTINE MAINTENANCE

z

Clean and examine the gas filter cartridge and replace it if necesssary;

z

Remove and clean the combustion head;

z

Examine and clean the ignition electrodes, adjust and replace them if necessary;

z

Examine and clean the detection electrode/photoelement (according to the burner models), replace it if necessary, in case of
doubt, check the detection circuit, after the burner start-up;

z

Clean and grease leverages and rotating parts.

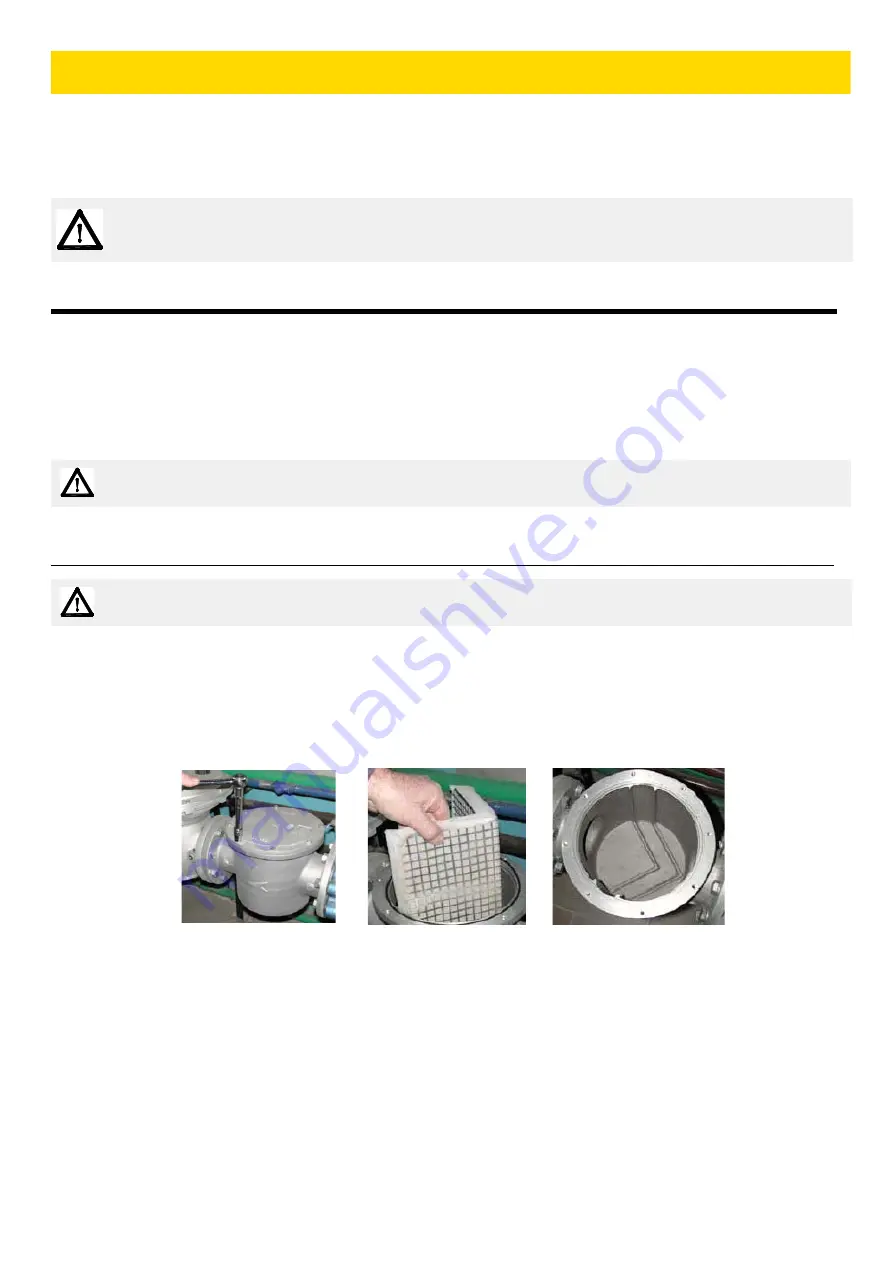
6.1  Gas filter maintenance

To clean or remove the filter, proceed as follows:
1

remove the cap unscrewing the fixing screws (A);

2

remove the filtering cartridge (B), clean it using water and soap, blow it with compressed air(or replace it, if necessary)

3

replace the cartridge in its proper position taking care to place it inbetween the guides as not to hamper the cap replacement;

4

be sure to replace the “O” ring into its place (C) and replace the cover fastening by the proper screws (A).

WARNING: ALL OPERATIONS ON THE BURNER MUST BE CARRIED OUT WITH THE MAINS DISCONNECTED
AND THE FUEL MANAUL CUTOFF VALVES CLOSED!

ATTENTION: READ CAREFULLY THE “WARNINGS” CHAPTER AT THE BEGINNIG OF THIS MANUAL..

 ATTENTION: when servicing, if it was necessary to disassemble the gas train parts, remember to execute the gas
proving test, once the gas train is reassembled, according to the procedure imposed by the law in force. 

ATTENTION: Before opening the filter, close the manual cutoff valve downstream the filter and bleed the gas;
check that inside the filter there is no pressurised gas.

A

B

C

PART IV: MAINTENANCE

Summary of Contents for R1030

Page 1: ...M03996CI Rel 8 1 03 2015 BURNERS BRUCIATORI BRULERS BRENNER QUEMADORES Gas burners Progressive Fully modulating MANUAL OF INSTALLATION USE MAINTENANCE R1025 R1030 R1040...

Page 2: ...CTIONS FOR BURNERS z The burner should be installed in a suitable room with ventilation openings complying with the requirements of the regulations in force and sufficient for good combustion z Only b...

Page 3: ...ditions such as the development of toxic or explosive mixtures DIRECTIVES AND STANDARDS Gas burners European directives Directive 2009 142 EC Gas Appliances Directive 2006 95 EC on low voltage Directi...

Page 4: ...apparatus EN 50165 Electrical equipment of non electric appliances for household and similar purposes Safety requirements UNI EN 746 2 Industrial thermoprocessing equipment Burner data plate For the...

Page 5: ...ssure in the utilisation limits The electric actuator that moves proportionally the air damper and the gas butterfly valve uses an adjusting cam with variable shape This one allows the optimisation of...

Page 6: ...R1030 M 1 xx R1040 M 1 xx Output min max kW 2550 8700 2550 9500 2550 10600 2550 13000 Fuel M Natural gas Gas category see next paragraph Gas rate min max Stm3 h 270 921 270 1000 270 1122 270 1376 Powe...

Page 7: ...ssive Fully modulating Pressure see Note 2 Gas train 65 Valves Connection 2 1 2 DN65 2 1 2 DN65 2 1 2 DN65 Gas train 80 Valves Connection 3 DN80 3 DN80 3 DN80 3 DN80 Gas train 100 Valves Connection 4...

Page 8: ...0 709 660 831 M16 651 460 460 922 204 269 718 80 1092 289 1161 372 330 R1030 80 1890 377 30 841 132 542 657 1348 680 2041 1219 822 454 504 520 709 660 831 M16 651 460 460 944 204 269 740 80 1092 310 1...

Page 9: ...the available gas pressure value upstream the burner s gas valve Then subtract the backpressure The result is called pgas Draw a vertical line matching the furnace input value 600kW in the example qu...

Page 10: ...um output point is usually reached by adj suting the combustion head to its MAX position see paragraph Adjusting the combustion head the minimum output point is rea ched setting the combustion head to...

Page 11: ...M 1 xx Gas rate Stm3 h GAS PRESSURE IN THE NETWORK mbar R1040 M Gas rate Stm3 h Caution the gas rate value is quoted on the x axis the related network pressure is quoted on the y axis pressure value i...

Page 12: ...the combustion chamber 3 Gas pressure outlet on the butterfly valve 4 Differential pressure gauge 1 10 Measuring the gas pressure in the combustion head In order to measure the pressure in the combust...

Page 13: ...te in combustion head curves natural gas Curves are referred to pressure 0mbar in the combustion chamber Gas pressure in combustion head R1025 M Gas rate Stm3 h Gas pressure in combustion head R1030 M...

Page 14: ...After fitting the burner to the boiler ensure that the gap between the blast tube and the refractory lining is sealed with appropriate insulating material ceramic fibre cord or refractory cement 2 1...

Page 15: ...he boiler manu facturer In absence of these consider the following z Cast iron boilers three pass flue boilers with the first pass in the rear part the blast tube must protrude no more than Dist 100 m...

Page 16: ...ets are not part of the standard supply ATTENTION BEFORE EXECUTING THE CONNECTIONS TO THE GAS PIPE NETWORK BE SURE THAT THE MANUAL CUTOFF VALVES ARE CLOSED Gas train with valves group VGD with built i...

Page 17: ...ted z Connect the reference gas pipe TP in figure 8mm external size pipe supplied loose to the gas pressure nipples placed on the gas pipe downstream the gas valves gas pressure must be measured at a...

Page 18: ...e following scheme valid for LPG In case of natural gas connect the pressure goveror pos 3 to the natural gas line maximum input pressure 1 bar Fig 11 Key 1 Gas valves 2 Minimum gas pressure switch 3...

Page 19: ...he filter with stabiliser to the gas supply network Fig 12 pipe port 3 for connecting the pilot gas train to the valves group of the main gas train ATTENTION once the gas train is mounted according to...

Page 20: ...t time td1 The pressure switch PGCP has not to detect a rise of pressure z Test space filling EV2 opens and keep this position for a preset time td3 in order to fill the test space z Test gas pressure...

Page 21: ...terminal X3 04 4 in case of LMV2x LMV3x LMV5x LME7x on the board and the earth terminal an RC Siemens RC466890660 filter must be inserted For LMV5 control box please refer to the clabeling recommenda...

Page 22: ...R OPEN OR DISMANTLE ANY COMPONENT OF THE MACHINE EXCEPT FOR ITS MAINTENANCE TO SECURE THE MACHINE ACT ON THE ISOLATOR SWITCH IN CASE OF ANOMALIES THAT REQUIRED A SHUT DOWN OF THE BURNER IT S POSSIBLE...

Page 23: ...n the gas valves open z Few seconds after the valves opening the transformer is de energised and lamp B4 turns off z The burner is now operating meanwhile the actuator goes to the high flame position...

Page 24: ...ime comes to an end and that the burner starts up 4 drive the burner to high flame stage by means fo the thermostat TAB 5 Then move progressively the microswitch to higher values until it reaches the...

Page 25: ...nimum output point 11 as for the point to point regulation move the gas low flame microswitch a little lower than the maximum position 90 12 set the TAB thermostat to the minimum in order that the act...

Page 26: ...he transparent plastic cap z While the burner is operating at the maximum output test the gas pressure on the pressure port of the minimum gas pressure switch z Slowly close the manual cutoff valve pl...

Page 27: ...ase o the operation turn slowly the adjusting ring nut VR in the clockwise direction to increase the adju sting pressure until the burner lockout then read the value on the pressure switch scale and s...

Page 28: ...gas burners plate holes are fully opened 5 12 Center head holes gas flow regulation LPG burners To adjust the gas flow partially close the holes as follows 1 loosen the three V screws that fix the ad...

Page 29: ...ollows 1 remove the cap unscrewing the fixing screws A 2 remove the filtering cartridge B clean it using water and soap blow it with compressed air or replace it if necessary 3 replace the cartridge i...

Page 30: ...rrectly the O ring OR between burner and gas manifold To replace the spring in the gas valve group proceed as follows 1 Carefully twist the protection cap 1 and the O ring 2 2 remove the set value spr...

Page 31: ...led view of the combustion head with pilot P and ignition elecctrode E Observe the values shown on next picture Fig 17 ATTENTION avoid the electrode to get in touch with metallic parts blast tube head...

Page 32: ...ctor the electrical contacts and if necessary replace the electrode or the detector 6 7 Cleaning and replacing the detection photocell To clean replace the detection photocell proceed as follows 1 Dis...

Page 33: ...proceed as follows 1 turn the burner main switch to 0 Off position 2 disconnect the power mains 3 close the fuel valve of the supply line 6 9 Burner disposal In case of disposal follow the instruction...

Page 34: ...MAINTENANCE 34 7 0 WIRING DIAGRAMS Refer to the attached wiring diagrams WARNING 1 Electrical supply 230V 50Hz 1 a c 400V 50Hz 3N a c 2 Do not reverse phase with neutral 3 Ensure burner is properly e...

Page 35: ...AS z z MAXIMUM GAS PRESSURE SWITCH DEFECTIVE z z THERMOSTATS PRESSURE SWITCHES DEFECTIVES z z z OVERLOAD TRIPPED INTERVENTION z AUXILIARIES FUSE INTERRUPTED z DEFECTIVE CONTROL BOX z z z z z DEFECTIVE...

Page 36: ...PART IV MAINTENANCE 36 8 0 BURNER EXPLODED VIEW...

Page 37: ...OVER 6 4 LEVERAGE 10 2 4 GAS VALVE HOUSING 13 4 1 CONTROL BOX SOCKET 6 5 LEVERAGE 10 2 5 GAS PRESSURE 13 4 2 TIME COUNTER 6 6 ACTUATOR 10 3 FLANGED REVERSIBLE CURVE 13 4 3 BIMETAL RELAY 6 7 LEVER 10 4...

Page 38: ......

Page 39: ......

Page 40: ...ia L Galvani 9 35011 Campodarsego PD ITALY Tel 39 049 9200944 Fax 39 049 9200945 9201269 web site www cibunigas it e mail cibunigas cibunigas it Note specifications and data subject to change Errors a...

Reviews: