background image

Basic Configuration

6)

Click “Save”.

Sorting Entries in the Central Phonebook

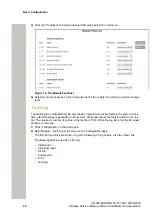
The entries in the Central phonebook can be sorted on Last Name, First Name or Number by

clicking the arrows in the list’s title bar.

 Delete Entries

1)

Click “Phonebook” on the start page.

2)

Select Phonebook > Edit in the menu on the Configuration page.

A) Delete a single Entry:
1)

Locate the entry to be deleted and click the 

 button in the same row.

2)

Click “Save”. The entry is deleted.

B) Delete several Entries:
1)

Click “Delete All”.

2)

All entries in the list will be crossed over and the 

 icon will be displayed to the right of each

entry. If you want to keep an entry just click the 

 icon and the changes will be discarded

for that entry.

3)

Click “Save”. All entries marked with a blue arrow are deleted.

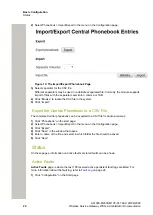
 Import Entries to the Central Phonebook from a CSV File

The CSV file to be imported to the Central phonebook shall have the following format:
First name;Last name 1;Telephone number
Different separators may be used, see below:
Warning: When importing a Central phonebook file in CSV format, existing entries are deleted.

1)

Click “Phonebook” on the start page.

A31003-M2000-M105-01-76A9, 29/06/2020

Wireless Service Gateway WSG, Administrator Documentation

21

Summary of Contents for OpenScape WLAN Phone WL4

Page 1: ...Wireless Service Gateway WSG OpenScape WLAN Phone WL4 WL4 Plus Administrator Documentation A31003 M2000 M105 01 76A9 ...

Page 2: ...nify Software and Solutions GmbH Co KG 29 06 2020 All rights reserved Reference No A31003 M2000 M105 01 76A9 The information provided in this document contains merely general descriptions or characteristics of performance which in case of actual use do not always apply as described or which may change as a result of further development of the products An obligation to provide the respective charac...

Page 3: ...onfiguration 20 4 1 Configure the Central Phonebook 20 4 1 1 Add Entries to the Central Phonebook 20 4 1 2 Delete Entries 21 4 1 3 Import Entries to the Central Phonebook from a CSV File 21 4 1 4 Export the Central Phonebook to a CSV File 22 4 2 Status 22 4 2 1 Active Faults 22 4 2 2 Reset the Error Relay 23 4 2 3 Level of Seriousness for different Fault Types Module Fault List 23 4 2 4 Fault Log ...

Page 4: ...et Parameter Values 46 6 4 8 Associate a Number with a Device 46 6 4 9 Delete a Number in the Site Database 46 6 4 10 Rename a Number 46 6 4 11 Copy a Number 47 6 4 12 Import Contacts 47 6 4 13 Export Contacts to a File 48 6 5 Devices 48 6 5 1 Add Devices 48 6 5 2 Synchronize a Device 48 6 5 3 Delete a Device 49 6 5 4 Replace a Device 49 6 5 5 Add a new Device 49 6 5 6 Assign a Number to a device ...

Page 5: ... is Time Source 66 8 4 Network Settings 66 8 5 Setting the License Number 68 8 5 1 Reboot 68 9 Remote Management 69 10 Absence Handling 72 10 1 Absence Handling in the VoWiFi System 72 10 1 1 Sort on Handset Status 72 10 1 2 Search on Handset Status 72 11 Open Access Protocol OAP 73 11 1 Configuration 73 11 2 Importing a new OA XML file 73 12 WLAN Interface 75 12 1 Handset Registration 75 12 2 WLA...

Page 6: ...e Manager Troubleshooting 87 15 2 1 Device does not Show Up in the module 87 15 2 2 Software in Device Not Recognized Synchronization Fails 88 15 2 3 Software Download Fails 88 15 3 Troubleshooting Guide 88 15 3 1 Troubleshooting for the Device Manager 88 15 3 2 General Troubleshooting for the WSG 92 15 4 Built in tools 93 15 5 Advanced Troubleshooting 95 15 6 What to consider when replacing a mod...

Page 7: ...or an external database is used as phonebook source The software uses open source components and the source code can be downloaded from the web site oss ascom ws com How to use this Document This document is used for installation and configuration for administration maintenance and troubleshooting These activities require good knowledge about functionality and limitations both on module and system...

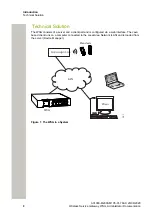
Page 8: ... a web interface The Java based client runs on a computer connected to the Local Area Network LAN and is loaded from the server Device Manager LAN Handsets Client WSG 301 Windows PDM Access point Figure 1 The WSG in a System A31003 M2000 M105 01 76A9 29 06 2020 8 Wireless Service Gateway WSG Administrator Documentation ...

Page 9: ...ages to optional TBD LDAP properties if an LDAP server is used for Central Phonebook requests optional Accessing the WSG Getting Started When accessing the module the first time follow the instructions in the Getting Started and safe ty Leaflet The IP address must not change during operation because renew of IP address via DHCP is not handled Other equipment connected to this product also expects ...

Page 10: ...y if an LDAP server is not used see Configure the Central Phonebook on page 20 3 Create a security backup 4 We recommend you to create a security backup of all settings to facilitate the configuration in case of a software upgrade See Backup the Configuration on page 28 Optional Settings Some of the optional settings in the module are included in the basic license other requires an additional lice...

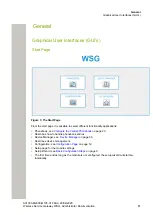
Page 11: ...20 Describes how to handle phonebook entries Device Manager see Device Manager on page 36 Describes device management Configuration see Configuration Page on page 12 Setup page for the module settings Setup Wizard see Basic Configuration Steps on page 9 The first time and as long as the module is not configured the setup wizard will start au tomatically A31003 M2000 M105 01 76A9 29 06 2020 Wireles...

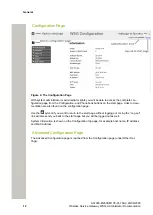
Page 12: ...Use the symbol if you want to return to the start page without logging out Using the Log out link will also send you back to the start page but you will be logged out as well System information is shown on the Configuration top page for example host name IP address and MAC Address Advanced Configuration Page The Advanced Configuration page is reached from the Configuration page under Other Set tin...

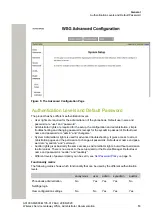
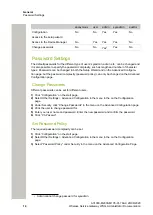
Page 13: ...ss to all ad ministration pages and the permission to change all passwords Default user name and pass word are sysadmin and setmeup Auditor rights gives basically the same access as Administrator rights but without permission to alter values There is no access to the setup wizard or the Device Manager Default user name and password is auditor and readonly Different levels of password policy can be...

Page 14: ...ent passwords can be set for different users 1 Click Configuration on the start page 2 Select Other Settings Advanced Configuration in the menu in the on the Configuration page 3 Under Security click Change Passwords in the menu on the Advanced Configuration page 4 Click the user to change password for 5 Enter your user name and password Enter the new password and confirm the password 6 Click Ch P...

Page 15: ...gs When secure mode is enabled only secure access via HTTPS and FTPES is allowed HTTP is automatically redirected to HTTPS and FTP access is not allowed The web access security level can be set as follows 1 Click Configuration on the start page 2 Select Other Settings Advanced Configuration in the menu in the on the Configuration page 3 Select Web Access under Security in the menu on the Advanced ...

Page 16: ...eral smaller packets which then can be transmitted and reassembled at the final destination If the network has a MTU value lower than the default 1500 bytes packets will be dropped if not fragmenting is allowed If fragmentation is allowed in the network the parameter needs to be en abled in the module 1 Click Configuration on the start page 2 Select Other Settings Advanced Configuration in the men...

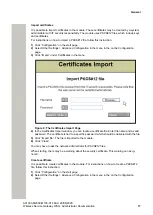
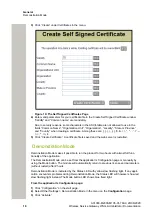
Page 17: ...w you can locate a certificate file Enter file name and a valid password The certificate is tied to a specific password which should be delivered with the file 5 Click Import file The file is imported to the module 6 Click Close You may have to ask the network administrator for PKCS 12 files When starting there may be a warning about the security certificate This warning can be ig nored Create cer...

Page 18: ...un the product for two hours with almost full func tionality of the application The Demonstration Mode can be set from the application s Configuration page or manually by using the Mode button The module will automatically return to previous license and parameters without restart after 2 hours Demonstration Mode is indicated by the Status LED with yellow slow flashing light If any appli cation enc...

Page 19: ...re the 2 hours have passed is done by clicking Deactivate Using the Mode button 1 Press and hold the Mode button for 10 seconds A31003 M2000 M105 01 76A9 29 06 2020 Wireless Service Gateway WSG Administrator Documentation 19 ...

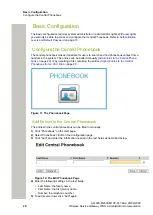
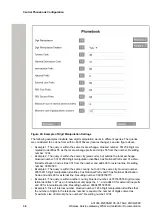
Page 20: ...page 20 or by importing a file containing the entries Import Entries to the Central Phonebook from a CSV File on page 21 Figure 11 The Phonebook Page Add Entries to the Central Phonebook The entries in the central phonebook can be filled in manually 1 Click Phonebook on the start page 2 Select Phonebook Edit on the Configuration page 3 Click Add and enter the information needed in the text fields ...

Page 21: ...ies in the list will be crossed over and the icon will be displayed to the right of each entry If you want to keep an entry just click the icon and the changes will be discarded for that entry 3 Click Save All entries marked with a blue arrow are deleted Import Entries to the Central Phonebook from a CSV File The CSV file to be imported to the Central phonebook shall have the following format Firs...

Page 22: ...rted to a CSV file for backup reasons 1 Click Phonebook on the start page 2 Select Phonebook Import Export in the menu on the Configuration page 3 Click Export 4 Click Save in the window that opens 5 Enter a name of the file and select in which folder the file should be saved 6 Click Save Status On these pages information on active faults or stored faults can be shown Active Faults Active Faults p...

Page 23: ...t is also possible to delete the fault in the list by clicking the icon If the IP address or license is changed in the module the faults reported for the previous IP address license will remain since no confirmation can be received These faults must be manually deleted The active faults list page has to be manually updated by clicking the Update Page link up permost on the page Reset the Error Rel...

Page 24: ... system information about the fault is written to the log file The maximum number of entries in the log file is 1050 When the log file is full the 50 oldest entries are removed 1 Click Configuration on the Start page 2 Select Status Fault Log in the menu on the Configuration page The first 25 log entries are shown To get the following 25 log entries click the Next link The following fault levels e...

Page 25: ...is the fault will be discarded and no actions will be executed 1 Click Configuration on the Start page 2 Select select Other Settings Administer Fault Log in the menu on the Configuration page Export the Fault Log in CSV format 1 Click Export 2 Click Save in the dialog window and enter the file name default name statuslog csv and the file path Remove all non active faults from the Fault Log 1 Clic...

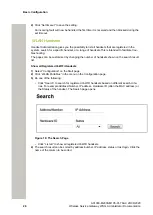
Page 26: ...t Show all Registered VoWiFi Handsets 1 Select Configuration on the Start page 2 Click WLAN Portables in the menu on the Configuration page 3 Do one of the following Click Search to search for registered VoWiFi handsets based on different search crite rias For example Address Number IP address Hardware ID often the MAC address or the Status of the handset The Search page opens Figure 16 The Search...

Page 27: ...Handset 1 Select the handset s check box in the search result list 2 Click Remove IP Address Force Relogin or Delete Selected Remove IP Address Used for refreshing the address of a handset Force Relogin Used for checking the connection with a handset Delete Selected Used for removing numbers not in use Show Handset Details Click the icon in the search result list All details of the chosen handset ...

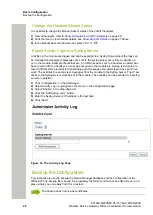
Page 28: ...SYStem LOG protocol for transmitting event messages and alerts text across an IP net work The activities are sent as text messages from the module to the Syslog Server The IP ad dress to the Syslog Server must be set in the module The activities can be exported to 5 syslog servers in parallel 1 Click Configuration on the Start page 2 Select Activity Log Log Export in the menu on the Configuration ...

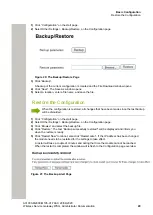
Page 29: ...ck Configuration on the start page 2 Select Other Settings Backup Restore on the Configuration page 3 Click Browse and select the backup file 4 Click Restore The text Backup successfully restored will be displayed and inform you when the restore is ready 5 Click Restart Now to reboot else click Restart Later If the IP address has been changed the module needs to be restarted for the settings to ta...

Page 30: ... Phonebook Address The default Call ID for accessing the phonebook is 999999 When the Unite Name Server UNS is set to forwarding mode the phonebook Call ID must exist in the module that the requests are sent to Any change of the Call ID and or IP address must be made in that module If the default address is used no changes are needed When the UNS is set to stand alone mode do as follows to change ...

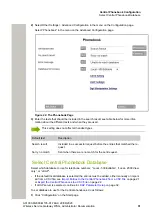
Page 31: ...hat matched the re quest Sorry no match Sent when there were no match for the sent request Select Central Phonebook Database Select which database to use for telephone numbers Local 500 Editable Local 2000 View only or LDAP If the default local database is selected the entries must be added either manually or import ed from a CSV file see Import Entries to the Central Phonebook from a CSV File on ...

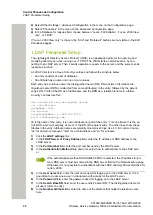
Page 32: ...5 6789 mail john company com dn is the name of the entry it is not an attribute nor part of the entry cn John Ericson is the en try s RDN and dc company dc com is the DN of the parent entry The other lines show the at tributes in the entry Attribute names are typically mnemonic strings like cn for common name dc for domain component mail for e mail address and sn for surname 1 Click the LDAP setti...

Page 33: ...hone number is considered to be an internal number and the number is stripped from superfluous international prefixes etc Telephone number standards There are several standardized ways of writing telephone numbers The following formats are currently supported Format Comment 4631559300 E 164 international standard and E 123 031 559300 E 123 local number 46 031 559300 National prefix national destin...

Page 34: ...r and adds 00 for external line Resulting number 00612500 Example 3 The query is within the same country but not in the same city Queried number 035158115 Digit manipulation identifies 0 as National Prefix and 35 as National Destination Code and adds 00 for external line Resulting number 00035158115 Example 4 The query is within another country Queried number 4781530555 Digit manipu lation identif...

Page 35: ...eeded International Prefix The International Prefix is used to dial a call from a particular country to another country This is followed by the country code for the destination country This value is used to replace the character when an international call is made National Prefix National Prefix is used to make a call within a country from one city to another The national prefix is followed by the ...

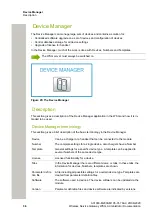
Page 36: ...anager Device Can be a charger or a handset that can be connected to the module Number The complete settings for a single device Also chargers have a Number Template General settings for a specific device type A template can be applied to several Numbers of the same device type License Licensed functionality for a device Tabs In the Device Manager there are different views or tabs In these tabs th...

Page 37: ...reate a new Number for the corresponding device type Associate the Number with the device Refer to applicable handset configuration manual for a description of the work flow Device Manager GUI The Device Manager window has a menu bar a toolbar and a work area The toolbar has dif ferent tabs and when a tab is selected the available device types will be shown in the left hand pane of the work area T...

Page 38: ...lt value Navigation For keyboard short cuts see Used IP Ports on page 96 Tabs The Device manager has different views or tabs Devices tab Numbers tab Templates tab Licenses tab Each tab shows information about devices Numbers templates or licenses Some information overlaps for example Device ID which is tied to both a specific device and to a specific Number Different menus are accessible in the di...

Page 39: ...the version of the parameters in the Number Device ID the unique identifier of the device that the Number is associated to Online shows if the device the Number is associated to is online The symbol indicates an online device Status shows the parameter synchronization status A Number can also be queued for syn chronization Several different indications are used for example Synchronizing Sync queue...

Page 40: ...set Logging On to the Device Manager When an attempt is made to start the Device Manager a dialog window is displayed with a warning that the program s digital signature cannot be verified The text is displayed in the language used in the computer s operating system Click Run or the equivalent term in the operating system language Ten clients can be logged in at the same time but to avoid conflict...

Page 41: ...ied on a number of devices 1 Some parameters are user specific If it is decided to apply this type of template to several handsets it is recommended to exclude the following parameters Owner ID A text string specified in standby mode The parameter is located directly un der Settings Phone lock PIN code The security code used to unlock the keypad The parameter is lo cated under Settings Locks 2 Ope...

Page 42: ...5 Click OK Delete a template 1 Select the Templates tab 2 Select the template you want to delete The selected row is highlighted 3 In the Template menu select Delete or right click and select Delete or press the Delete button The Delete template dialog opens 4 Click Yes The dialog window closes and the template is deleted Upgrade a template In order to upgrade a template the new parameter version ...

Page 43: ...the call number Click OK To create a range of Numbers select the Range option Enter the start call number end call number and click OK The maximum range that can be added at a time is 100 Numbers Save a Number to Database An online device can be saved to the database 1 Select the Numbers tab 2 Select the Number 3 In the Number menu select Save Alternatively right click the Number and select Save A...

Page 44: ...e parameter see the Configuration Manual for the VoWiFi handset Edit Certificate 1 Select the Numbers tab 2 In the Number menu select Edit certificates Alternatively right click in the Numbers list and select Edit certificates The following information is displayed Number of the device Device type Parameter version The online status of the device Imported certificates if any 3 Click the correspond...

Page 45: ...arameters window shows the set of parameters relevant to the Number that is being edited The parameter groups are organized in a tree structure in the left pane with the parame ters in the current node in the right pane The parameter list has one column with the parameter name and another column shows the parameter value This can be for example a numerical val ue a boolean value or text Clicking t...

Page 46: ...d vance and to associate them with a Number at a later moment See also Assign a Number to a device on page 49 and Add a new Device on page 49 1 Select the Numbers tab 2 In the Number menu select Associate with device The Associate Number dialog opens 3 Select the device you want to associate with in the list 4 Click OK If the selected device is online it will immediately be updated with the select...

Page 47: ...the Number menu select Import contacts From file Alternatively right click the device and select Import contacts From file from the menu that opens 4 Find and select a file containing contacts txt or csv Click Open The contacts in the imported file are synchronized with the handsets Import Contacts From Number This feature enables transfer of contacts from one handset to another handset that has b...

Page 48: ...f a range of new devices are to be added the easiest way is to 1 Create a template with all common parameter settings See Create a Parameter Template on page 41 2 Add a range of Numbers and run the template See Create New Numbers on page 43 and Run a Template to set Parameter Values on page 46 3 Edit the parameters and change individual settings See Edit Parameters on page 45 4 Connect the devices...

Page 49: ... when handling many devices a bar code reader can be used The bar code reader should send a carriage return after each item but it is not necessary If carriage re turn is not sent it is necessary to click Create after each read item 1 Select the Devices tab 2 In the Device menu select Add device The Create devices dialog opens 3 Select Device type and Parameter Version 4 Enter a Device ID for the ...

Page 50: ... Factory reset in the Device menu Alternatively right click on the device and select Factory reset 4 A message saying Do you want to reset the selected device s to factory defaults will ap pear 5 Click Yes Licenses Device licensing offers a possibility to view manage and upgrade licenses of devices In the Li censes tab devices are listed If a device is selected in the list the status of the licens...

Page 51: ...ct license information is shown in the WSG and the device Export and Import Licensing information In order to upgrade licenses on devices when the WSG does not have an internet connection to the license server the following is done The information needed for licensing of a device is exported from the Device Manager to a file see Export Licensing information on page 51 The file is used to purchase ...

Page 52: ... license option disabled The search result is updated directly when selecting devices and license options In addition the icon is also displayed next to the Advanced find button to indicate that the search result is filtered 5 When clicking Close the filtered search result will still be displayed When clicking Reset the filter is removed and all devices are displayed Move License This feature requ...

Page 53: ...se server sent to the device and displayed in the Device Manager Remove Devices from the License View This command removes devices from the Licenses tab view 1 Select the Licenses tab 2 Select the device s that shall be removed from the list The selected row s are highlighted 3 In the License menu select Delete or right click and select Delete 4 Click Yes in the Remove device dialog The dialog clo...

Page 54: ... file pkg to be imported and click Open The files included in the package are now imported If needed select the Parameter definition tab or Software tab to view the corresponding imported files if any If template s has been imported it can be viewed by clicking Close and then selecting the Template tab 4 Click Close Import Parameter Definition Files Updated parameter definition files are distribut...

Page 55: ...re shown such as bin and pkg 5 Click Open 6 Check that the newly imported software files appear in the list 7 Click Close Import Language files for Devices For adding a new language to a device a language file lng distributed by your supplier must be imported to the Device Manager and then uploaded to the device 1 In the File menu click File management The File management window opens 2 Click the ...

Page 56: ...mpany phonebook to It is possible to select several de vices but only devices of the same Device Type can be selected 3 Select Device Upload company phonebook in the menu A new window opens 4 Select which company phonebook to upload 5 Click OK The company phonebook is uploaded to the device Upgrade a Device with new Software Devices can be upgraded with new software Note that upgrade of device sof...

Page 57: ...n the Available files text box 8 Click OK The Upgrade software window closes The software will be downloaded to the device For some device types a progress bar in the Status column for the device shows the progress of the download To cancel the upgrade click Cancel upgrade in the Device menu Alternatively right click the device in the device list and select Cancel upgrade The device will restart a...

Page 58: ...e parameter configuration in Numbers can be exported to a file This file can be used by the supplier to pre program devices before delivery to the customer If there is a naming conflict when importing a template the new template is imported and the old template is deleted If there is a Number conflict when importing Numbers an error message is displayed Import Numbers 1 In the File menu click Impo...

Page 59: ...anoth er name and folder 4 Click Save Export Templates to a File It is possible to export templates to a file One or several templates can be selected 1 Select the Templates tab The Templates view opens 2 Select the template s to be exported 3 In the Template menu click Export The Export templates window opens By default the file will be saved in the My documents folder with the name Templates tpl...

Page 60: ... to the interfaces that the devices are connected to 5 Click Activate Service Discovery Service Discovery allows automatic detection of WSG devices and services on a network with out prior configuration WSG services and devices that shall belong to a certain WSG must be set to the same domain ID 1 Click Configuration on the start page 2 Select Other Settings Advanced Configuration on the Configura...

Page 61: ...Device Configuration Figure 27 The Module Settings Page A31003 M2000 M105 01 76A9 29 06 2020 Wireless Service Gateway WSG Administrator Documentation 61 ...

Page 62: ...nnot resolve the address 1 Click Configuration on the start page 2 Select Other Settings Advanced Configuration on the Configuration page 3 Under Other click UNS in the menu on the Advanced Configuration page Figure 28 The UNS Page Operating Mode Operating mode is changed in systems with a Unite CM only 1 To set Operating mode click Operating mode Figure 29 The UNS Operation Mode Page 2 In a syste...

Page 63: ...fault Category Figure 30 The UNS Default Category Page 2 Enter values for Messaging handler IP address and Messaging handler service name De fault service name is DGH which is the internal message group handler If you for example want to send messages to a WSG connected to a WLAN system enter the IP address of the module and set messaging handler to WLAN 3 Click Activate Alias Call ID Alias can be...

Page 64: ...Default the Status and System Activity logs are stored locally but they can also be sent to another WSG 1 Click Configuration on the start page 2 Select Other Settings Advanced Configuration on the Configuration page 3 Under Other click Logging in the menu on the Advanced Configuration page Figure 33 The Log Settings Page 4 Click Status Log System Activity Log or View Advanced parameters 5 In the ...

Page 65: ... Time server address IP address to NTP server Fault log Create fault log for time server faults Time zone Current time zone Auto DST adjust Automatic adjustment for daylight saving time Date format Which date format to use Date separator Which character to use to separate the date fields Time Format Which time format to use Time push time When to update all interfaces within the module 5 Click Act...

Page 66: ...tting can also be done in the setup wizard 1 Under Time click Set time Figure 35 The Log Settings Page 2 Enter date and time 3 Click Submit time Date and time can also be set in the setup wizard Network Settings 1 Click Configuration on the start page 2 Select Other Settings Advanced Configuration on the Configuration page A31003 M2000 M105 01 76A9 29 06 2020 66 Wireless Service Gateway WSG Admini...

Page 67: ... the host name below is applicable IP address Sets the IP address for the module Default gateway Sets the IP address to a Gateway on the LAN Subnet mask sets the network mask that is to be used If this parameter is set to 0 0 0 0 it means that the Gateway never will be used Host name Domain name Sets the desired domain name for the module DNS Server Sets the IP address to a DNS if one exists If no...

Page 68: ... in the menu on the Advanced Configuration page 4 Enter the license number and click Activate Reboot The module can be rebooted on the Advanced Configuration page 1 Click Configuration on the start page 2 Select Other Settings Advanced Configuration on the Configuration page 3 Under Common click Reboot in the menu on the Advanced Configuration page 4 Click the Reboot button If the Reboot page is r...

Page 69: ... in the GUI will give more information about each parameter set tings 1 Click Configuration on the start page 2 Select Other Settings Advanced Configuration on the Configuration page 3 Click Remote Management in the menu on the Advanced Configuration page Figure 37 Remote Management Server Remote connection 1 Click Edit for Remote Connection to set up the connection parameters Figure 38 Connection...

Page 70: ...s to be open 2 Set up the port parameters 3 Click Activate 4 You will be prompt to confirm the change by pressing the mode button 5 Press the mode button on the module 6 Click Activate to save the changes 7 Click the mode button to return to normal mode immediately or wait 10 minutes for the mod ule to return automatically Any secured setting can be activated within the 10 minutes period The modul...

Page 71: ...up a new channel Figure 40 Serial Port Channel One serial port channel for each tool has to be set up Web based configuration tools do not require serial port channels 2 Set up the channel and click Activate A31003 M2000 M105 01 76A9 29 06 2020 Wireless Service Gateway WSG Administrator Documentation 71 ...

Page 72: ...the name of the column in this case Status to sort the list on handset status Search on Handset Status It is possible to search for handsets with selected status 1 Click Configuration on the start page 2 Select WLAN Portables Search in the menu on the Configuration page 3 Enter the optional search parameters Address Number IP Address Hardware ID and Status To view absent portables select All absen...

Page 73: ...OAP Server is xxx xxx xxx xxx OAP Configuration Example The WLAN Interface should be configured to send User Data to the OAP Server 1 Click Configuration on the start page 2 Select Other Settings Advanced Configuration in the menu on the Configuration page 3 Under WLAN Interface click Message Distribution in the menu on the Advanced Configu ration page 4 Select Alarm Figure 41 WLAN Message Distrib...

Page 74: ...e file 3 Click Submit File New services are added to the OAP list on the System Information page The Protocol version in the list shows the currently installed OA XML version The new service will only be shown in System Information if there is a valid license for the service A31003 M2000 M105 01 76A9 29 06 2020 74 Wireless Service Gateway WSG Administrator Documentation ...

Page 75: ...xt when a call diversion takes place By entering the char acter the original call ID will be included in the display text on the place where the character is entered Note that some characters are special characters that are not visible Enable Extended Activity Log Enable Extended Activity Log for intermediate logs Authentication Method The very first time a VoWiFi handset logs in it must authentic...

Page 76: ...er of characters included in the message text Add company logo and or modify the GUI to suit the customer s image The user interface only supports the Latin 1 character set For the best screen appearance Windows standard screen settings using normal font size are recommended The recommend ed screen resolution is 1024 x 768 How to edit The code is thoroughly commented to make it easy to understand ...

Page 77: ...oaded language file there are numerous tags but only the translation of two tags and one attribute are mandatory language id English The id attribute is the text that appears in the drop down list Change English to the name of your translated language here translation Text displayed in menus on buttons tabs etc Translated text can be added in side the tags helptext On line help text Translated tex...

Page 78: ...pp language translations 079 Figure 44 Example of a language file XML Show Pages in Translation Mode All texts buttons menus etc are identified with labels for example TEXT_TRANSLATION_TI TLE With the translation mode function it is possible to view the label for each button menu etc This can be helpful when translating the language file For not losing one s bearings during the translation it is a...

Page 79: ...nd User Interfaces Figure 45 Translation Page Translation page in normal view All the labels on the pages are shown see example below A31003 M2000 M105 01 76A9 29 06 2020 Wireless Service Gateway WSG Administrator Documentation 79 ...

Page 80: ...n page 3 Click the Import Export Language button The Translation page opens 4 Click Browse to locate the translated file and then click the Import button The name of the translated language the language id attribute will appear as a link in the Ex isting Language list and can be downloaded for editing purposes Delete Language File On the Translation page click the icon to the right of the language...

Page 81: ... only that is for this browser window until closed click Temporary Customize the User Interface GUI The module has an FTP area with default 50 MB disk space The disk space can be set in the in terval 5 MB up to 150 MB The free space can be used for storing files and folders for example a customized user inter face for sending messages Change the Size of the FTP Area This is a secured setting and b...

Page 82: ...TP clients 3 Default username is ftpuser and default password is changemetoo xxx xxx xxx xxx is the host name Examples Windows Explorer fill in ftp username password xxx xxx xxx xxx in the address field Firefox fill in ftp xxx xxx xxx xxx in the address field and log on with username and password When secure mode is enabled only secure access via HTTPS and FTPES are allowed HTTP is automatically r...

Page 83: ... html file that can be copied and edited The start page can also be replaced with a completely new user interface Figure 51 Start page default user interface index_template When the edited or new html file is saved as index html and placed in the Start page folder on the module s FTP area it will replace the default start page Upload the Files to the module s FTP Area Upload paste all updated file...

Page 84: ...t it looks all right and that the module opens quick ly If it opens slowly minimize the picture file size and save it as interlaced to decrease wait time for the image Check that all text is correctly translated Check that the phonebook opens and that the entries are correct Send a message Check that the message history status is received and displayed Update the User Interface after a new Release...

Page 85: ...ge 3 Under Select settings select one of the following Keep previous settings means that the settings last used for the software is activated again after the switch This option is only available if the software has been used at least one time before Copy Current settings means that you copy the configuration from the software you are currently using and is only available if both software are of th...

Page 86: ...rrently used This selection will have no effect if the software type is different than the currently used software The module will always start up using factory settings if the software type differs 6 Click the Start Installation button Create a Software Backup It is recommended to now and then create a backup of the software configuration 1 Click Configuration on the start page 2 Select Software ...

Page 87: ...en the module and any devices the firewall may need some configu ration to allow communication See Used IP Ports on page 96 for a description of used ports Unable to Access FTP Area Make sure the client is set in active mode Example for Internet Explorer In the menu select Tools Internet Options Advanced Under Browsing uncheck the Use Passive FTP for firewall and DSL modem compatibility check box ...

Page 88: ...gured and looses packages The LAN is overloaded and looses packages The web server containing the image file is overloaded Erroneous image file Erroneous path to the image file The web server containing the image file is incompatible with the portable Troubleshooting Guide This section lists a number of possible faults probable causes and suggested actions Troubleshooting for the Device Manager Fa...

Page 89: ...arger parameter in the desired Device Manager is pointing to another Device Man ager service discovery or IP ad dress which causes the charger to log out and connect to another Device Manager after completed synchronisation Before connecting the ad vanced charger to the LAN make sure that if the advanced charg er is saved in the desired Device Manager it has parameters that points to the correct D...

Page 90: ...his is due to selected activation time in previous software update i e When idle in charger or Af ter manual restart Restart the device manually and restart the download Software downloads are aborted Wrong file selected for download to devices External web server Make sure that the URL to the desired software is correct and retry Make sure that the file is in tended for that device Low software d...

Page 91: ...uitable for the device The pkg file is provided by the supplier The parameter version is displayed in dark red in the Device Manager GUI The version of the imported p kg files are not 100 compatible with the device Import a pkg file suitable for the device The pkg file is provided by the supplier The parameter ver sion of the Number in the Numbers tab is high er than in the parameter version of th...

Page 92: ...f the advanced charger in the Device Manager Use WinPDM to recon figure the advanced charger so that it will log on to the correct device manager Connect the ad vanced charger to the LAN The handset does not log on to the device manager OTA The Domain ID is not set cor rectly in the IPBS The system does not support service discovery Reconfigure it to match the de vice manager Service Discovery par...

Page 93: ... log settings are set to a de tailed level Change the log settings in Advanced configuration Trou bleshoot System information Several functions of the system does not start There is not a valid license Enter a valid license and restart the module Some IP DECT Base Stations have no contact with the system after a migration from a multiple system to a single sys tem The IP address to has not been se...

Page 94: ...voltage Mode LED Blue Indicates that manual confirmation is required Blue Yellow Status LED Blue Confirmation is done and setting can be activated Secured settings Power Figure 52 Flashing Pattern Demonstration Mode Demonstration Mode is activated by pressing the Mode button for 10 sec onds The module will then run with full functionality for 2 hours it then returns to the configured license If it...

Page 95: ...d detailed information about the system Specify Information to Log Standard debug is set by default but this can be extended and show more details 1 Click System Information in the left menu 2 Enable desired logs and click Activate Send Test Message The Troubleshoot page also includes the possibility to send test messages 1 Click Send Test Message in the left menu 2 Enter Call ID and click Send Me...

Page 96: ...rt protocol 20 21 FTP TCP 53 Domain Name Server DNS UDP 68 DHCP UDP 80 Web traffic HTTP TCP 113 Authentication TCP 123 Network Time Protocol NTP UDP 443 HTTPS TCP 514 Syslog Syslog messages UDP 1321 1322 OAP Server TCP 5891 NetPage TCP 8080 HTTP TCP 10147 DECT Charger Communication TCP 10153 Device Manager Communication TCP A31003 M2000 M105 01 76A9 29 06 2020 96 Wireless Service Gateway WSG Admin...

Page 97: ...ete Delete the selected device s Ctrl F Find a device Ctrl Enter Open the Properties window for the selected device Numbers Shortcut Description Ctrl N Add a new Number Enter Edit the selected Number Ctrl C Copy the selected Number F2 Rename the selected Number Ctrl S Save the selected Number to the database Delete Delete the selected Number from the database Ctrl F Find a Number Templates Shortcu...

Page 98: ...e the selected template Delete Delete the selected template Ctrl F Find a template Licenses Shortcut Description Delete Remove the selected device s from the license view Ctrl F Find a device A31003 M2000 M105 01 76A9 29 06 2020 98 Wireless Service Gateway WSG Administrator Documentation ...

Page 99: ...ible settings for a certain type for a certain version Language file lng or xml Language file for or the module Language file for the module uses XML eXtensi ble Markup Language Package file pkg Archive that can include different file types such as parameter definition files def software files bin and template files tpl Template file tpl Contains one or more exported templates Number file xcp Expo...

Page 100: ...36 color coding 38 Device Manager terminology 36 devices add new device 49 assign a number to device 49 automatic detection of devices 60 delete device 49 device licensing 50 export import licence info 51 import company phonebook files 55 import contacts to handset 47 import language file for devices 55 licence upgrade 51 replace device 49 reset device back to factory settings 50 synchronize devic...

Page 101: ...5 Service discovery 60 Software See Administration Status 22 active faults 22 fault log 24 module fault list 23 Syslog server 28 T Template See Device Manager Time settings 64 Troubleshooting 87 U UNS 62 alias 63 default category 63 operating mode 62 W WLAN 26 handsets 26 change absent status 28 delete a handset 27 force a relogin 27 remove IP address 27 show handset details 27 show registered han...

Reviews: