11
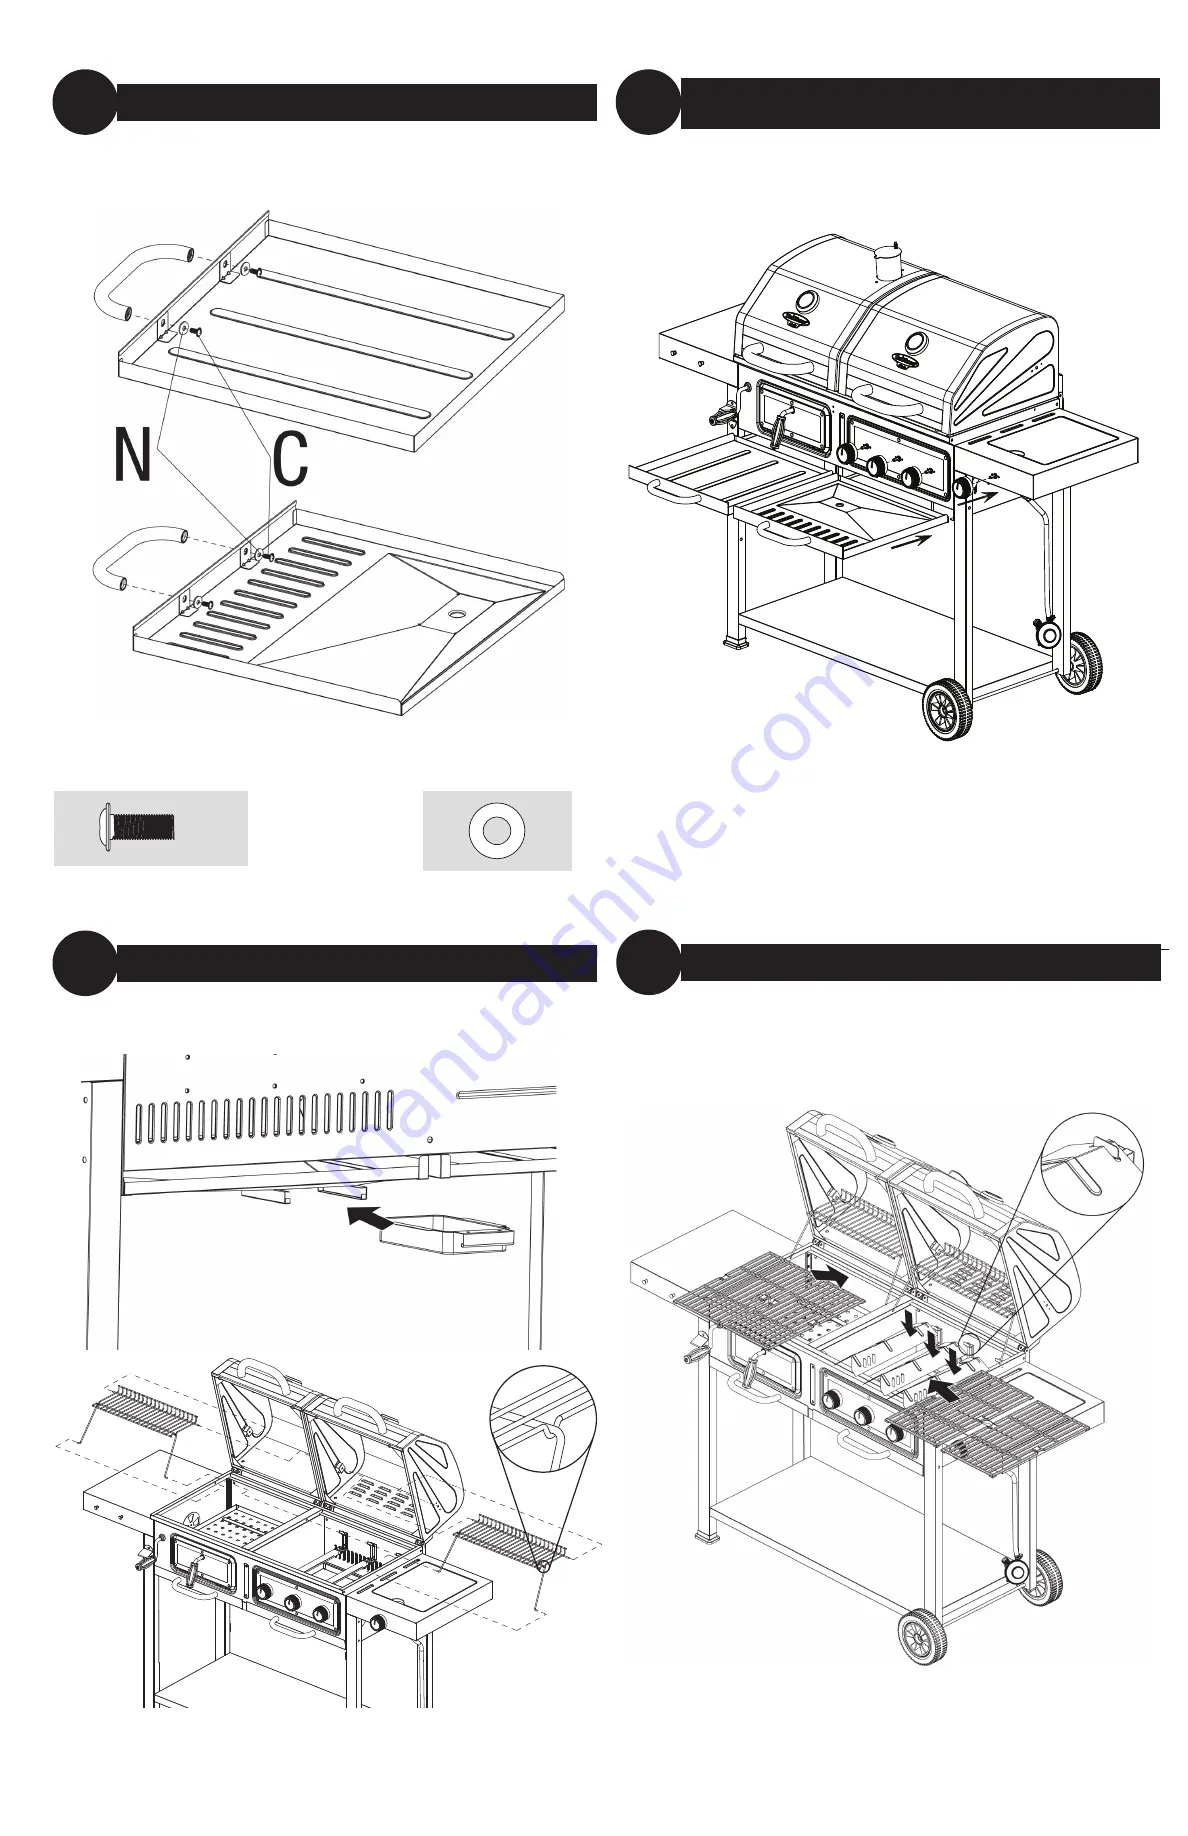
Attach Tray Handles
23
Insert Ash Receiver Tray, Grease Receiver Tray and Control Knobs
24
Insert Grease Cup and Warming Racks
25
Insert Heat Plates and Cooking Grids
26
C
x 4
N
Page 1: ...propane patio gas cylinders Model No GBC1793W U ASDA Spec Code 16B 02 17 041 This barbecue will become very hot do not move it during operation ATTENTION Never operate this appliance unattended If you...
Page 2: ...liance is only suitable for use with low pressure butane or propane gas or LPG mixtures fitted with the appropriate low pressure regulator via a flexible hose This barbecue is supplied with a 27mm pro...
Page 3: ...on W W Do NOT attempt to move grill when in use Allow the grill to cool before moving or storing W W Gas cylinder must be properly disconnected and removed prior to moving this grill W W Storage of gr...
Page 4: ...Washer 6 5x18 Nickel Plated 16 pcs O Lock Washer 8 5 Nickel Plated 1 pc P Spring 1 pc Parts List 1 Smoke Stack Top 2 Smoke Stack 3 Lid Handle 2 4 Temperature Gauge 2 5 Brand Plate Charcoal 6 Brand Pl...
Page 5: ...PANE 1 Leak detection solution instructions on how to make the solution are included in the Operating Instructions section of this manual not included PROPANE 1 precision filled gas cylinder between 1...
Page 6: ...eld and Front Heat Plate Support 6 Attach Gas Manifold Regulator Hose Assembly Charcoal Door Handle and Charcoal Door Handle Support 5 Attach Left Panel and Right Panel 8 Attach Gas Heat Shield 7 A x...
Page 7: ...7 Attach Receiver Tray Support 9 Attach Feet Legs and Bottle Opener 10 Insert Axle and Attach Wheels 12 Attach Bottom Shelf 11 C x 2 C x 2 F x 8 N x 8 C x 4 L x 2 S x 2...
Page 8: ...8 Attach Bottom Hinges 13 Attach Charcoal Pan 14 E x 8 C x 4 R x 2 Q x 1...
Page 9: ...arcoal Pan Handle Side Air Vent and Lighting Rod 15 Attach Igniter Wires and Burners 16 Attach Igniter Cap 17 Attach Left Side Shelf and Tool Holders Hardware H 18 B x 3 D x 1 C x 1 I x 1 J x 1 R x 3...
Page 10: ...10 Attach Right Side Shelf 19 Attach Side Burner Valve 20 Insert Side Burner Igniter Wire and Side Burner Grid 21 Attach Lid 22 A x 2 A x 2 R x 4 Q x 4 G x 4...
Page 11: ...11 Attach Tray Handles 23 Insert Ash Receiver Tray Grease Receiver Tray and Control Knobs 24 Insert Grease Cup and Warming Racks 25 Insert Heat Plates and Cooking Grids 26 C x 4 N x 4...
Page 12: ...p on compact to a cylinder valve 1 Connect regulation rubber hose to the barbed stem on the regulator Tip Lubricate the barbed stem with water to help connect the regulator hose to the regulator 2 Use...
Page 13: ...tion and proceed Operating Main Burners First Use 1 Make sure all labels packaging and protective films have been removed from the grill 2 Remove manufacturing oils before cooking on this grill for th...
Page 14: ...low to the burners Spiders insects and webs can clog the burner venturi tube A clogged burner tube can lead to a fire 3 Control knob must be in the OFF position Figure 3 4 Connect gas cylinder per Ins...
Page 15: ...and Care Before Each Use 1 Keep the grill area clean and free from any combustible materials gasoline and other flammable vapors and liquids 2 Do NOT obstruct the flow of the combustion of LP gas and...
Page 16: ...Clean all surfaces 5 Lightly coat the burner s and cooking grid s with cooking oil to prevent excess rusting 6 If storing the grill indoors disconnect the gas cylinder per Disconnecting Gas Cylinder...
Page 17: ...Exchange refill or replace gas cylinder Overfilling prevention device may have been activated 1 Turn control knobs to OFF 2 Wait 30 seconds and light grill 3 If flames are still too low reset the over...