11
A
Secure Right Side Shelf
13
14
Attach Side Burner Valve and Control Knob Bezel
Attach Control Knobs
16
15
Attach Side Burner, Side Burner Grid and Igniter Wire
C
x 4
x 2
Page 1: ...d the following instructions carefully and be sure your barbecue is properly installed assembled and cared for Failure to follow these instructions may result in serious bodily injury and or property damage FOR YOUR SAFETY For Outdoor Use Only Outside any enclosure Never operate this appliance unattended Keep children and pets away This barbecue will become very hot do not move it during operation...
Page 2: ... to or attempted use of natural gas is dangerous W The gas cylinder regulator and hose must be approved W Regulator and hose a These items are supplied with the barbecue but replacements are available from your equipment retailer or an authorized LPG gas stockist Use only regulators and hose approved for Gas at the above pressures The life expectancy of the regulator is estimated as 10 years It is...
Page 3: ...m a leak test before lighting the grill and each time the cylinder is connected for use b No smoking Do NOT use or permit sources of ignition in the area while conducting a leak test c Conduct the leak test outdoors in a well ventilated area d Do NOT use matches lighters or a flame to check for leaks e The use of alcohol prescription or non prescription drugs may impair the consumer s ability to p...
Page 4: ...thing on the grill while the appliance is in operation W Do NOT attempt to move grill when in use Allow the grill to cool before moving or storing W Gas cylinder must be properly disconnected and removed prior to moving this grill W Storage of grill indoors is permissible only if the cylinder is disconnected removed from the grill and properly stored outdoors W Always open grill lid carefully and ...
Page 5: ...ble adult W Death serious injury or damage to property may occur if the above is not followed exactly Specifications Approvals 0359 19 Pin 0359CR01461 Barbecue Appliance Category I3 I3BP 30 Weight 46 2 kg 102 lbs Dimensions L x W x H 142cm x 56cm x 117 4cm Grilling surface L x W 77cm x 42cm Load weight Side shelf Side burner table Max 15 kg Max 15 kg Gas System Heat quantity Main burner Side burne...
Page 6: ...6 1 16 27 28 17 20 14 3 9 4 5 10 11 21 22 24 8 29 2 18 15 19 23 7 12 13 6 26 25 11 33 34 31 Expanded View 12 32 30 35 36 36 37 37 26 ...
Page 7: ... 2 B0204 040 23 Rotisserie Handle G1273 020 24 Rotisserie Counterweight B0204 070 25 Rotisserie Rod GR100 020 26 Cooking Griddle C4124 010 27 Front Cart Frame G1762 080 28 Rear Cart Frame G1762 090 29 Left Cart Frame G1762 100 30 Left Door G1768 040 31 Base G1768 050 32 Right Door G1768 060 33 Lighting Rod B0223 D04 34 Right Cart Frame G1762 110 35 Magnet G1762 120 36 Locking Caster 2 B0302 A01 37...
Page 8: ...cracks or openings 2 Spread out all parts 3 Tighten all hardware connections by hand first Then before completing each step go back and fully tighten all hardware Be careful not to over tighten That could damage surfaces or strip threads 4 For best results complete each step in the order presented To complete assembly you will need 1 Leak detection solution instructions on how to make the solution...
Page 9: ...9 Attach Front Cart Frame 5 Attach Magnet 6 8 Attach Doors 7 Attach Temperature Gauge A x 2 G x 2 A G ...
Page 10: ...ssembly 9 12 11 Attach Left Side Shelf C Secure Left Side Shelf Attach Right Side Shelf C D F E C C x 4 E x 4 F x 4 C C x 2 Note Leave 5 mm of bolt threads exposed C C x 4 Note Leave 5 mm of bolt threads exposed C C x 2 C 1 2 3 ...
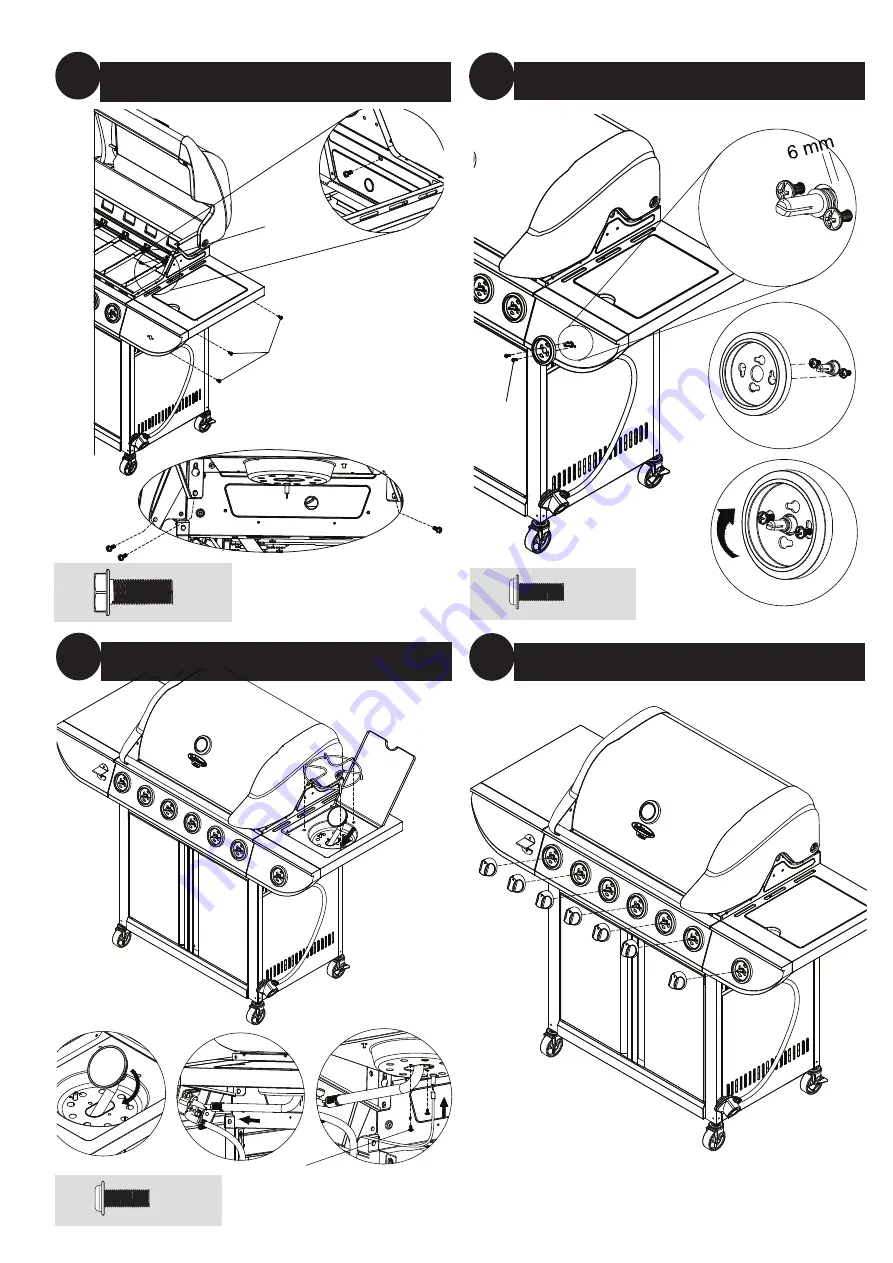
Page 11: ...11 A Secure Right Side Shelf 13 14 Attach Side Burner Valve and Control Knob Bezel Attach Control Knobs 16 15 Attach Side Burner Side Burner Grid and Igniter Wire C x 4 A x 2 A x 2 C C A ...
Page 12: ...12 Insert Heat Plate and Cooking Grid 18 17 Insert Grease Tray and Grease Cup Insert Warming Rack 19 Place and Replace Cooking Griddle 20 1 2 ...
Page 13: ...sserie Rod Insert D Batteries Not Included Assembly Instructions Rotisserie D x 2 E x 2 F x 2 x 2 B x 2 B E F D Insert Rotisserie Rod 4 Attach Rotisserie Motor Support and Rotisserie Motor 3 2 1 Remove Warming Rack 1 2 ...
Page 14: ...lator identification label The Snap on compact can be fitted to any cylinders equipped with automatic valves having a diameter as indicated on the regulator W CAUTION The gas cylinder must always be used in the upright position W CAUTION Whenever used outdoors the snap on compact should be protected against rain W CAUTION Never use a flame to look for leaks do it using a soap solution W CAUTION In...
Page 15: ...er 5 Place regulator onto the automatic valve on the gas cylinder Push down firmly and vertically Figure B 6 You should hear a click sound when the regulator is securely latched W CAUTION Never attempt to connect regulator when the regulator valve is not in the OFF position Operating Regulator 1 To turn regulator ON turn the regulator valve handle clockwise into the the ON position Figure D 2 To t...
Page 16: ...and 4 a If any bubbles appear turn the regulator valve clockwise into the the OFF position Figure C b If you continue to see bubbles after several attempts turn gas cylinder valve to OFF and disconnect gas cylinder per Disconnect Gas Cylinder section Contact 0800 9520101 for assistance c If no bubbles appear after one minute turn gas cylinder valve to CLOSED wipe away solution and proceed Operatin...
Page 17: ...e regualtor and repeat Connect Gas Cylinder section W CAUTION If burner flame goes out during operation immediately turn the control knobs to the OFF position Gas cylinder valve OFF and open lid to let the gas clear for 5 minutes before re lighting Figure 6 Burner Flame Slight Yellow Slight Blue Dark Blue Flare ups are a part of cooking meats on a grill and add to the unique flavor of grilling Exc...
Page 18: ...s normal as the last of the LP gas is burned 3 Disconnect gas cylinder per Disconnecting Gas Cylinder section Cooking 1 Open lid and ignite the side burner per Lighting instructions 2 Adjust control knob to desired flame height 3 Place pan on center of grid 4 Cook and adjust temperature as needed 5 Turn grill off per Turning Off instructions Operating Rotisserie W WARNING Basic safety precautions ...
Page 19: ...e middle of the meat and evenly attach to the prongs of the rotisserie fork Figure 10 5 Attach second rotisserie fork onto rod and insert prongs into meat Tighten rotisserie forks Figure 11 6 Insert rotisserie rod into motor and place other end of rod into grooves on bottom bowl Figures 12 and 13 7 Turn rotisserie motor ON to test meat placement Note Heavy side of meat should rotate down towards t...
Page 20: ...xed with water 2 For stubborn surfaces use a citrus based degreaser and a nylon scrubbing brush 3 Rinse clean with water 4 Allow to air dry Cleaning Main Burners 1 Turn the regulator valve handle counterclockwise into the the OFF position Figure C 2 Turn all control knobs clockwise to the OFF position Note A poof sound is normal as the last of the gas is burned 3 Disconnect gas cylinder per Discon...
Page 21: ...ing Gas Cylinder section 7 Place the protective cap cover on the gas cylinder and store the tank outdoors in a well ventilated area out of direct sunlight 8 If storing the grill indoors cover the grill and store in a cool dry place 9 If storing the grill outdoors cover the grill with a grill cover for protection from the weather Refund information 28 day no quibble refund If you re not delighted b...
Page 22: ... or replace gas cylinder Overfilling prevention device may have been activated 1 Turn control knobs to OFF 2 Wait 30 seconds and light grill 3 If flames are still too low reset the overfilling prevention device a Turn control knob s OFF b Turn Gas cylinder valve to CLOSED c Disconnect regulator d Turn control knobs to HIGH e Wait 1 minute f Turn control knobs to OFF g Reconnect regulator and leak ...