Uniden TRU 8860 Series Owner'S Manual Download Page 65

P R E C A U T I O N S   &   W A R R A N T Y   [ 6 4 ]

w w w . u n i d e n . c o m

Finally, it should be noted that some cordless telephones operate at 
frequencies that may cause interference to nearby TVs and VCRs. To 
minimize or prevent such interference, the base of the cordless 
telephone should not be placed near or on top of a TV or VCR. If 
interference is experienced, moving the cordless telephone farther away 
from the TV or VCR will often reduce or eliminate the interference.

Cordless Telephone Privacy

Cordless telephones are radio devices. Communications between the 
handset and base of your cordless telephone are accomplished by means 
of radio waves which are broadcast over the open airways.
Because of the inherent physical properties of radio waves, your 
communications can be received by radio receiving devices other than 
your own cordless telephone unit. Consequently, any communications 
using your cordless telephone may not be private.

One Year Limited Warranty

Important: Evidence of original purchase is required for warranty service.
WARRANTOR: UNIDEN AMERICA CORPORATION ("Uniden") ELEMENTS OF 
WARRANTY: Uniden warrants, for one year, to the original retail owner, 
this Uniden Product to be free from defects in materials and 
craftsmanship with only the limitations or exclusions set out below.

WARRANTY DURATION: This warranty to the original user shall terminate 
and be of no further effect 12 months after the date of original retail 
sale. The warranty is invalid if the Product is (A) damaged or not 
maintained as reasonable or necessary, (B) modified, altered, or used as 
part of any conversion kits, subassemblies, or any configurations not 
sold by Uniden, (C) improperly installed, (D) serviced or repaired by 
someone other than an authorized Uniden service center for a defect or 
malfunction covered by this warranty, (E) used in any conjunction with 
equipment or parts or as part of any system not manufactured by Uniden, 
or (F) installed or programmed by anyone other than as detailed by the 
owner's manual for this product.
STATEMENT OF REMEDY: In the event that the product does not conform 
to this warranty at any time while this warranty is in effect, warrantor 
will either, at its option, repair or replace the defective unit and return it 
to you without charge for parts, service, or any other cost (except 
shipping and handling) incurred by warrantor or its representatives in 
connection with the performance of this warranty. Warrantor, at its 
option, may replace the unit with a new or refurbished unit. THE LIMITED 
WARRANTY SET FORTH ABOVE IS THE SOLE AND ENTIRE WARRANTY 
PERTAINING TO THE PRODUCT AND IS IN LIEU OF AND EXCLUDES ALL 
OTHER WARRANTIES OF ANY NATURE WHATSOEVER, WHETHER EXPRESS, 
IMPLIED OR ARISING BY OPERATION OF LAW, INCLUDING, BUT NOT 
LIMITED TO ANY IMPLIED WARRANTIES OF MERCHANTABILITY OR FITNESS 
FOR A PARTICULAR PURPOSE. THIS WARRANTY DOES NOT COVER OR 
PROVIDE FOR THE REIMBURSEMENT OR PAYMENT OF INCIDENTAL OR 
CONSEQUENTIAL DAMAGES. Some states do not allow this exclusion or 
limitation of incidental or consequential damages so the above limitation 
or exclusion may not apply to you.

LEGAL REMEDIES: This warranty gives you specific legal rights, and you 
may also have other rights which vary from state to state. This warranty 
is void outside the United States of America and Canada.

PROCEDURE FOR OBTAINING PERFORMANCE OF WARRANTY: If, after 
following the instructions in the owner's manual you are certain that the 
Product is defective, pack the Product carefully (preferably in its original 
packaging). Disconnect the battery from the Product and separately 
secure the battery in its own separate packaging within the shipping 
carton. The Product should include all parts and accessories originally 
packaged with the Product. Include evidence of original purchase and a 
note describing the defect that has caused you to return it. The Product 
should be shipped freight prepaid, by traceable means, to warrantor at: 

Uniden America Service

4700 Amon Carter Blvd.

Fort Worth, TX 76155

PREC

A
U
TIONS

 &


W
A
RRANTY

Summary of Contents for TRU 8860 Series

Page 1: ...TRU 8860 SERIES OWNER S MANUAL...

Page 2: ...ce Mail Access 38 PHONEBOOK 39 Phonebook Storing Phone Numbers Names Distinctive Rings and Speed Dial 39 Editing or Erasing a Phonbook Entry 45 Copying Phonebook Entries 46 CALLER ID 47 Caller ID and...

Page 3: ...ay differ from the actual unit for explanation purposes As an Energy Star Partner Uniden has determined that this product or product models meets the Energy Star guidelines for energy efficiency Energ...

Page 4: ...han standard digital transmissions The result is a more secure conversation with the clarity of digital sound extended range and minimal interference from other cordless phones IntegriSound Built in s...

Page 5: ...isplay 8 soft Keys P 8 9 cid vol volume up P 48 34 18 10 redial p vol volume down P 34 32 21 35 11 tone P 36 41 12 speaker P 31 13 intcom hold P 54 33 14 Headset Jack Cover 15 talk flash P 32 33 16 en...

Page 6: ...23 24 25 26 27 22 22 Base Charging Contacts 23 Base Antenna 24 Charge LED 25 find handset P 56 26 DC IN 9V Jack 27 TEL LINE Jack C O F U...

Page 7: ...dicates that ringer is turned off Talk The Mute icon appears when you mute the handset Talk The Speaker icon appears when the handset speaker phone is used Talk The Privacy icon appears when the Priva...

Page 8: ...ing up the phone Confirmation Done Deleting Deleted Making a call Find Handset Paging the Handset Also the animation display changes depending on the ringer volume setting Out of Range Unavailable Low...

Page 9: ...edit phone numbers Access Voice mail waiting The function of each soft key is determined by the icon that appears directly above it For example when the handset is in standby mode pressing soft key 2...

Page 10: ...s not connected to a switch The base and handset should be kept away from sources of electrical noise such as motors microwave ovens and fluorescent lighting For better reception place the base as hig...

Page 11: ...lack wires is near the jack inside the battery compartment Match the connector s wire colors to the polarity label in the battery compartment the connector notches fit into the grooves of the jack onl...

Page 12: ...does not illuminate check to see that the AC adapter is plugged in and the handset makes good contact with the base charging contacts 4 After install the battery pack in the handset charge your handse...

Page 13: ...NE jack 4 Slide the wall mount adapter into the notches on the base 5 Plug the AC adapter into a standard 120V AC wall outlet Hook the cord on the notch of the wall mount adapter 6 Plug the telephone...

Page 14: ...hone jack to avoid excessive lengths Make sure the wall material is capable of supporting the weight of the base and handset Use 10 screws minimum length of 1 3 8 inches with anchoring devices suitabl...

Page 15: ...mong 2 handsets and an outside line All of handsets ring when a call is received Backwards Forwards Compatibility Your phone is compatible with other Uniden 5 8GHz Digital Expandable Handsets Compatib...

Page 16: ...harger on a desk or tabletop and place the handset in the charger with the keypad facing forward See B Install the rechargeable battery pack into the handset on page 10 Charge the handset battery pack...

Page 17: ...set is registered the battery pack MUST be charged for 15 hours To register TCX805 simply place it in the main base While the handset is registering Handset Registering will appear in the LCD When Reg...

Page 18: ...ne features The table below lists the default settings Function Default Settings Function Default Settings Edit Voice Mail None Day Time SUN 12 00 AM Ringer Volume High CW CWDX CW on CWDX off Ringer T...

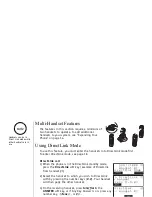
Page 19: ...Link Mode allows two handsets to communicate with each other without the base unit or a telephone line Use them at sporting events or while shopping to stay in contact with family members or friends Y...

Page 20: ...Press the MENU soft key and select the Room Monitor menu 2 Select the handset you want to monitor by using cid vol or redial p vol 3 Press the OK soft key Monitoring appears and you hear sounds in the...

Page 21: ...e number keypad 0 9 tone the DELETE soft key or redial p vol up to 20 digits 3 Press the OK soft key You will hear the confirmation tone To delete the current Voice Mail Access Number delete all numbe...

Page 22: ...yes Are Smiling Irish Eyes Aura Lee Let Me Call You Sweet Heart Sweetheart Star Spangled Banner Star Spngl Old MacDonald Old MacDld You must set the separate ringer tone on each handset 1 Press the ME...

Page 23: ...You can assign distinctive rings to multiple phonebook memory locations Switching the setting to Distinctive Off disables distinctive ringing all incoming calls will have a normal ring tone Switching...

Page 24: ...p vol to select On or Off 3 Press the OK soft key You will hear a confirmation tone Setting the Anykey Answer Any Key Answer allows you to answer the phone by pressing any number key tone or on the ha...

Page 25: ...and then the Banner submenu 2 Use the number keypad 0 9 tone or the DELETE soft key to enter or edit the name 3 Press the OK soft key You will hear a confirmation tone Selecting a Language Language se...

Page 26: ...the LCD 10 levels 3 Press the OK soft key You will hear a confirmation tone Setting the Key Touch Tone Key Touch Tone is the tone your keypad makes when keys are pressed You can turn this tone on or o...

Page 27: ...ting when you hang up and so on 1 Press the MENU soft key Select the Handset Setup menu and then the Animation Screen submenu 2 Press cid vol or redial p vol to select On or Off 3 Press the OK soft ke...

Page 28: ...he Day Time submenu option 2 Press cid vol or redial p vol to select the day of the week and then the soft key 3 Press cid vol or redial p vol to set hour and then press the soft key 4 Press cid vol o...

Page 29: ...Setting the Area Code If you enter a 3 digit area code number in the Area Code option your local area code does not appear in the Caller ID message For calls received from outside your local area code...

Page 30: ...situations during a call you can switch over to tone dialing refer to Tone Dialing Switch over on page 36 1 Press the MENU soft key Select the Global Setup menu and then the Dial Mode submenu 2 Press...

Page 31: ...ital security code see page 56 1 In standby mode select Deregister HS in the menu and press the OK soft key Deregister HS appears 2 Press cid vol or redial p vol to select Yes and then the OK soft key...

Page 32: ...during hands free conversations You can easily switch a call from normal conversation to hands free conversation To switch a call press speaker during the call 6CNM 76 07 For best performance talk alt...

Page 33: ...dle 1 Press speaker 2 Listen for the dial tone 3 Dial the number OR Dial the number and then press speaker To hang up Press end or return the handset to the cradle AutoStandby To enter a pause within...

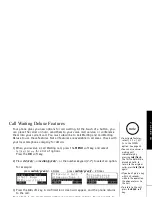
Page 34: ...inutes has passed the call is disconnected and the phone returns to standby mode 1 During a call press intcom hold The call will be put on hold If you leave a call on hold for more than 10 seconds the...

Page 35: ...U soft key then select the redial menu Press cid vol or redial p vol to select the number you want to dial Press the DIAL soft key to redial the number Deleting a Redial Record 1 With the phone in sta...

Page 36: ...lect from among six volume levels on the handset Pressing the volume up key or volume down key during a call will change the earpiece or speaker volume This setting will remain in effect after the tel...

Page 37: ...re is useful when you need tone dialing to use any automated menu systems such as telephone bank tellers telephone prescription refills customer support menus etc If your phone is set to pulse dialing...

Page 38: ...on from other registered handsets This works only when the phone is in use 1 Press the MENU soft key on the handsets during talk mode 2 Press cid vol or redial p vol to select Privacy Mode and then th...

Page 39: ...See page 20 Dialing your Voice Mail Service Once you ve programmed your personal access number you can dial your mailbox with the touch of a button When you have messages simply press If you have not...

Page 40: ...k entries You will have to delete some of the Caller ID messages before you can store a new phonebook entry 1 When the phone is in standby mode press phonebook The following items appear 2nd line The...

Page 41: ...the OK soft key You will hear a confirmation tone and Done appears in the display Chain Dialing The phonebook entries in the handset are not limited to phone numbers You can also store a group of num...

Page 42: ...the number keys to select the desired characters With each press of a number key 0 9 the displayed character appears in the following order Upper case letters first lower case letters next and finally...

Page 43: ...ss 4 six times 6 Press 3 five times 7 Press 7 eight times 8 When finished press the OK soft key To continue to store the telephone number proceed to step 5 in Phonebook Storing Phone Numbers Names Dis...

Page 44: ...honebook entries Phonebook entries appear in alphabetical order from first to last when you press redial p vol from last to first when you press cid vol You can also use the letters on the number keys...

Page 45: ...ess talk flash or speaker 2 Select the phonebook entry you want to dial see Viewing the Phonebook on page 43 3 Press the DIAL soft key The number in the displayed phonebook location is dialed 4 To han...

Page 46: ...dit Store Edit Name appears 2 Follow the steps 3 to 7 under Phonebook Storing Phone Numbers Names Distinctive Rings and Speed Dial on page 39 40 to complete the editing operation 3 Press the OK soft k...

Page 47: ...e OK soft key 4 Press cid vol or redial p vol to select One Memory or All Memories and then press the OK soft key If you select All Memories Are you sure appears on the display screen Press cid vol or...

Page 48: ...00 entries for each handset Caller ID messages are not stored when you have 100 phonebook entries When you have stored a total of 100 phonebook entries and Caller ID messages the oldest Caller ID mess...

Page 49: ...iew the Caller ID list through the handset during a call or when the phone is in standby mode 1 With the phone in standby mode press cid vol Or with the phone in talk mode press the MENU soft key Use...

Page 50: ...t key or talk flash during a call Deleting a Caller ID Message Deleting Information from the Caller ID List 1 When the phone is in standby mode view the Caller ID information to be deleted see Viewing...

Page 51: ...Calling a party from the Caller ID list Standby mode 1 When the phone is in standby mode select the Caller ID message see Viewing the Caller ID List on page 48 2 To have the phone dial a 1 before the...

Page 52: ...oft key Store Edit Name appears If the Caller ID message is already stored in memory you will hear a beep and This data is already stored appears The number will not be stored 2 To complete the settin...

Page 53: ...Press cid vol or redial p vol or the number keypad 1 7 to select an option For example press redial p vol 4 times press redial p vol 2 times 3 Press the OK soft key A confirmation screen will appear a...

Page 54: ...the DirectLink standby mode press the DirectLink soft key example of DirectLink from handset 1 2 Select the handset to which you wish to DirectLink with by pressing the number keys 0 9 Your handset w...

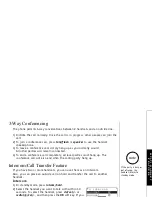
Page 55: ...all local parties must hang up The conference call will also end when the calling party hang up Intercom Call Transfer Feature If you have two or more handsets you can use them as an intercom Also yo...

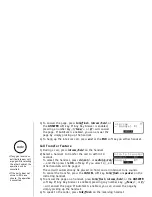
Page 56: ...The call will automatically be placed on hold and an intercom tone sounds To cancel the transfer press the CANCEL soft key talk flash or speaker on the initiating handset 3 To answer the page on a han...

Page 57: ...age 30 2 Register the handsets by following step 2 3 in Registering the Handset on page 16 Find Handset To locate the handset press find handset on the base when the phone is in standby mode All regis...

Page 58: ...ime becomes short even after a battery is recharged please replace the battery With normal usage your battery should last about one year Please contact your place of purchase or the Uniden Parts Depar...

Page 59: ...good charge it is important to clean the charging contacts on the handset once a month Using water only dampen a cloth to clean the charging contacts Then make sure to go back over the charging contac...

Page 60: ...e your phone on a regular basis by returning the handset to the base after each phone call When the operating time becomes short even after the battery is recharged please replace the battery With nor...

Page 61: ...oth ends of the base telephone line cord Make sure the AC adapter is plugged into the base and wall outlet Disconnect the AC adapter for a few minutes and then reconnect it De register the handset see...

Page 62: ...he battery pack for 15 20 hours De register the handset see De register the Handset on page 30 and register the handset see Register the Handset on page 16 The handset doesn t communicate with other h...

Page 63: ...battery pack disconnected for at least 3 days 3 Once the handset is completely dry reconnect the battery pack and the battery cover 4 Recharge the handset s battery pack for 20 hours before using Base...

Page 64: ...5 0 To be certain of the number of devices that may be connected to a line as determined by the total RENs contact the local telephone company For products approved after July 23 2001 the REN for thi...

Page 65: ...someone other than an authorized Uniden service center for a defect or malfunction covered by this warranty E used in any conjunction with equipment or parts or as part of any system not manufactured...

Page 66: ...ed to each terminal equipment provides an indication of the maximum number of terminals allowed to be connected to a telephone interface The termination on an interface may consist of any combination...

Page 67: ...13 14 15 16 17 18 19 20 21 22 23 24 25 26 27 35 36 37 38 39 40 41 42 43 44 45 46 47 48 49 50 51 52 53 54 55 56 57 58 59 60 61 Name Phone No 69 70 71 72 73 74 75 76 77 78 79 80 81 82 83 84 85 86 87 88...

Page 68: ...e volume 35 Expanding your phone 14 G General information 59 Global Setup 27 H Hands free conversation 31 Headset installation 57 Hold 33 I I C notice 65 Important safety instructions 63 Intercom 54 K...

Page 69: ...KVQT CPFUGV 5GVWR 1 6Q GPVGT KTGEV KPM OQFG RTGUU 06 4 06 4 CPFUGV CPFUGV CPFUGV CPFUGV CPFUGV CPFUGV CPFUGV KUVGP VQ CPFUGV CPFUGV 1 0 5 6 5 672 FKV 8QKEG CKN 4KPIGT 8QNWOG QPVTCUV G 6QWEJ 6QPG PKOCV...

Page 70: ...KCN QFG 8QKEG CKN 6QPG C 6KOG 1 5 672 1 CPFUGV 5GVWR NQDCN 5GVWR GTGIKUVGT 5 1 GTGIKUVGT 5 GU 0Q 1 GTGIKUVTCVKQP QORNGVG 1 or or OK 4QQO QPKVQT CPFUGV 5GVWR NQDCN 5GVWR 1 OK OK M A I N M E N U F L O W...

Page 71: ...holidays Need a Part To order headsets additional handsets replacement batteries or other accessories visit our website at www uniden com or call 1 800 554 3988 Mon Fri 8 a m to 5 p m CST Help for ou...

Page 72: ...U FOR BUYING A UNIDEN PRODUCT 2005 Uniden America Corporation Fort Worth Texas Contains additional foreign articles Custom manufactured in China REGISTER ONLINE TODAY FO R A CCESSO R IES G O O N LIN E...

Reviews: