background image

16

UNIDEN iGO CAM 750

Vehicle Recorder

Ensure that the PC is connected to the internet to view the map screen.

View the Recorded Files

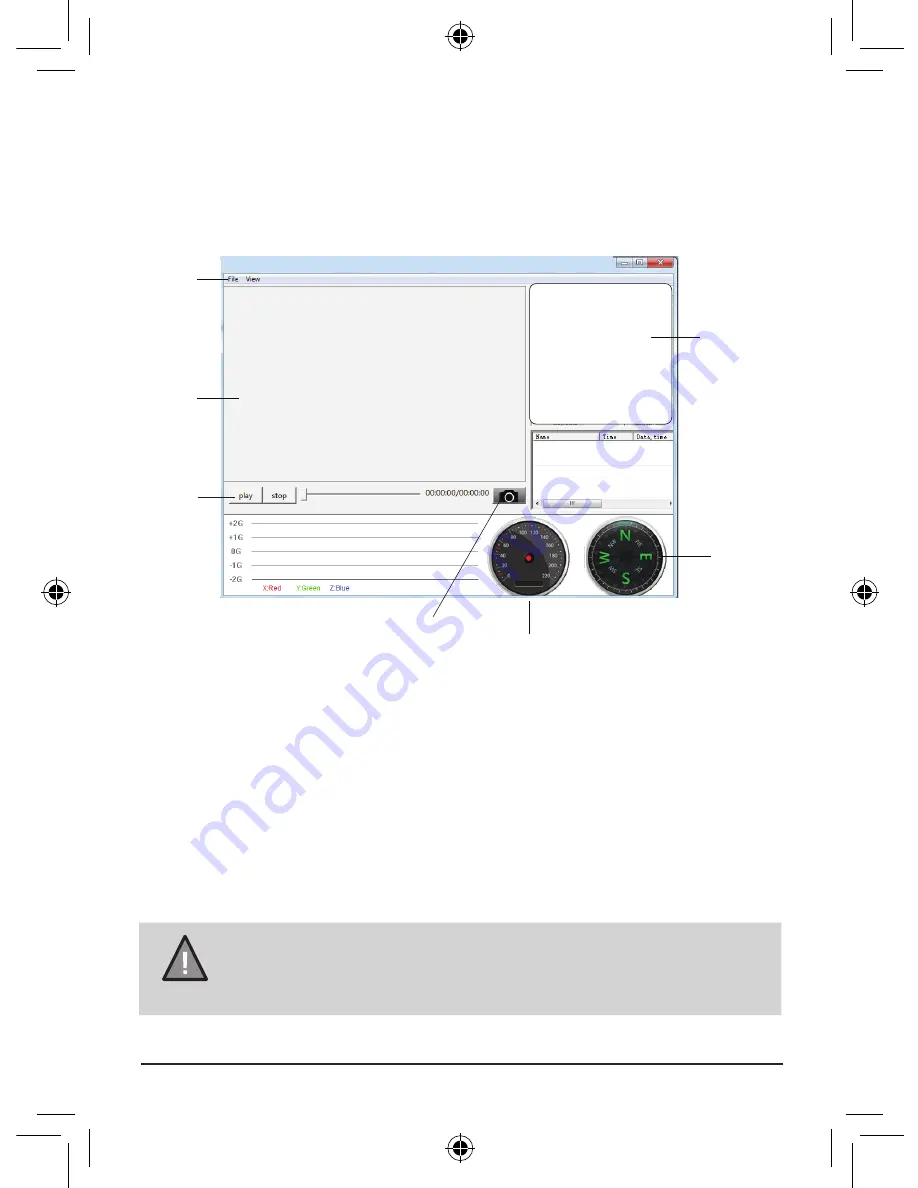
To view the recorded files on the iGO CAM Player, follow the steps below:

1. Start the iGO CAM Player (i.e., double click on the iGO CAM Player icon).

2. Click on the option File and select Open to open the files on


    to the iGO CAM Player. 

3. Click on the PLAY button (Playback Controls) to start playback. 


Video 

Playback 

Screen

Map 

Screen

Compass

Playback 

Controls

Menu

Speed

Snap Shot

NOTE

GPS Player version is subject to change without notice. See 

Uniden website to download the latest GPS Player.

Click on the ‘Snap Shot’ icon to take photos of the recording. These photos 

will automatically save into a folder named ‘screenshot’. This folder is located 

in the GPS Player folder stored in your PC.

Summary of Contents for iGO CAM 750

Page 1: ...iGO CAM 750 Accident CAM Vehicle Recorder For more exciting new products please visit our website Australia www uniden com au New Zealand www uniden co nz ...

Page 2: ...e deployment of any airbags NOTE Keep your attention on the road Don t try to operate or focus on any device while driving If you have to concentrate on a device pull off the road for a few minutes NOTE Ensure that the camera lens is kept clean and there is nothing blocking the lens NOTE Don t leave the device in direct sunlight for a long period of time or where the temperature could go above 60 ...

Page 3: ...ols Indicators 5 How Do I Put It in My Car 7 Attaching the Windshield Mount 7 Operation 8 Micro SD Card 8 Plug it in Power On Off 9 Video Mode 10 Photo Mode 13 Playback Mode 14 Connecting to a PC 15 iGO CAM Player 15 Special Features 17 Important Information 19 Warranty 20 3 UNIDEN iGO CAM 750 Vehicle Recorder ...

Page 4: ...r If any item is missing or damaged contact your place of purchase immediately Never use damaged products Need help Get answers at our website www uniden com au for Australian model www uniden co nz for New Zealand model Owner s Manual Windshield Mount iGO CAM 750 HDMI Cable USB Cable iGO CAM Player software CD ...

Page 5: ...his button to manually lock the files 2 MENU In standby open the Menu 3 Power Function varies with different screens modes Press and hold to either switch on or off the unit While recording press to turn on or off the audio At other times press to turn on off or auto detect the IR light UNIDEN iGO CAM 750 5 Vehicle Recorder 1 2 3 4 5 6 7 8 9 10 11 12 13 14 15 ...

Page 6: ...onfirm a selection in the Menu Press to confirm a change in the settings 7 Micro SD Card Slot Use this slot to insert the micro SD card 8 HDMI HDMI output Connect using an HDMI cable 9 Reset If the device fails to operate properly try resetting the device Press the reset button by using a fine pen or paperclip 10 Mic Records Sound 11 AV Out Connects to an external device 12 CAM Camera Lens 13 USB ...

Page 7: ...re 6 To remove the unit press the lever at the back of the windshield mount and gently pull the unit out It maybe a good idea to secure the power cord with cable clips so that it does not interfere while driving The unit can be rotated to 180 to the left and right However avoid rotating the unit at 360 as it might damage the cabling inside SLIDE LOCK 1 Slide the bracket hook into the bracket slot ...

Page 8: ... the micro SD card before using it so as to avoid any damage to the files created on iGO CAM 750 Uniden recommends using good quality micro SD cards Operation 8 Vehicle Recorder UNIDEN iGO CAM 750 Battery Information The unit has an in built battery of 180mAh capacity The iGOCAM 750 is designed mainly for in vehicle use drawing on vehicle power and the duration of portable use is limited by the se...

Page 9: ...is turned off the unit will automatically turn off To manually turn the unit on or off press and hold the POWER button for 2 3 seconds The GPS icon on the screen flashes red when the unit hasn t detected the GPS signal glows blue when the unit has detected the GPS signal NOTE Only use the DC car adaptor that comes with your device Any other adaptor might damage the device Full Half full Low Empty ...

Page 10: ...hand of the screen indicating that the unit is recording To stop recording press OK and the red dot disappears indicating that the recording has stopped Recording Protect the Current Recording While recording if you want to protect the current recordings then press the MODE button the icon will appear on the screen This indicates that those recordings have been locked and will not be overwritten b...

Page 11: ...ne Assist This option will alert you when the vehicle is moving into another lane Line Calibration The Lane Assist feature requires correct calibration to capture road markings Adjust the sensor lines to encompass only the area of the display where road markings can be seen see page 18 for details Click the Menu button again for the following settings to be displayed Anti Flicker Change depending ...

Page 12: ... light conditions Volume Increase or decrease the volume Key Tone Enable or disable this feature to sound a tone or go mute when you press the keys G Sensor This functions helps protect lock video files in case of a sudden movement collision You can change the sensitivity level of the G sensor LCD Off Enable to automatically turn off the LCD GPS Enable or disable the GPS signal Alert Enable to rec...

Page 13: ... the quality of the recordings Digital Zoom Turn on this option to zoom in and out of an image Date Time Display Choose to display either date or time or both on the LCD Click the Menu button again for the following settings to be displayed Anti Flicker Change depending on the electrical power frequency in your area Default setting is 50Hz and you may not have to change this setting White Balance ...

Page 14: ...V Out Connect to an external audio video display Date Time Setup Use the UP DOWN and the OK buttons to set the date and time Format Use this setting to format the micro SD card Default Setting Use to change the settings to the default factory settings LCD Control Use this setting to control the brightness and contrast of the LCD Auto Power Off Enable or disable the recorder to shut down when idle ...

Page 15: ... CAM 750 can be connected to a PC plug the USB cable supplied into the USB DC IN port When the unit is connected to a PC USB Connected is displayed on the unit s screen Two drives SD card and the Internal memory open up on the PC Select the relevant drive to view and manage the contents on the PC Access the Recorded Files Before playing the recorded files on the iGO CAM Player ensure that you can ...

Page 16: ...nd select Open to open the files on to the iGO CAM Player 3 Click on the PLAY button Playback Controls to start playback Video Playback Screen Map Screen Compass Playback Controls Menu Speed Snap Shot NOTE GPS Player version is subject to change without notice See Uniden website to download the latest GPS Player Click on the Snap Shot icon to take photos of the recording These photos will automati...

Page 17: ... camera alert icon along with specific information This information will include the distance from the vehicle to the camera the specified speed limit and the current speed of the vehicle Please refer to the image below This display is accompanied by a voice alert Camera Alerts GPS The iGO CAM 750 has an in built GPS antenna allowing your videos to be geo tagged Please ensure that the bracket is f...

Page 18: ...rivers traversing short roads in city areas where deliberate lane changing is done often 18 UNIDEN iGO CAM 750 Vehicle Recorder Please Note RED LINE BLUE LINE 1 First ensure that the iGO CAM 750 is mounted and powered on and the vehicle is safely parked 2 Next ensure that the Menu option in the Video Mode Lane Assist is turned ON 3 After that select the Menu option Line Calibration Video Mode You ...

Page 19: ...nsure that the lens is always kept clean Colour of the images is not good Set the Colour setting to Off Cross stripe interference in an image This is due to the light frequency Change the light frequency depending on the local power supply The unit crashes Press and hold the Reset button with a pin to reset the unit Important Information Solving Problems Listed below are some of the problems and t...

Page 20: ...chased either in Australia or New Zealand and will expire one 1 year from the date of the original retail sale If a warranty claim is made this warranty will not apply if the Product is found by Uniden to be A Damaged or not maintained in a reasonable manner or as recommended in the relevant Uniden Owner s Manual B Modified altered or used as part of any conversion kits subassemblies or any config...

Page 21: ...nder either the COMPETITION AND CONSUMER ACT 2010 Australia or the CONSUMER GUARANTEES ACT New Zealand as the case may be none of which can be excluded Procedure for obtaining warranty service Depending on the country in which the Product was first purchased if you believe that your Product does not conform with this warranty you should deliver the Product together with satisfactory evidence of yo...

Page 22: ......

Page 23: ......

Page 24: ... 2014 Uniden Australia Pty Limited Uniden New Zealand Ltd Printed in China ...

Reviews: