background image

13

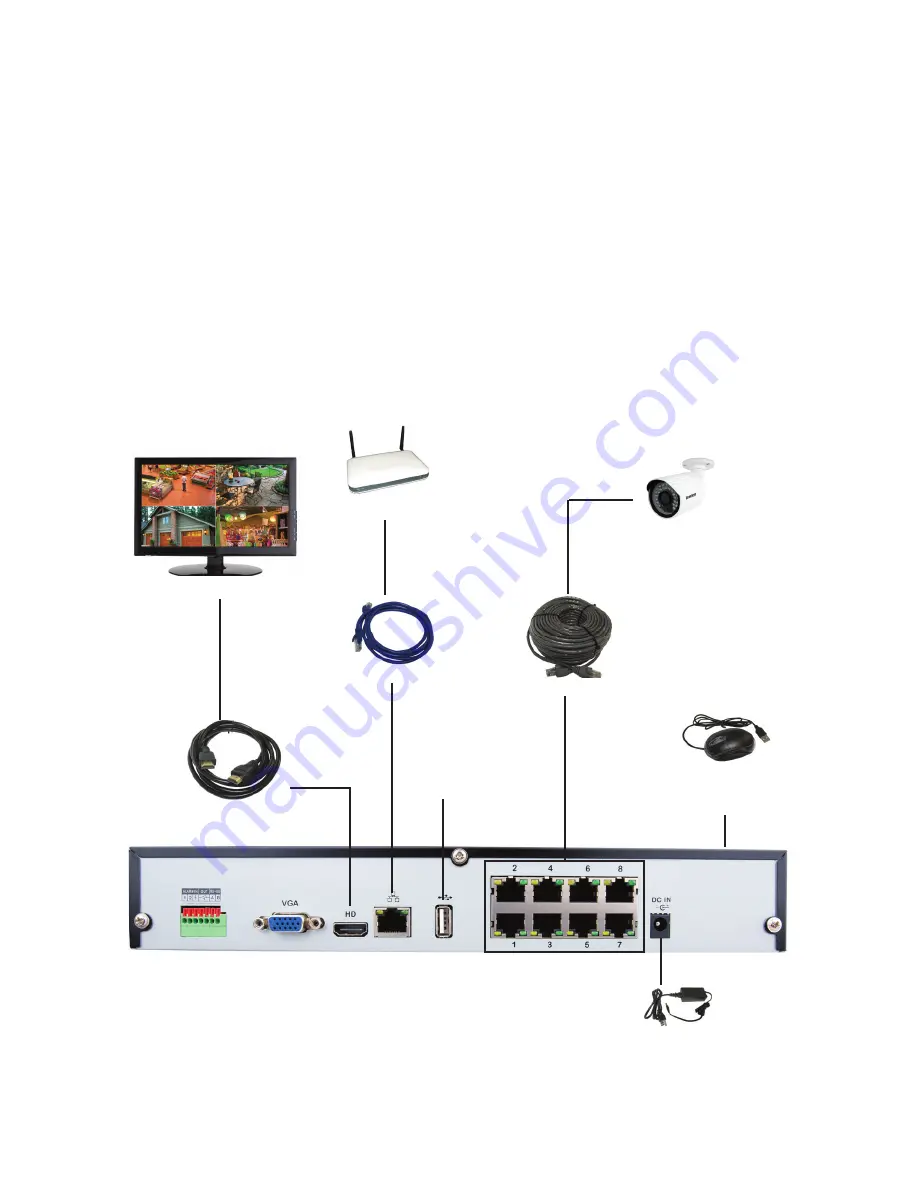
1. Connect the camera to the 30m Ethernet cable and plug the cable into the 

VIDEO IN port on the GNVR.

2. Connect the HDMI cable (supplied) to the HDMI port on the GNVR and to 

the external display device (TV/PC) or the VGA cable (not supplied) to the 

VGA port.

3. Connect the Mouse to one of the USB ports on the GNVR.
4. Connect the Ethernet cable to the RJ45 port on the GNVR and to your 

modem/router (remote viewing). 

5. Plug the GNVR’s Power Cable jack into the DC IN port and the other end to 

a power outlet. 

HarDWare connections

Follow the steps below to connect the GNVR and the camera(s).

Camera

30m Ethernet Cable

Power Cable

(To Power Outlet)

External 

Hard Disk

Ethernet Cable

Modem/Router

HDMI Cable

External Display

nVr

Mouse

(To the USB 

port in front)

Summary of Contents for GnVr 85XX series

Page 1: ...GnVr 85XX series security system OWNER S MANUAL For more exciting new products please visit our website australia www uniden com au...

Page 2: ...ert the user to the presence of uninsulated dangerous voltage within the product s enclosure that may be of sufficient magnitude to constitute a risk of electric shock WarninG to PreVent Fire or sHocK...

Page 3: ...humid or wet places 4 Keep enough space around the product for ventilation Slots and openings in the storage cabinet should not be blocked 5 It is highly recommended to connect the product to a surge...

Page 4: ...mage or deteriorated insulation have it replaced by your service technician 6 Power Cord Protection Power supply cords should be routed so that they are not likely to be walked on or pinched by items...

Page 5: ...cable s to verify compliance with your local authority regulations prior to installation 14 Mounting The cameras provided with this system should be mounted only as instructed in this guide or the in...

Page 6: ...fety checks recommended by the manufacturer to determine that the product is in safe operating condition Use 1 Cleaning Unplug the product from the wall outlet before cleaning Do not use liq uid clean...

Page 7: ...Mouse Operation 15 BASIC OPERATION 17 Start up the GNVR system 17 On screen display 18 Main Menu 18 ADVANCED OPERATION 24 Log into the System 24 ADVANCED SETTINGS IN MAIN MENU 25 Playback 26 Backup 27...

Page 8: ...8 Power Off 59 Reboot 59 Logout 59 Device Time 59 Volume 60 USING THE APP 61 WARRANTY 66...

Page 9: ...nuous scheduled and motion recording H 264 video compression HDMI cable included for simple connection to HD TVs PTZ cameras supported remotely controlled through a mobile App Accurate time stamps wit...

Page 10: ...x Model 8 ch nVr outdoor camera GNVR 8540 1 4 GNVR 8580 1 8 Each NVR comes with Each Camera comes with 5 30m Cat5E Cable 6 Mounting Hardware not shown here 1 2 3 4 5 1 Power Cable 2 HDMI Cable 3 Mouse...

Page 11: ...dicator 5 USB port 1 RS485 and Alarm In Out Connections Connect external alarm devices 2 VGA Connect a VGA monitor not included to view the system interface and live or recorded playback 3 HDMI Connec...

Page 12: ...talling the GNVR Before installing the GNVR take into consideration the following points Ideally choose a location that is central and has easy access to the mains power To get the most out of the rem...

Page 13: ...e to one of the USB ports on the GNVR 4 Connect the Ethernet cable to the RJ45 port on the GNVR and to your modem router remote viewing 5 Plug the GNVR s Power Cable jack into the DC IN port and the o...

Page 14: ...fic In high risk locations have multiple cameras point in the same area This provides camera redundancy if a vandal attempts to damage the camera The following installation instructions refer to the c...

Page 15: ...s several adjustment points to provide maximum flexibility when setting the view angle To make the adjustments use the hex key included with the Camera Mounting Kit camera View angle adjustments Mouse...

Page 16: ...channel to view it in full screen Double click again to return to the split screen display mode While navigating menus click to open a menu option RIGHT BUTTON In live view right click anywhere on the...

Page 17: ...e beep and the preview screen displays 2 The GNVR s normal start up mode is multi screen The GNVR system displays live views of any cameras connected The main camera is highlighted Click on another sc...

Page 18: ...om Take a snapshot Click to on screen Display The GNVR system shows the following for all live views Main Menu The Main Menu allows access to the GNVR s key functions Using the mouse right click the s...

Page 19: ...splaying 4 6 8 or 9 live view screens at the same time Click the desired screen configuration When in Quad view 4 screen Series 1 and 2 change from viewing Cameras 1 4 to viewing Cameras 5 8 Working W...

Page 20: ...lick any channel to view it in full screen Log into the System You must log into the system to access all features of the GNVR 1 Hover the cursor over start A sub menu displays 2 Click login The login...

Page 21: ...display the Main Menu then left click setting 2 Click Account 3 Click the admin field 4 Click Modify user in the lower right corner Use the on screen keypad to enter and confirm a password Click OK s...

Page 22: ...22 2 Click setting setting Menu displays setting screen 3 Scroll to near the bottom of the screen to Device Time and click Setting The Device time screen displays...

Page 23: ...23 Accessing Device Time 4 To set the date and time for your location click the desired field and then click the up or down arrows Click OK when complete...

Page 24: ...tion loG into tHe sYsteM To access the Advanced Settings in the Main Menu log into the system 1 Hover the cursor over start A sub menu displays access login screen 2 Click login The login screen displ...

Page 25: ...designed to Pan Tilt Zoom capture Saves a photo of the image displayed on the screen alarM Set alarms for motion detection video loss tampering and other functions File Manager Organizes saved video...

Page 26: ...k Slow Slow down the playback speed 1 2 1 4 1 8 1 16 times available Fast Speed up the playback process 2 4 8 16 times available Frame play Play recording one frame at a time with each mouse click Sna...

Page 27: ...the USB port on the GNVR s front panel usB Port 3 Click refresh The name of the USB backup device displays in the Back to field 4 Select a single channel or all channels for backup 5 Use the From and...

Page 28: ...on setting the camera s parameters PtZ camera Parameters Menu Presets The GNVR system can move a PTZ camera to a specific angle point of view and then save that setting as a preset preset 1 preset 2 e...

Page 29: ...Click Track Start to set the PTZ camera operation then click Track Stop to set the track in memory 3 To recall a track setting select the track number in the drop down list and click Capture Capture a...

Page 30: ...on Video loss Tampering To see a list of alarms received right click the screen to display the Main Menu then click alarm File Manager File manager lists all video and capture files stored on the hard...

Page 31: ...files display 2 Double click the file name in the left portion of the screen to display the captured image or file Setting The Setting screen specifies parameters for several major functions in the G...

Page 32: ...Device Name Specify a name for the GNVR Device Number Assign a number to the device Record Replace Enable record overwrite Record Time Hour Set the time for a recording Sub Stream Record Enable record...

Page 33: ...the GNVR rear panel Video Format Choose between NTSC or PAL Stream Type Choose the resolution of the video stream Protocol Choose between 18 18S 18S Plug and Play Onvif Device Time Set the GNVR time a...

Page 34: ...for a Pan Tilt Zoom PTZ camera PtZ setting screen CH The channel number where a PTZ camera connects Obtain the following information from the PTZ camera Protocol Data Bits PTZ Address Bits per Second...

Page 35: ...e box to activate the DST settings 2 Set Daylight saving time to begin on the first Sunday in October and to end on the first Sunday in April Daylight savings time Dst screen Qr code This screen shows...

Page 36: ...channel screen allows for setting parameters to control several features for each channel Display setting Sets parameters for each camera s screen display CH Choose the channel where the camera is co...

Page 37: ...the brightness contrast saturation and hue of the camera image Sensor Sets specifics for the camera sensor such as Day Night IR set tings Exposure and Iris Copy To Allows copying all the display sett...

Page 38: ...t Highest Frame interval Set the video frame interval Default 25 Copy To Allows copying the settings to other camera channels schedule record Set recording parameters for each channel Use the Copy To...

Page 39: ...hereby the motion is to be detected It consists of area within enclosed red boxes Use the mouse to set up area Left click and hold while you drag to set up the detect area Right click and hold while y...

Page 40: ...n in case a camera loses video Use the Copy To feature to transfer the settings to other channels tampering alarm This screen sets parameters for triggering an alarm caused by tampering with a camera...

Page 41: ...41 Video Mask Use Video Mask to block off a portion of the camera s video Blocked portions will be shown as black boxes Video Mask screen...

Page 42: ...gs because changing the settings may result in loss of remote or local access network settings These settings do not require changes The GNVR series support a P2P connection directly to the Uniden P2P...

Page 43: ...43 DDns server settings The DDNS server allows for a connection to the Internet a PC with a fixed IP address ntP settings Set up Network Time Protocol DDns settings screen ntP settings screen...

Page 44: ...44 This feature allows for time synchronization between DVR and network Internet connection is required Choose from the list of time zone provided You can turn off this feature by unticking Enable NTP...

Page 45: ...ch as iCloud or WebServer DDns setting screen Management Platform screen Enter sender s email address and password Gmail is recommended Enter receiver s email address You can also put user name if pre...

Page 46: ...em The GNVR alerts you by popping up live video and playing sound alerts for events such as motion detection video loss or hard disk drive problems alarm input Enables alarm processing sets the alarm...

Page 47: ...t Sets the alarm output delay and alarm schedule alarm output screen exception Sets parameters for alarm event types and alarm displays on the monitor Allows you to choose an audio alarm type alarm ex...

Page 48: ...48 account Enter details of the user account in this screen account screen account setting Enter user name password and specify user type account setting screen...

Page 49: ...tus of an online user s connection System The system screen allows for setting up system parameters as needed Device log Check the device logs according to the video type and date time user online scr...

Page 50: ...fo View the band width of data streaming for each channel HDD setting Check the capacity and free space of the HDD hard Disk Drive and format the HDD if needed system screen stream info system screen...

Page 51: ...51 update Update the GNVR system hardware auto reboot Enable or disable the GNVR system for rebooting once daily or weekly system screen update system system screen auto reboot...

Page 52: ...overy configuration file record The record screen allows for setting the system to record based on a schedule or you can manually turn recording on or off for all channels or individual channels Syste...

Page 53: ...53 record screen Display setting Main Menu Display setting...

Page 54: ...ration during the selected minutes Display Adjust the brightness contrast saturation hue of the video screen display Resolution Select a different resolution to match the resolution of the connected T...

Page 55: ...55 image setting image setting screen Adjust the following items in the image setting screen Brightness Contrast Saturation Hue Main Menu image setting...

Page 56: ...Main Menu iP channel setting iP channel setting Manual The IP Channel Settings do not require changing The system automatically identifies when cameras are attached and assigns the IP addresses iP ch...

Page 57: ...P Channel Setting Screen This IP Channel Setting screen allows setting up parameters for connecting the GNVR system to the Internet Choose Manual or Automatic to set up all channels or individual chan...

Page 58: ...ver the mouse over start in the Main Menu and these options display Quick Setup Power Off Reboot Logout Device Time Volume Main Menu Features under start QuicK setuP Click Quick setup to return to the...

Page 59: ...m the GNVR Main Menu Power off reBoot Click reboot to reboot the GNVR system automatically Main Menu reboot loGout Click logout to exit the advanced feature items in the Main Menu Main Menu logout DeV...

Page 60: ...Me Click Volume to change the volume of the SELECTED live screen Main Menu Volume The camera on the channel showing the live view screen must be equipped with a microphone to pick up sounds around the...

Page 61: ...e name and password again and the Device List screen displays 4 Select the icon at the top right corner to add your DVR system to the app The Add Device screen displays 5 Name your GNVR system Select...

Page 62: ...62 LIVE SCREEN Live Screen is the main screen in the GuardianLive app Quad View Pause Microphone Audio HD SD Alarm Refresh Snapshot Remote Playback Record Back Camera Name Date Time display...

Page 63: ...on Recording Tap the camera view that you want to record and then tap the Record icon Mic Tap to record sound HD SD Tap to view either in High Definition or Standard Definition Refresh Tap to refresh...

Page 64: ...options About Recordings Snapshots and Logout Tap the option Recordings to view the recordings that have been initiated on the app Please note these recordings are NOT stored on the hard disk REMOTE P...

Page 65: ...Menu icon top left corner to reveal menu options About Recordings Snapshots and Logout Tap the option Snapshots to view the images that have been taken using the app Please note these images are NOT...

Page 66: ...A Damaged or not maintained in a reasonable manner or as recommended in the relevant Uniden Owner s Manual B Modified altered or used as part of any conversion kits subassemblies or any configuration...

Page 67: ...tion to and sits alongside your rights under either the COMPETITION AND CONSUMER ACT 2010 Australia or the CONSUMER GUARANTEES ACT New Zealand as the case may be none of which can be excluded Procedur...

Page 68: ...2015 Uniden Australia Pty Limited Version 1 0...

Reviews: