Uniden EXAI378 Owner'S Manual Download Page 62

A D D I T I O N A L I N F O R M A T I O N

[ 60 ]

Radio Interference

Radio interference may occasionally cause buzzing and humming in
your cordless handset, or clicking noises in the base. This
interference is caused by external sources such as TV, refrigerator,
vacuum cleaner, fluorescent lighting, or electrical storm. Your unit is
NOT DEFECTIVE. If these noises continue and are too distracting,
please check around your home to see what appliances may be
causing the problem. In addition, we recommend that the base not
be plugged into a circuit that also powers a major appliance because
of the potential for interference. Be certain that the antenna on the
unit is fully extended when needed.
In the unlikely event that you consistently hear other voices or
distracting transmissions on your phone, you may be receiving radio
signals from another cordless telephone or other source of
interference. If you cannot eliminate this type of interference, you
need to change to a different channel.
Finally, it should be noted that some cordless telephones operate at
frequencies that may cause interference to nearby TVs and VCRs. To
minimize or prevent such interference, the base of the cordless
telephone should not be placed near or on top of a TV or VCR. If
interference is experienced, moving the cordless telephone farther
away from the TV or VCR will often reduce or eliminate the
interference.

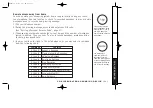
More Than One Cordless Telephone

If you want to use more than one cordless telephone in your home,
they must operate on different channels. Press the channel key to
select a channel that provides the clearest communication.

Cordless Telephone Privacy

Cordless telephones are radio devices. Communications between the
handset and base of your cordless telephone are accomplished by
means of radio waves which are broadcast over the open airways.
Because of the inherent physical properties of radio waves, your
communications can be received by radio receiving devices other
than your own cordless telephone unit. Consequently, any
communications using your cordless telephone may not be private.

Installation Considerations

Selecting a Location

Before choosing a location for your new phone, there are some
important guidelines you should consider:
• The location should be close to both a phone jack and continuous

power outlet. (A continuous power outlet is an AC outlet which
does not have a switch to interrupt its power.)

• Keep the base and handset away from sources of electrical noise

such as motors or fluorescent lighting.

• Be sure there is sufficient space to fully extend the base antenna.
• The base can be placed on a desk or tabletop or mounted on a

standard telephone wall plate.

• You should charge your new phone for 15-20 hours before

completing the installation or using the handset.

Telephone Line Outlets

There are two types of phone outlets:

Modular Jack

Most phone equipment available now uses modular jacks. Phone cords
are fitted with a molded plastic connector which plugs into this type
of jack. If you do not have modular phone jacks, contact your local
telephone company for information about their installation.

Hardwired Jack

Some equipment is wired directly to a phone jack, and these types of
installations require a modular jack converter. This type of
installation is not difficult; however, you should contact your Uniden
telephone dealer or a telephone supply store for advice about the
proper adapter or converter for your particular situation.

Connecting the Telephone Cords

Consider these safety guidelines before connecting the telephone
cords:

Caution!

• Never install telephone wiring during a lightning storm.
• Never touch uninsulated telephone wires or terminals unless the

telephone line has been disconnected.

• Use caution when installing or modifying telephone lines.

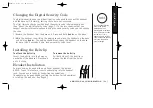
Applying Power to the Base

This phone requires an AC outlet, without a switch to interrupt
power, and the included AC adapter. To relieve strain on the DC plug
when the phone is placed on a desk or table, wrap the power cord
around the strain relief notch on the bottom of the base.

NOTE:

Place the power cord so that it does not create a trip
hazard, or where it could become chafed and create a fire
or other electrical hazards.

Adapter Safety Features

Do not use an outlet controlled by a wall switch.

Use only the Uniden AC Adapter supplied with this phone.

One Year Limited Warranty

Important:

Evidence of original purchase is required for warranty
service.

WARRANTOR: UNIDEN AMERICA CORPORATION (“Uniden”)

ELEMENTS OF WARRANTY: Uniden warrants, for one year, to the
original retail owner, this Uniden Product to be free from defects in
materials and craftsmanship with only the limitations or exclusions
set out below.

WARRANTY DURATION: This warranty to the original user shall
terminate and be of no further effect 12 months after the date of
original retail sale. The warranty is invalid if the Product is (A)
damaged or not maintained as reasonable or necessary, (B) modified,
altered, or used as part of any conversion kits, subassemblies, or any
configurations not sold by Uniden, (C) improperly installed, (D)
serviced or repaired by someone other than an authorized Uniden
service center for a defect or malfunction covered by this warranty,
(E) used in any conjunction with equipment or parts or as part of any
system not manufactured by Uniden, or (F) installed or programmed
by anyone other than as detailed by the owner’s manual for this
product.

STATEMENT OF REMEDY: In the event that the product does not
conform to this warranty at any time while this warranty is in effect,
warrantor will either, at its option, repair or replace the defective
unit and return it to you without charge for parts, service, or any
other cost (except shipping and handling) incurred by warrantor or
its representatives in connection with the performance of this
warranty. Warrantor, at its option, may replace the unit with a new or
refurbished unit. THE LIMITED WARRANTY SET FORTH ABOVE IS THE
SOLE AND ENTIRE WARRANTY PERTAINING TO THE PRODUCT AND IS IN
LIEU OF AND EXCLUDES ALL OTHER WARRANTIES OF ANY NATURE
WHATSOEVER, WHETHER EXPRESS, IMPLIED OR ARISING BY OPERATION
OF LAW, INCLUDING, BUT NOT LIMITED TO ANY IMPLIED WARRANTIES
OF MERCHANTABILITY OR FITNESS FOR A PARTICULAR PURPOSE. THIS
WARRANTY DOES NOT COVER OR PROVIDE FOR THE REIMBURSEMENT
OR PAYMENT OF INCIDENTAL OR CONSEQUENTIAL DAMAGES. Some
states do not allow this exclusion or limitation of incidental or
consequential damages so the above limitation or exclusion may not
apply to you.

LEGAL REMEDIES: This warranty gives you specific legal rights, and
you may also have other rights which vary from state to state. This
warranty is void outside the United States of America.

PROCEDURE FOR OBTAINING PERFORMANCE OF WARRANTY: If, after
following the instructions in the owner’s manual you are certain that
the Product is defective, pack the Product carefully (preferably in its
original packaging). The Product should include all parts and
accessories originally packaged with the Product. Include evidence of
original purchase and a note describing the defect that has caused
you to return it. The Product should be shipped freight prepaid, by
traceable means, to warrantor at:

Uniden America Corporation

Parts and Service Division
4700 Amon Carter Blvd.
Fort Worth, TX 76155

(800) 297-1023, 8 a.m. to 5 p.m. Central, Monday through Friday

EXAI378  2/8/2 6:57 PM  Page 60

Summary of Contents for EXAI378

Page 1: ...EXAI378 2 8 2 6 57 PM Page i...

Page 2: ...www uniden com EXAI378 2 8 2 6 57 PM Page ii...

Page 3: ...d or Phone Number 28 Erasing a Stored Name and Phone Number 30 RocketDial RocketDial 31 Storing and Editing the RocketDial 31 Making Calls with the RocketDial 31 Deleting the RocketDial 32 Caller ID F...

Page 4: ...Display Integrated Telephone Answering Device ITAD Voice Prompted Guidance through ITAD Setup Menu 10 Number Memory Dialing RocketDial Caller ID and Call Waiting Caller ID 30 Number Caller ID Memory...

Page 5: ...ch might result from your phone being activated by other equipment the EXAI378 series has Random CodeTM digital security which automatically selects one of over 262 000 digital security codes for the...

Page 6: ...eeting until you hear Record greeting and a confirmation tone 2 Record your personal greeting Position yourself as near to the base as possible and speak clearly 3 When finished press greeting again o...

Page 7: ...et battery compartment 5 Handset earpiece 6 LCD display 7 Caller ID cid menu key 8 Talk flash key 9 tone left cursor key 10 Redial pause p key 11 Select key 12 Handset microphone and ringer speaker 13...

Page 8: ...tainer clip 24 Set ringer key 25 Delete key 26 Repeat rewind rew key 27 Find hs key 28 Memo key 29 Base charging contacts 30 Base speaker 31 Speaker volume keys 32 Menu key 33 Status LED 34 Message co...

Page 9: ...ou charge the battery pack for the first time If you want to change the security code see page 53 Read this First Step 1 page 8 Unpack the telephone and accessories Step 2 page 9 Next choose the best...

Page 10: ...web at www uniden com Make sure you have received the following items in the package If any of these items are missing or damaged contact the Uniden Parts Department G E T T I N G S TA R T E D Base un...

Page 11: ...ot switchable Keep the base and handset away from sources of electrical noise such as motors microwave ovens and fluorescent lighting Be sure there is sufficient space to raise the base antenna to a v...

Page 12: ...se damage to the battery or handset Once you are certain that you have made a good connection then insert the battery pack into the battery compartment Do not pinch the wires 3 Securely close the batt...

Page 13: ...none of the keys will operate If the phone is in use Low Battery flashes and the handset beeps Complete your conversation as quickly as possible and return the handset to the base unit for charging Cl...

Page 14: ...If the LED does not illuminate check to see that the AC adapter is plugged in and the handset makes good contact with the base charging contacts Use only the supplied AD 420 AC adapter Do not use any...

Page 15: ...can be mounted on any standard wall plate 1 Plug the the AC adapter to the DC IN 9V jack 2 Wrap the AC adapter cord inside the molded wiring channel as shown 3 Plug the AC adapter into a standard 120...

Page 16: ...l cables pipes or other items behind the mounting location that could cause a hazard when inserting screws into the wall Try to mount your phone within 5 feet of a working phone jack to avoid excessiv...

Page 17: ...e the handset from the base and the phone automatically answers the call If the phone rings when AutoTalk is off you must press talk flash to answer the call Caller ID options To change your AutoTalk...

Page 18: ...s twice to select Area Code 3 Press select 4 Use the number keys 0 to 9 tone or delete ch to enter the 3 digit area code 5 Press select A confirmation tone sounds and the displayed area code is entere...

Page 19: ...se unit to complete the setting The handset returns to the standby mode Setting the language 1 When the phone is in the standby mode Press and hold cid menu The following screen appears 2 Press 5 or p...

Page 20: ...dset 2 Press redial p then press talk flash Press talk flash any number tone or 1 Press talk flash 2 Listen for the dial tone 3 Dial the number OR Dial the number then press talk flash 1 Press talk fl...

Page 21: ...his setting will remain in effect after the telephone call has ended Ringer Mute You can temporarily mute the handset ringer tone The base unit will continue to ring When the handset is off the base a...

Page 22: ...ne dialing digits you can switch over to tone dialing during the call For example entering your bank account number after you have called your bank Initially make your call with the pulse dialing mode...

Page 23: ...interference while using your phone you can manually change the phone s channel for clear operation This function works only when the phone is in use Press delete ch Scanning appears on the display i...

Page 24: ...t The following screen appears and a cursor flashes indicating that the display is ready for the name to be entered If this screen appears the selected memory location is already stored Then you must...

Page 25: ...le if you store a name and number into memory location number 7 the display shows Memory 7 Stored After about 2 seconds Memory Store is displayed Repeat steps 2 7 to store more numbers 8 Press end to...

Page 26: ...ou make a mistake while entering a name Use tone or to move the cursor to the incorrect character press delete ch to erase up to the wrong entry then enter the correct character To delete all characte...

Page 27: ...ice 5 Press 6 five times 6 Press 4 six times 7 Press 3 four times then press to move the cursor to the right If the next character uses the same number key you must press to move the cursor over Other...

Page 28: ...alk 0123456789012 Program name Program number 1 1 1 8002971023 2 5452930 3 8175551212 1 UNIDEN CORP 2 JOHN DOE 3 MOM AND DAD 5 012345678901 6 011813554329 7 When the stored phone number has 15 or more...

Page 29: ...ory locations on the handset are not limited to phone numbers You can also store a group of numbers up to 20 digits that you need to enter once your call connects This is referred to as Chain Dialing...

Page 30: ...s not been stored the cursor appears at the beginning of the second line 5 Use the number keys tone or delete ch to edit the name See page 22 To edit only the phone number skip this step 6 Press selec...

Page 31: ...tone and the following display appears The memory storage is complete For example if you store a name and number into memory location number 1 the display shows Memory 1 Stored After about 2 seconds...

Page 32: ...move the pointer to Yes 7 Press select or delete ch You hear a confirmation tone and the following screen appears 8 After about 2 seconds the display returns to the Memory Store screen You may delete...

Page 33: ...then press select 2 Store the number by following step 6 under Storing Phone Numbers and Names on page 23 3 Press select You hear a confirmation tone and displays the following screen Memory storage...

Page 34: ...te Number 3 Press select Following display appears 4 Press to move the pointer to Yes 5 Press select or delete ch You hear a confirmation tone and the following display appears The handset returns to...

Page 35: ...mation is stored in the Caller ID record If the Caller ID service includes the caller s name the caller s name appears on the display up to 15 letters Here are some typical displays 5 11 12 30PM UNIDE...

Page 36: ...ID Message List Data errors appear as 2 800 297 1023 When an unknown number is received When an unknown name is received 2 When you pick up the phone the display changes to Talk AutoTalk feature is s...

Page 37: ...hen the pointer is at Yes You hear a confirmation tone and the Caller ID message is deleted The next Caller ID message is then displayed When the pointer is at No The display returns to the Caller ID...

Page 38: ...Select the phone number that you want to dial by pressing or 2 Press talk flash The displayed phone number dials automatically Long Distance calls and Area Code Setting Cancellation While the incomin...

Page 39: ...or enter a number 0 9 to select the memory location to be stored 4 Press select You hear a confirmation tone and the number is stored in memory The display returns to the Caller ID list 5 17 12 30PM 0...

Page 40: ...Time Call Screening Selectable Outgoing Messages Voice Prompts for Guidance Time and Day Announcement Remote Message Retrieval Toll Saver Conversation Recording Voice Memo Digital Tapeless Recording a...

Page 41: ...to indicate standby mode If any of the following occurs during menu setup the handset returns to standby Start over with the menu function prior to the interruption Press talk flash Press play stop 30...

Page 42: ...displayed on the base 3 Press set ringer to select the day 4 Press skip ff or repeat rew until you hear the correct hour setting The numbers through are displayed on the base as each hour is announced...

Page 43: ...corresponds with the day of the week Setting a Personal Security Code PIN To play your messages from a remote location you will need to enter a two digit Personal Identification Number PIN code 00 99...

Page 44: ...have new messages and after four rings if there are none This way if you make a long distance call to check your messages you can hang up after the second ring to avoid billing charges status 1 Press...

Page 45: ...leave a message To set Announce only follow the steps above To scroll between the prerecorded message or your own personal greeting press greeting when the outgoing message is played If you want to us...

Page 46: ...r to select the new setting You hear a confirmation tone then the announcement Message Alert and the current setting you have selected is announced When the first new message is received the beeping t...

Page 47: ...sage counter 2 Start recording your message You have 30 seconds and the message counter starts to count down to every second 3 When you are finished recording your greeting press greeting or play stop...

Page 48: ...il the desired ringer option appears 3 The system displayed new ringer volume When you have set the base ringer to off and the handset is on the base you will still hear the ringer from the handset Ad...

Page 49: ...ays the number of new messages and the number flashes The day and time that each message was received is announced after the message is played The message counter displays the number of current messag...

Page 50: ...stored in memory status status 1 Press play stop to review your messages The number of messages is announced 2 Press skip ff at anytime to skip to the next message Each time skip ff is pressed the sys...

Page 51: ...e all the messages 1 Press delete You hear a announcement To delete all messages press delete again 2 Press delete again You hear a confirmation tone and all the messages are deleted When you try to d...

Page 52: ...You can record up to 10 minutes of conversation while you are using your phone 1 During a conversation from the handset press and hold memo The unit begins recording and flashes on the message counter...

Page 53: ...memory Then you hear To play incoming messages press pound two For help press pound zero 4 You may continue to listen to the Help Guidance or you may select a command from the following chart For your...

Page 54: ...o standby Turn on the answering system remotely If you have forgotten to turn on your answering system you can turn it on remotely from any touch tone telephone 1 Call your telephone number 2 Wait ten...

Page 55: ...he paging sound stops Leave the handset on the base for more than 3 seconds A new random security code is set Installing the Beltclip To attach the beltclip Insert the beltclip into the holes on each...

Page 56: ...r is off you will not be able to make or receive calls with the telephone Caution Use only the specified Uniden battery pack BT 905 Do not remove the battery from the handset to charge it Never throw...

Page 57: ...n Make sure that the base antenna is in a vertical position Move the handset and or base to a different location away from metal objects or appliances and try again Press delete ch in the Talk mode to...

Page 58: ...eep the handset away from microwave ovens computers remote control toys wireless microphones alarm systems intercoms room monitors fluorescent lights and electrical appliances Move to another location...

Page 59: ...tures from another touch tone phone If you still have a problem Suggestion Adjust the speaker volume on the base unit Make sure you re using the correct PIN code Make sure that the touch tone phone yo...

Page 60: ...pective to the amount of time the handset is off the base Recharge your phone on a regular basis by returning the handset to the base after each phone call When the operating time becomes short even a...

Page 61: ...en the appliance is subsequently used 12 Unplug this product from the wall outlet and refer servicing to qualified service personnel under the following conditions A When the power supply cord is dama...

Page 62: ...ephone wiring during a lightning storm Never touch uninsulated telephone wires or terminals unless the telephone line has been disconnected Use caution when installing or modifying telephone lines App...

Page 63: ...uipment itself The REN assigned to each terminal equipment provides an indication of the maximum number of terminals allowed to be connected to a telephone interface The termination on an interface ma...

Page 64: ...E F G H I J K L Earpiece volume 19 Flash 21 General information Specification 58 Greeting 45 Headset installation 53 I C Notice 61 Interference 21 M N O P Q Maintenance 54 Making a call 18 Memory dia...

Page 65: ...PIN code 3 Press then 5 to stop the announcement 4 Press then 6 to turn the answering system on EXAI378 series REMOTE OPERATION CARD C U T Remote access away from home 1 Call your phone number from a...

Page 66: ...Answering System On 6 Memo Record Stop 7 Greeting Message Record Stop 8 Answer System Off 9 Help Guidance 0 Task Key Repeat a Message 1 Playing Incoming Messages 2 Skipping a Message 3 Deleting a Mess...

Page 67: ...023 PLEASE DO NOT RETURN THIS PRODUCT TO THE PLACE OF PURCHASE Our Uniden representatives will be happy to help you with any matters regarding the operation of this unit available accessories or any o...

Page 68: ...EXAI378 2 12 2 10 54 AM Page 66 B B B B B B...

Reviews: