background image

6

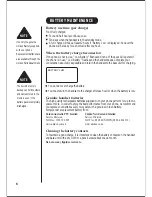
Battery use time (per charge)

From fully charged

Four and half hours continuous use.
Ten days when the handset is in the standby mode.
A full charge will take at least 12 hours if ‘Battery Low’ is displayed - however the
phone will be ready for a short call after one hour.

When the battery charge becomes low

If the phone is not in use, “ Low Battery” flashes and none of the keys will operate if
the phone is in use, “Low Battery” flashes and the handset beeps. Complete your
conversation as quickly as possible and return the handset to the base unit for charging.

Use only the genuine

Uniden Battery supplied

with your phone.

Replacement batteries are

also available through the

Uniden Parts Department.

The built-in memory

backup can hold numbers

and names stored in the

memory even if the

battery pack is completely

discharged.

NOTE

NOTE

You cannot over charge the battery.

You may return the handset to the charger after each call or when the battery is low.

Genuine handset batteries

The high quality rechargeable batteries supplied with your phone perform for up to two

years or more.  In order to enjoy the best performance from your phone, we recommend
you replace your batteries every two years with a genuine Uniden Battery.

Simply order a replacement battery from:

Uniden Australia PTY Limited

Uniden New Zealand Limited

Service Division

Service Division

Toll Free: 1300 366 895

Toll Free: 0800 4 UNIDEN (0800 4 864 336)

www.uniden.com.au

www.uniden.co.nz

Cleaning the battery contacts

To maintain a good charge, it is important to clean the battery contacts on the handset
and base unit with a dry cloth or a pencil eraser about once a month.

Do not use any liquids or solvents.

BATTERY LOW

BATTERY MAINTENANCE

Summary of Contents for DS 805

Page 1: ...DS 805 Optional Handset and Charge Base Suits models DS815 DS825 DS845 DS875 QUICK START GUIDE Start Here Quick Start Guide next page...

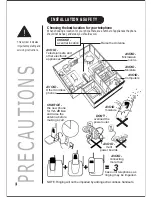
Page 2: ...of appliances the phone should not be near and areas you should avoid AVOID Television sets and other electronic appliances AVOID Microwave ovens AVOID Computers AVOID Moisture AVOID Other Cordless p...

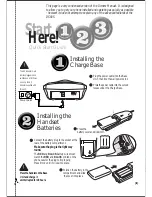
Page 3: ...nder the Charge Base Position the battery in the compartment and slide the cover into place Press the battery cover and slide it off Place the handset on the Base Unit and charge it uninterrupted for...

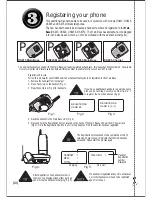
Page 4: ...the back of the Main Base unit near the DC power jack Fig 4 Hold the Registration button in until a long beep confirms the handset has been registered Fig 1 O The original handset supplied with the M...

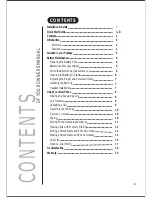
Page 5: ...justing the Ringer and Earpiece Volume Installing the Belt Clip Headset Installation Using Your New Phone Making and Receiving Calls Call Transfer Redialling a Call Travelling out of Range Keylock Unl...

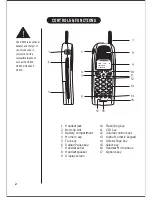
Page 6: ...ey Talk key Redial Pause key Handset aerial Handset speaker Display screen Flash Reg key CID key Volume control keys Alpha Numeric keypad Delete Page key Select key Handset Microphone Options key 1 2...

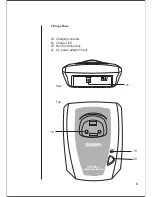
Page 7: ...21 Charging contacts Charge LED Non functional key AC power adaptor input 18 19 20 21 18 20 Rear Top 3 DIGITAL SPREAD SPECTRUM charge 19 900MHz Charge Base...

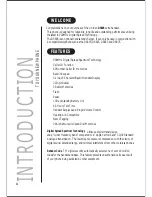
Page 8: ...lit Handset Display 32 Digit Redial 3 Redial Memories Flash Pause 10 Days Standby Battery Life 4 5 Hours Talk Time Handset Earpiece and Ringer Volume Control Hearing Aid Compatible Name Tagging 29 Alp...

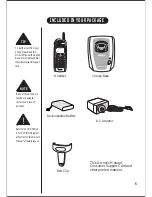
Page 9: ...ner s Manual thoroughly Besuretocompleteandmail theproductconsumersupport card This Owner s Manual Consumer Support Card and other printed material NOTE Refer to the CONTROLS FUNCTIONS diagram at the...

Page 10: ...ored in the memory even if the battery pack is completely discharged NOTE NOTE You cannot over charge the battery You may return the handset to the charger after each call or when the battery is low G...

Page 11: ...e the earpiece volume of the handset The telephone will keep this setting for all calls and display the setting for each call Loud High Mid Low TALK LOUD 1 Your phone may be used with an optional head...

Page 12: ...g up options redial p select channel delete 1 2 3 4 5 7 6 8 9 0 tone pqrs g h i abc def mno j k l wxy t u v oper talk cid memory flash vol button Pick up handset INCOMING CALL TALK LOUD 1 2 3 1 Auto t...

Page 13: ...again and the 2nd most recent number dialled will be displayed 3 Repeat to display the 3rd most recent number dialled REDIALLING A CALL redial p redial p delete page talk NOTE If any key is pressed be...

Page 14: ...eeded your call will terminate within 30 seconds TRAVELLING OUT OF RANGE When an incoming call is received during paging paging is cancelled and the telephone is switched to the incoming call NOTE KEY...

Page 15: ...splays the confirmation screen 8 Press to return to standby mode or select another location to programme Memory Dialling allows you to dial a number using just a few key strokes You can store up to 29...

Page 16: ...desired phone number The selected phone number is displayed Then the number is dialed TALK LOUD 1 TALK LOUD 1 00182326634488 Chain Dialing On certain occasions after dialing a number you may be reques...

Page 17: ...second line 5 Press or to edit the name To edit only the phone number skip this step 6 Press STORE NUMBER is displayed 7 Use and the number keypad to edit the phone number The phone number cannot exc...

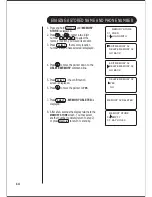
Page 18: ...o move the pointer down to the DELETE MEMORY command line 5 Press the confirmation screen is displayed 6 Press to move the pointer to YES MEMORY STORE 01 FRED 02 JOHN SMITH EDIT MEMORY 02 DELETE MEMOR...

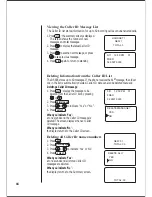
Page 19: ...appears on the display up to 15 letters Date and Time received DD MM HH MM 28 09 12 30 01 JIM STATEN 02 9597 9035 Number of calls Caller s name Caller s number Some typical Displays INCOMPLETE DATA 2...

Page 20: ...5 11 12 30 PM 01 FRED 02 9597 9035 1 Press the summary screen is displayed The screen shows the number of new messages and total messages 2 Press to display the latest Caller ID message 3 Press to se...

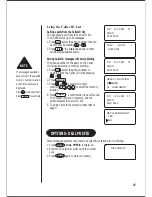
Page 21: ...confirmation tone will sound The number is stored in memory and the screen displays the Caller ID list 5 To add a name to the stored number refer to page 17 talk cid If a message has already been sto...

Page 22: ...ends and switched On SUGGESTION Make sure the charging contacts on both the handset and the base unit are in contact during charging The charging contacts may need to be cleaned with a dry cloth or p...

Page 23: ...ale PARTS COVERED This warranty covers for one 1 year the Base Charging Unit and Handset only All accessories AC Adaptor battery etc are covered for 90 days only STATEMENT OF REMEDY In the event that...

Page 24: ...2001 Uniden Australia Pty Limited Uniden New Zealand Limited FOR PURCHASING A UNIDEN PHONE THANK YOU...

Reviews: