background image

40

Instructions for the installer

VF

VF

1

2

VF

VF

VF

AF

SPF

A11

5

4

PT1000

2+

F14

F12

2+

3

Mixing Header

Filter 

Heating Circuit 1

Outside

Sensor

Heating Circuit 2

Safety devices kit

Primary

system pump 

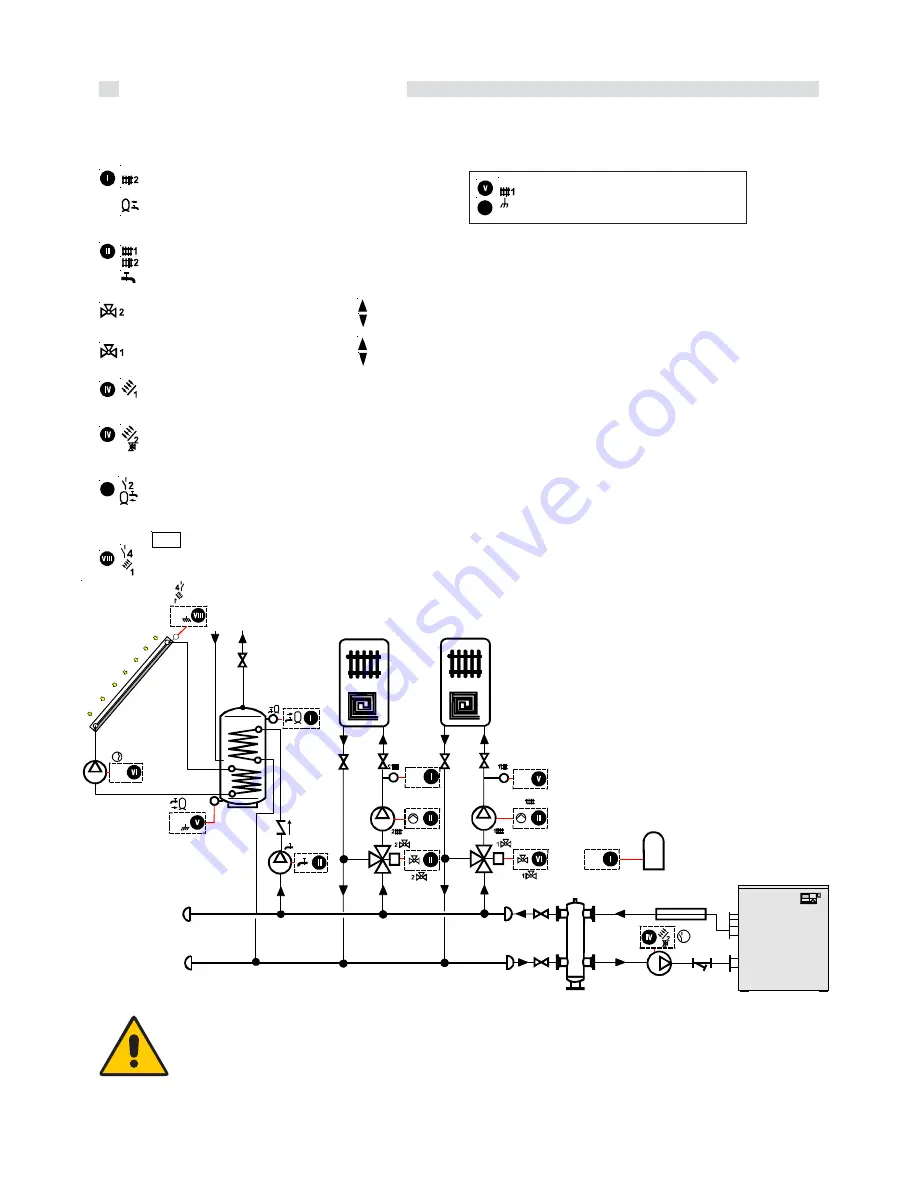
INSTALLATION OF A BOILER WITH CONNECTION TO TWO MIXED ZONES + D.H.W. PRODUCTION BY SOLAR PANELS

(9-10) outdoor sensor

(4-5) Flow sensor heating circuit 2

(6-7) Storage tank sensor

(4) Pump heating circuit 1
(5) Pump heating circuit 2
(6) Cylinder charging pump

SPF

AF

n

(5) Re-circulation pump storage tank

VF

V

(2) Hot water tank low  / Multifunction relay sensor 2

(2) PT1000 sensor solar 1  / Multifunction relay sensor 4

PT1000

For the connection to a solar installation it is
necessary to change some parameters. See
Table:

Expert AREA 


 Level SOLAR / MF 


 MF 4

FUNCTION = ‘’23’’

(4) Collector pump

(7) Mixer motor heating circuit 2  OPEN
(8) Mixer motor heating circuit 2 CLOSE

(1) Mixer motor heating circuit 1 OPEN
(2) Mixer motor heating circuit 1CLOSE

(1) Flow sensor  heating circuit 1

VF

10

I

(10) Ground outdoor sensor

Summary of Contents for SuperModulex 440

Page 1: ...00331587 a 2nd edition 02 10 SuperModulex 440 550 660 770 900 INSTALLATION ANDSERVICING INSTRUCTIONS MODULAR CONDENSING BOILER ...

Page 2: ...2 ...

Page 3: ...op valves 25 3 15 Boiler freeze protection 26 3 16 Mixing header and plate heat exchanger 26 3 17 Condensing drain 27 3 18 Water treatment 28 3 19 Flue chimney connection 29 3 20 Operation 31 3 21 Electrical connections 33 3 22 Functional wiring diagram 34 3 23 Wiring diagram for connection and managing 36 3 24 Installation examples functional wiring and connections description 39 3 25 Cascade man...

Page 4: ...to be instructed on the use and operation of his heating system in particular Hand over these instructions to the end user together with any other literature regarding this appliance placed inside the envelope contained in the packaging The user has to keep these documents in a safe place in order to always have them at hand for future reference Inform the user on the importance of air vents and o...

Page 5: ...ARNING Indications for appliances operating with propane gas Ensure yourself that before installing the appliance the gas tank has been purged For a correct purging of the tank contact the liquid gas supplier or a competent person who has been legally authorized If the tank has not been correctly purged problems could occur during ignition If this occurs contact the liquid gas tank s supplier Smel...

Page 6: ...rent from Qn 16 D Specific D H W flow rate according to EN 625 EN 13203 1 17 R factor N taps based on the quantity of water declared EN 13203 1 18 F factor N stars based on the quality of water declared EN 13203 1 19 PMW Max pressure D H W system 20 T max Max temperature D H W system C Electrical features 21 Electrical power supply 22 Consumption 23 Protection grade D Countries of destination 24 D...

Page 7: ... cleaning or servicing turn off the electrical supply to the boiler by means of the ON OFF switch and or by means of the appropriate shutdown devices Do not obstruct the intake outlet terminal ducts In the event of failure and or faulty functioning of the appliance switch off the boiler Do not attempt to make any repairs contact qualified technicians Any repairs must be carried out by Unical autho...

Page 8: ...haring on as many modules as possible at min load down to 22 kW for the max efficiency B Automatic operation hour splitting up system for each module to guarantee the best homogeneous use C D H W production via a storage tank loading pump or a three way diverting valve controlled by a priority sensor through the E 8 heating controller D Output check of each module for any calibration and or assist...

Page 9: ...system Flow M mm inch C H system Return R mm inch Chimney connection D mm Chimney width H mm Condensate drain diameter mm 920 206 171 666 232 474 974 398 R M G 460 460 1372 Øi 250 110 124 615 440 4 1372 1378 920 50 2 80 3 80 3 250 615 40 S 390 988 1378 2 2 DIMENSIONS FRONT VIEW RIGHT HAND SIDE VIEW LEFT HAND SIDE VIEW UPPER VIEW ...

Page 10: ...m inch Chimney connection D mm Chimney width B mm Condensate drain diameter mm 660 6 1372 1256 1520 50 2 100 4 100 4 300 721 40 770 7 1372 1390 1520 50 2 100 4 100 4 300 855 40 550 5 1372 1122 1520 50 2 80 3 80 3 250 615 40 666 232 474 1372 L 206 171 974 398 R M G 460 460 350 Øi D B 110 124 Øi D 425 175 920 600 S FRONT VIEW RIGHT HAND SIDE VIEW LEFT HAND SIDE VIEW UPPER VIEW ...

Page 11: ... inch C H system Flow M mm inch C H system Return R mm inch Chimney connection D mm Chimney width mm Condensate drain mm 900 8 1434 1674 1546 80 3 100 4 100 4 300 986 40 544 232 530 1434 1574 961 585 S 222 1306 R M G 488 5 472 5 364 Øi D 986 100 Øi D 410 175 FRONT VIEW RIGHT HAND SIDE VIEW LEFT HAND SIDE VIEW UPPER VIEW ...

Page 12: ...7 50mbar Qn kg h Gas Consumption G31 supplypressure 37 50mbar Qmin kg h Max available pressure at the chimney base Pa Condensate production max kg h Emissions CO with 0 of O2 in the flue system ppm NOx with 0 of O2 in the flue system ppm Sound level dBA Electrical Data Voltage Frequency V Hz Fuse on main supply A F Max power absorbed Insulation degree IP Standby Consumption W Room Temperature 20 C...

Page 13: ...turn connection on the L H side Gas connection on the L H side BCM under the frontal panel 2 4 R H SIDE VIEW WITH MAIN COMPONENTS AIR INTAKE CONNECTION CONTROLL PANEL FAN GAS VALVE GAS PIPE BURNER COVER BURNER ALUMINIUM SILICON HEAT EXCHANGER CONDENSATE DRAIN SIPHON CONDENSATE COLLECTING TRAY SMOKE MANIFOLD C H RETURN C H FLOW AUTOMATIC AIR VENT Min Depth 100 mm BOILER FRAME ...

Page 14: ... indication on the packaging and on the data badge c Check that the chimney flue pipe has an adequate draught does not have any constrictions and that no other appliance s flue outlets have been fitted unless the chimney is serving more than one heating appliance according to the specific standards and regulations in force The connection between the boiler and chimney flue outlet can be made only ...

Page 15: ...pply company The installation must be carried in accordance to the codes of practice the regulations and the requirements hereby indicated which constitute an indicative list but not a complete one as these continue to undergo evolve devolpments Moreover the boiler must be installed in accordance to all the regulations regarding the boiler room the building regulations and the prescriptions regard...

Page 16: ...the L H side of the boiler for Modulex 440 and on the R H side of the boiler for Modulex 550 660 770 900 there is the terminal of the smoke chamber inside which there are A plastic bag containing Tre gaskets gasket between smoke chamber and its terminal gasket for the base of flue socket gasket Ø 250 or 300 according to the models to be put inside the flue socket Tre curves a Te piece a plastic pl...

Page 17: ...17 Instructions for the installer 1 2 3 4 A B PALLET REMOVAL BOILER UNLOADING AND PACKAGE REMOVAL ...

Page 18: ...ecial baffle placed under the aluminum sections This baffle can be fixed indifferently from the R H or L H side of the condensate tray If no modification has been made the boiler must have its R H side accessible with the chimney connection fitted on the R H or L H side But if the smoke chamber terminal with the flue socket is left to the R H side and if from this same side the baffle has to be re...

Page 19: ...and the eventual tank are constructed according to the regulations in force The expansion vessels assure the total absorption of the dilatation of the fluid contained in the system The system has been cleaned of impurities and lime scale When a Modulex boiler is installed onto an existing heating system In case the replacement of an existing boiler in an old system can be programmed it is necessar...

Page 20: ...ements indicated by the local gas supplier An incorrect installation could cause injury to persons animals or damage to property The manufacturer shall not be held liable for any injury and or damage Before installing the boiler it is recommended to thoroughly clean all the supply piping in order to remove any eventual residual grime which could compromise the boilers correct functioning If you sm...

Page 21: ...YFORBIDDENTOFITON OFF VALVES ON THE GENERATOR TO THE FORE OFTHESAFTEYDEVICES WARNING Before installing the boiler we recommend that the system is flushed out with a suitable product in compliance to the norm UNI CTI 8065 in order to eliminate any metallic tooling or welding residues oil and grime which could reach the boiler and affect the proper running of the boiler Non observance of these instr...

Page 22: ...ic heating curve The boiler pump must have a delivery head which can ensure the water flow rate as shown in the diagram Water pressure losses The following table gives an indication of the pump s flow rate in function of the Δt of the primary circuit if the installation has a mixing header NOTE The use of a mixing header fitted between the boiler circuit and the system circuit is always advisable ...

Page 23: ...ter 10 Modulating pump 11 Mixing bottle 12 Automatic air vent Not supplied by Unical 13 Drain cock Not supplied by Unical 3 10 ADDITIONAL SAFETY AND CONTROL DEVICES ACCORDING TO THE ITALIAN LAW CERTIFICATIONOFTHEADDITIONALSAFETYDEVICES SAFETYDEVICES 1 On off gas valve a device which has the function of cutting off the gas supply when the water temperature reaches the max predetermined value The se...

Page 24: ...mum allowable operating pressure WARNING In correspondence to the heating pressure relief valve foresee the installation of a discharge pipe with a funnel and a siphon which lead to an adequate drainage The drainage has to be controllable by sight If this precaution is not made an eventual intervention of the pressure relief valve could cause injury to persons animals or damage to property The man...

Page 25: ...ice the boi ler can be drained without emptying the whole C H sistem WARNING IT IS NOT ALLOWEDTO ISOLATETHE SAFETY DEVICES as the safety valve and the expan sion vessel FROM THE BOILER Secondary circuit 3 13 MIXING HEADER FILTER UNICAL suggests the installation of a Y filter on the return pipe so that it can be cleaned if necessary This filter will protect the boiler from the heating system dirt ...

Page 26: ... materials present in the system and mainly with the aluminum 3 16 MIXING HEADER AND PLATE HEAT EXCHANGER D 1 2 KV KR HR g a b c h e HV 1 2 1 2 1 2 g CH FLOW CH RETURN F I L T E R CH FLOW CH RETURN Boiler Circuit Heating System Circuit In order to ensure correct boiler operation it is necessary to use a mixing header which guarantees the separation and collection of circuit dirt optimal air ventin...

Page 27: ...ines dish washing maschines etc which normally have a ba sic pH The connection to the sewer will be through a visible drain Given the high acidity degree pH 3 to 5 only plastic ma terial can be used for the condensate evacuation pipes Moreover it must be dimensioned and constructed so as to allow the correct out flow of drains preventing any bot tleneck and any leakage BACKSIDE The outlet of the c...

Page 28: ...e water is alkaline or it is caused by an alkaline treatment for example phosphate or glycol used as an antifreeze or in several cases it is due to the natural formation of alkaline in the system Vice versa if the pH value is between 6 5 and 8 the aluminium surfaces of the boiler body are passivated and protected from further corrosive attacks To minimize corrosion it is essential to use a scale i...

Page 29: ...0 550 660 770 900 250 250 300 300 300 1 Ball valve 2 Inspection pocket 3 Filling up group 4 Disconnector 5 Scale reducing device 6 Litre counter recommended 7 Y filter 1 2 3 4 5 2 7 1 6 EXAMPLE OF SCALE REDUCING DEVICE CONNECTION FORWATERTREATMENT ...

Page 30: ...2 296 370 444 519 593 668 741 889 1037 3 4 3 9 4 4 5 0 5 6 7 8 9 11 17 22 28 34 39 44 50 56 67 78 89 100 111 167 222 277 333 389 445 555 667 778 0 001 0 002 0 003 0 004 0 005 0 006 0 007 0 008 0 009 0 010 0 015 0 020 0 030 0 035 0 040 0 050 0 060 0 070 0 080 0 090 0 100 0 150 0 200 0 250 0 300 0 350 0 400 0 500 0 600 5 0 700 9 0 10 8 12 0 14 4 22 25 29 32 36 54 72 90 108 126 144 180 216 252 288 32...

Page 31: ...sensors In case of more heat request by heating or DHW systems the boiler starts up and water will be heated by the aluminium boiler body Then the boiler pump will send the water to the mixing bottle and from here to the radiators according to the heating system chosen The combustion air is supplied by fans which take it from the boiler room The combustion air is then pushed into the pre mixing ch...

Page 32: ...en the ionisation elec trode detects the flame the thermal element starts operating Subsequently other thermal elements are likely to start in the same way One of the operation principles for this boiler is letting as many burners as possible operate simultaneously at minimum load to reach the maximum efficiency For example if a 4 thermal element boiler is requested to operate at its max input thi...

Page 33: ...area of 3x0 75 mm2 The electric connections of the boiler are shown in the section named WIRING DIAGRAMS paragraph 3 19 page 30 A mains supply of 230 V 50 Hz is required The wiring to the boiler must be in accordance with the current CEI regulations WARNING We remind you that upstream of the electrical connection it will be necessary to foresee a service relay NOT SUPPLIED which when the electrica...

Page 34: ...L2 DL3 1 2 3 Y1 4 5 6 A1 SW1 0 10 V Modbus B Modbus A PLC BMS BCM eBUS eBUS 24 V PR IS GREY PINK WHITE WHITE BLACK BROWN BROWN BLACK RED KF II I WHITE O 1 1a 1b SE8 BCM BROWN BLUE 230 V 50Hz F10A BROWN RED 12 11 10 9 8 7 6 5 4 3 2 1 BLUE BLUE LIGHT BLUE M1 M3 VT 2 1 BROWN BROWN BROWN BROWN BROWN BROWN BROWN BROWN BROWN BLUE BLUE BLUE BROWN ORANGE ORANGE BROWN BLACK RELE BLUE 5 1 2 3 SL BLUE BLUE B...

Page 35: ...rmer Modulating Fan Reset push button Global PG PR SR SR SRR TL TL 1 8 VG E ACC 1 8 E RIL 1 8 IG IS KF LTLG PV 1 8 SMG SL SE8 BCM 1 8 TLG 1 8 TRA ACC 1 8 VM 1 8 BLACK 3 8 MODULES BLUE LIGHT BLUE BROWN LIGHT BLUE BROWN YEL GREEN BROWN WHITE LIGHT BLUE LIGHT BLUE YEL GRREN RED BROWN BLACK LIGHT BLUE BROWN WHITE BROWN BLUE BROWN BLUE BROWN TR ACC 1 TL2 TL8 PV2 PV8 SR2 SR8 4 1 2 5 1 2 3 RIL REG ALIM 2...

Page 36: ...8 A9 A10 A11 IV 4 M 2 1 3 n 1 2 3 4 IX L H BUS 50 Hz 230 V 1 2 3 III IMP 0 10V F17 F15 3 1 FBR 1 2 VIII PT1000 F14 F13 1 2 V SPF F12 F11 VF AF KF SPF VF F9 F8 F6 F5 F3 F2 F1 FBR eBUS FA 0 10 V 1 2 I VII 6 7 8 9 10 1 2 3 4 5 N L 1 L 1 1 2 1 Power supply PINK GREY From BCM BLUE BROWN BLACK Terminal II II A1 A2 A3 A4 A5 A6 N L1 L1 M T1 T2 6 7 8 9 10 1 2 3 4 5 N L 1 L 1 1 2 1 II N L1 L2 Neutral conduc...

Page 37: ...ensor Buf stor tank middle sensor FBR heat circ 1 room sensor Buf stor tank top sensor FBR heat circ 1 set value 1 2 V SPF F12 F11 VF Terminal V V VF SPF Pin 1 Flow sensor heating circuit 1 sensor multifunction 1 Pin 2 Service water low sensor sensor multifunction 2 1 2 VIII PT1000 F14 F13 Terminal VIII F13 F14 Pin 1 Sensor HS2 Solar 2 Multifunction relay 3 Pin 2 Sensor Solar 1 Sensor multifunctio...

Page 38: ...tions description INSTALLATION OF A BOILERWITH CONNECTIONTO A DIRECT HEATING ZONE INSTALLATION OF A BOILERWITH CONNECTIONTOTWO DIRECT HEATING ZONES D H W PRODUCTION 9 10 outdoor sensor 6 7 Storage tank sensor 4 Pump heating circuit 1 5 Pump heating circuit 2 6 Cylinder charging pump SPF AF n 5 Re circulation pump storage tank VF 4 5 Flow sensor heating circuit 2 9 10 outdoor sensor 4 Pump heating ...

Page 39: ...NE DIRECT HEATING ZONES D H W PROD SPF AF 1 Mixer motor heating circuit 1 OPEN 2 Mixer motor heating circuit 1CLOSE n 5 Re circulation pump storage tank VF 7 Mixer motor heating circuit 2 OPEN 8 Mixer motor heating circuit 2 CLOSE n 5 Re circulation pump storage tank 9 10 outdoor sensor 6 7 Storage tank sensor 4 Pump heating circuit 1 5 Pump heating circuit 2 6 Cylinder charging pump SPF AF VF 4 5...

Page 40: ...g circuit 1 5 Pump heating circuit 2 6 Cylinder charging pump SPF AF n 5 Re circulation pump storage tank VF V 2 Hot water tank low Multifunction relay sensor 2 2 PT1000 sensor solar 1 Multifunction relay sensor 4 PT1000 For the connection to a solar installation it is necessary to change some parameters See Table Expert AREA Level SOLAR MF MF 4 FUNCTION 23 4 Collector pump 7 Mixer motor heating c...

Page 41: ... be set to 01 to 08 4 Collector pump 1 Flow sensor heating circuit 1 VF 10 I 10 Ground outdoor sensor 9 10 outdoor sensor 4 5 Flow sensor heating circuit 2 6 7 Storage tank sensor 4 Pump heating circuit 1 5 Pump heating circuit 2 6 Cylinder charging pump SPF AF VF 7 Mixer motor heating circuit 2 OPEN 8 Mixer motor heating circuit 2 CLOSE 1 Mixer motor heating circuit 1 OPEN 2 Mixer motor heating c...

Page 42: ...ol of heating request temperature set point and modulation level Monitoring of boiler operation and temperature status Alarm control Functional parameters setting Management of the header pump Relay command for running a pump at fixed rate 0 10 analogical output for control of a modulating pump Special functions Emergency it avoids system shutdown caused by an interruption in communication with th...

Page 43: ...US 1 2 3 III IMP 0 10 V F17 F15 3 1 FBR 1 2 VIII PT1000 F14 F13 2 V SPF F12 F11 6 1 2 3 4 5 1 2 N L1 L1 1 2 3 4 IX L H BUS E8 Cascade Manager BCM modulex 2 Y2 1 2 E8 modulex 2 BUS L H SLAVE 1 SLAVE 2 System Supervisor E8 CanBUS Cascade Manager Scheda PLC BMS Modbus MASTER 0 1 2 3 4 5 6 7 8 9 BCM Pos 1 0 1 2 3 4 5 6 7 8 9 BCM Pos 2 I Comunication by MODBUS II Comunication by E8 Switch C see pag 47 ...

Page 44: ...x 2 Y2 3 4 Cascade Manager System Monitor BCM board eBUS Modbus System Manager System Supervisor PLC BMS board Modbus 0 1 2 3 4 5 6 7 8 9 BCM Pos 1 7 0 1 2 3 4 5 6 7 8 9 BCM Pos 0 0 1 2 3 4 5 6 7 8 9 BCM Pos 1 The applications in a cascade arrangement managed with an additional BCM require the correct boiler address setting within the cascade formation via the BCM s internal SWI selector 0 7 all d...

Page 45: ... Y3 1 2 3 Jp1 1 2 3 Y4 4 DL1 DL2 DL3 1 2 3 Y1 4 5 6 A1 SW1 eBUS remoto BCM eBUS eBUS 24 V eBUS remoto BCM modulex 2 Y2 3 4 I Comunication by MODBUS II Comunication by E8 Switch C see pag 47 in Position 0 for each boilers In this configuration switch C must be positionned on 0 The applications in a cascade arrangement managed with Modbus require the correct boiler address setting within the cascade...

Page 46: ...s preset to 3 for minimum speed 10 Volt for maximum speed These values can be changed according to the type of pump fitted For further information on the 0 10Volt signal please also refer to the pump s manual MODULATING PUMP ON OFF PUMP MODULATING PUMP 1 2 3 Y2 4 5 6 7 Y3 1 2 3 Jp1 1 2 3 Y4 4 DL1 DL2 DL3 1 2 3 Y1 4 5 6 A1 SW1 PUMP BCM eBUS eBUS 24 V N L1 N L1 P N L POWER TERMINALS E8 ALARM Mains s...

Page 47: ... the system a filling tap has to be foreseen on the system return pipe The filling up can also be made through the draining tap on the boiler return manifold Never use such a tap to drain the system since the system dirt could gather in the boiler and compromise its operation The system itself shall be equipped with its own draining tap whose size depends on the system capacity The application of ...

Page 48: ... decrease the value and in an ANTICLOCKWISE direction in order to increase it Follow this procedure also for the other burners B REGOLAZIONE ALLA POTENZA MINIMA Force the desired burner working at minimum output CASCADE MAN 10 Check that the C02 values are within the values indicated in the table Burner pressures If necessary correct the value by turning the adjustment screw B in a CLOCKWISE direc...

Page 49: ...clockwise direction until you arrive to the abutting end than slacken for 3 turns Verify the boiler ignition if the boiler goes into lockout slacken the screw A again of one turn than retry the ignition If the boiler goes into lockout again carry out the above indicated operations until the boiler is lighted At this point carry out the burner adjustment as previously indicated Smokes sampling poin...

Page 50: ...the operating flap turn clock wise Shaft encoder to symbol BOILER 01 00 BOILER 02 00 CHANGE PER CENT 0 MIN TO 100 MAX BOILER 01 100 BOILER 03 00 BOILER 04 00 BOILER 05 00 BOILER 06 00 BOILER 07 00 BOILER 08 00 Turn anticlok wise Turn clok wise Press to open the level Turn clok wise Press to open the level ATTENTION The chimney sweeper mode re mains active for 15 minutes Past this period the standa...

Page 51: ...aged by the BCM II Parallel connection the cascade is managed by the E8 F Relay of the condensate level sensor when the led is On it means every thing is OK when the led is Off it means that the condensate level sensor has cut the power supply to the boiler and the boiler stays Off till the level of the condensate decreases under a certain level Note The switches are positioned under the front pan...

Page 52: ...hon through the filling hole and check the correct drainage of the condensate If the appliance is used with the condensate drain siphon empty this could cause poisoning caused by the leakage of the flue gasses there are no water leaks all the necessary ventilation conditions and minimum cle arance distances are guaranteed for subsequent servi cing in case the boiler is sited in a cupboard compartm...

Page 53: ...it cannot be switched ON acci dentally Switch off the gas gate valve upstream the boiler If necessary and in function of the type of work to be carried out close any on off valves fitted on the CH flow and return pipes as well as the cold inlet valve Remove the appliance s front panel After maintenance works have been finished follow the next steps Open the CH flow and return valves as well as the...

Page 54: ...is within 5 of the value shown in the chapter 3 24 the boiler does not need to be cleaned The operation then can be limited to the cleaning of the siphon 1st phase Disassembly Switch off power and gas supply and ascertain the gas cock is well closed Unscrew the coupling at the gas inlet Remove the front rear and top panels of the casing Remove the plug of the supply cord from the 230 V socket Remo...

Page 55: ...rvicing schedule Remove the safety clip D of the supporting rod E Rotate the burner assembly on its rotation axis two persons required D E F F Bring up the supporting rod E and fix it with the safety clip D ...

Page 56: ... cutter betwe en the red gasket and the aluminium body Do this on the three sides L M and N of the burner Remove the burner by lifting it only on the long sides right or left as shown in fig O to avoid its deformation Repeat the a m operations for each individual burner WARNING AT EACHMAINTENANCESERVICE IT IS COMPULSORY TO REPLACE THE SEALINGGASKETOFEACHBURNER GASKETKITFOR SUPERMODULEX Code No 952...

Page 57: ...luminum sections have been washed make sure the condensate evacuation siphon is free if neces sary clean it Inspect the flue duct and the smoke chamber 3rd phase Reassembly Replace the burner sealing gaskets Reassemble all the components previously removed by following the reverse order Before starting the boiler ascertain that the condensate si phon is filled with water Before opening the gas coc...

Page 58: ...0 kW ma inferiore a 1000 kW Gas fired central heating boilers Type C boilers of nominal heat input exceeding 70 kW but not exceeding 1000 kW 92 42 EEC Direttiva Rendimenti Boiler Efficiency Directive 90 396 EEC Direttiva Gas Gas Appliances Directive Caldaie per riscaldamento centralizzato alimentate a combustibili gassosi Requisiti specifici per caldaie a condensazione con portata termica nominale...

Page 59: ......

Page 60: ...ag info unical ag com The Unical declines every responsibility for the possible inaccuracies if owed to errors of transcript or press Also reserves the right to bring those changes that it will hold necessary to it own products or profits without jeopardizing its essential characteristics ...

Reviews: