background image

                                                                                            UTL8200 User Manua


8


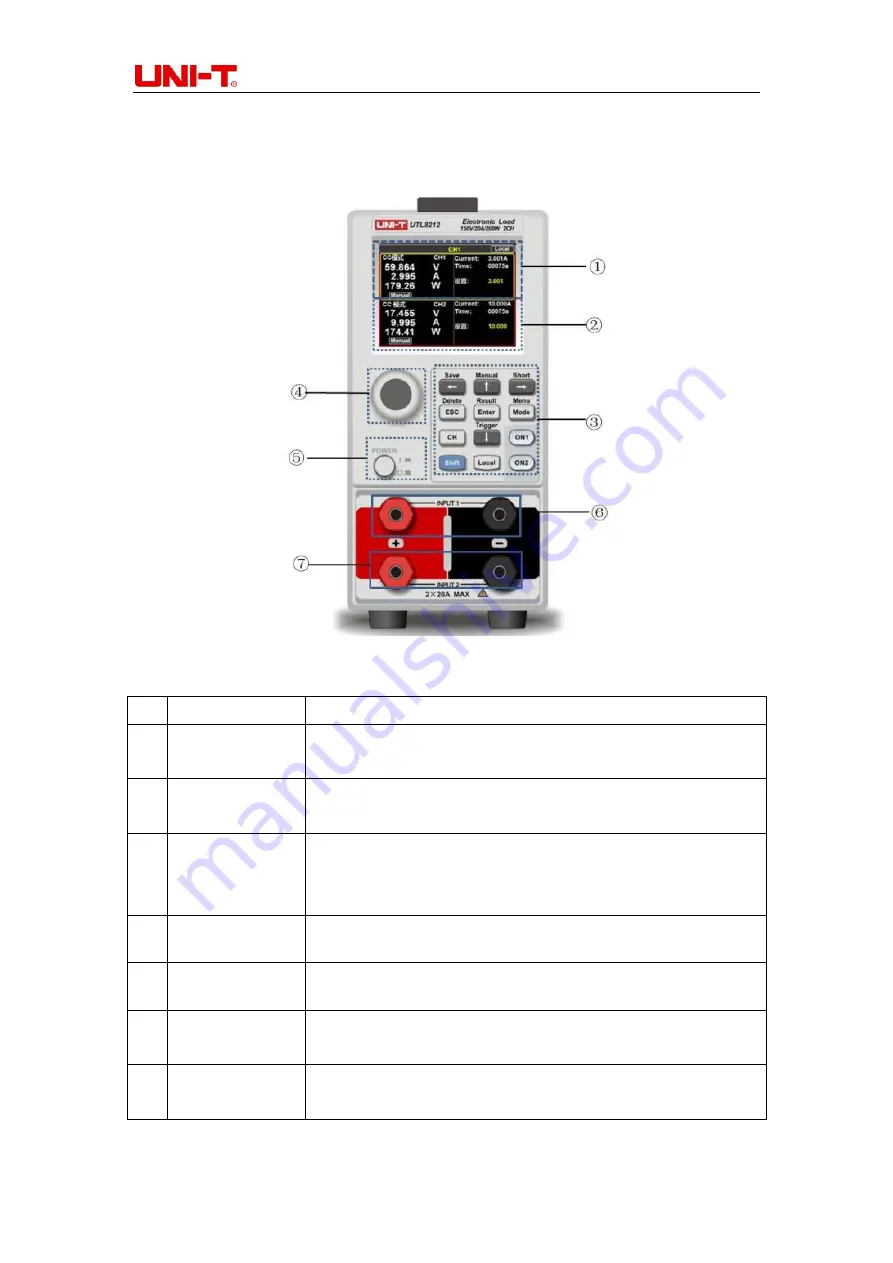
1.2 Front Panel 


Figure 1-2 UTL8212


Front Panel (Dual Channel) 


No. 

Item 

Description 

① 

LCD display 

Channel 1 

It  is  used  to  display  the  operating  status,  measurement 

parameters and mode of channel 1. 

② 

LCD display 

Channel 2 

It  is  used  to  display  the  operating  status,  measurement 

parameters and mode of channel 2. 

③ 

Buttons 

They are used to select test modes (CC, CV, CR, CP and more); 

In other interfaces, follow the on-screen instructions to perform 

specific operating functions 

④ 

Pulse knob 

It is used to adjust the parameters or move cursor in the menu. 

⑤ 

Power button 

Press it to power on/off. 

⑥ 

Channel 1 

Input terminals 

They are used to connect power supply. Please do not inversely 

connect to prevent damage. 

⑦ 

Channel 2 

Input terminals 

They are used to connect power supply. Please do not inversely 

connect to prevent damage. 

Summary of Contents for UTL8200 Series

Page 1: ...UTL8200 Series Electronic Load User Manual ...

Page 2: ...by the user during the warranty period the maintenance fee and the costs caused by the maintenance shall be borne by the user and the instrument shall be maintained by the company for life If the original purchaser sells or transfers the product to a third party within one year from the date of purchase of the product the warranty period of one year shall be from the date of the original purchase ...

Page 3: ...ves b Any damage caused by improper use or connection to an incompatible device c Any damage or malfunction caused by the use of a power source not provided by UNI T d Any maintenance on altered or integrated products if such alteration or integration leads to an increase in time or difficulty of product maintenance This warranty is written by UNI T for this product and it is used to substitute an...

Page 4: ...ls before connecting The instrument supports 2 kinds of AC input method 110V and 220V Please check if the switch of load matches with the input power source and if the fuse is correctly installed Please do not use the instrument in inflammable and explosive environment Do not use or store the instrument in high temperature high humidity flammable explosive and strong magnetic field environments Sa...

Page 5: ...splay 12 3 2 2 Measurement Interface Display 13 3 2 3 Status Information 13 3 2 4 Running Indicator 13 4 Measurement Settings 13 4 1 Mode Setting and Test 14 4 1 1 Constant Current Test 14 4 1 2 Constant Voltage Test 15 4 1 3 Constant Resistance Test 16 4 1 4 Constant Power Test 16 4 1 5 Dynamic Test 17 4 1 6 List Test 19 4 1 7 Battery Test 20 4 2 Short Circuit Test 21 4 3 Parameter Input and Oper...

Page 6: ...h 1mV 1mA and it has various test functions and modes for users to choose The instrument can be configured with RS232 communication module to flexibly meet on site test conditions and is convenient to connect with automated production lines and automatic test systems ATS 1 1 1 Features Four basic test modes CC CV CR CP High resolution of 1mV 1mA Minimum rise time of dynamic current test 500us Volt...

Page 7: ...05 0 05 FS 16 bit Precision Precision Dual channel 0 150V 0 2A 0 20A 2 200W 0 18V 0 150V 1 mV 10 mV Resolution Precision 0 05Ω 7 5kΩ 0 4A 0 40A 10mW 0 1 0 5 FS 0 18V 0 150V 1mV 10mV 0 1 0 5 FS 200W 0 001 0 15 A μS 0 05 0 1 FS 0 4A 0 40A 0 2A 0 20A Dynamic current 100μS 3600S 5 μS 100 ppm Dynamic mode Voltage readback Current readback 1mA 10mA 0 05 0 1 FS 400W 200W 10mW 0 1 0 5 FS Basic protection ...

Page 8: ...of channel 2 Buttons They are used to select test modes CC CV CR CP and more In other interfaces follow the on screen instructions to perform specific operating functions Pulse knob It is used to adjust the parameters or move cursor in the menu Power button Press it to power on off Channel 1 Input terminals They are used to connect power supply Please do not inversely connect to prevent damage Cha...

Page 9: ... used to set the operating mode CH It is used to switch channel UTL8212 only ON1 ON2 Load input control ON OFF 1 2 2 Shortcuts The buttons on the panel can be used together with the Shift button to realize the functions marked above the buttons Press Shift first and then press other buttons Buttons Description Shift Save Save list files Shift Manual Switch trigger mode Shift Short Short circuit te...

Page 10: ...k whether the accessories are missing according to the packing list If it is damaged or the accessories are missing please contact UNI T Instrument Sales Department or the distributor immediately Items Quantity Remarks DC electronic load 1 The model is subject to the actual order Power Cord 1 Use only a specified power cord which is authorized in the country of use 250VA 0 5A spare fuses 2 Note 11...

Page 11: ... Warning Please do not use the damaged power cable to avoid danger Use the 250V 0 5A fuse when 110V AC power is input 2 3 Operating Environment The operating environment requirements are listed as follows During the on load process the speed of the cooling fan will be intelligently adjusted based on the change of the cooling fin s temperature Operating environment Requirements Operating temperatur...

Page 12: ...n of correct power on and self check indicates that the load meets the factory standards so users can use it normally Warning Please make sure that the power supply voltage is consistent with the supply voltage before turning on the power otherwise the instrument will be burnt out Please be sure to connect the main power plug to a power socket with ground protection Do not use a wiring board witho...

Page 13: ...ntrol mode Local Remote Current operating mode Local Remote Trigger mode Manual Ext Trig Current trigger mode Manual External Trigger ready Trigger Wait for trigger the icon will disappear after triggering Short circuit Short Short circuit test mode 3 2 4 Running Indicator The UTL8200 series electronic load comes with running indicator on the ON button In on load mode the indicator will light up r...

Page 14: ...current when the voltage rises to remain constant power Dynamic test Two different current values are set The load will switch between these two values when testing List test Up to 16 step different loading modes can be set It can customize the stepping mode and the upper and lower limits of test and judgment and can save the list test files Battery test Discharge the measured battery by CC CR CP ...

Page 15: ... press the ON button again to stop it 4 1 2 Constant Voltage Test In CV mode the electronic load changes current consumption to keep the input voltage as set value In the mode selection interface select the CV mode press Enter to enter the main operating interface and enter the voltage value in the main interface Press the ON button the electronic load starts to load and the indicator light lights...

Page 16: ...ship of Voltage and Current in CR Mode Operation steps 1 After starting up first press the CH button to select the operating channel The yellow wireframe area is the selected channel And CH1 or CH2 will be displayed at the top of the screen UTL8212 only 2 Press the Mode button to enter the mode selection interface select the CR mode with the pulse knob or direction buttons and then press Enter to ...

Page 17: ... Through the set operation mode the load is switched back and forth between the two values Table 4 1 5 1 Dynamic Mode CC Setting Interface Dynamic Local Operating mode Continues Repeat 01000 Lower value 1 000 A Lower duration 100 0 ms Upper value 5 000 A Upper duration 100 0 ms Rise slope 0 100 A us Fall slope 0 100 A us Parameters of dynamic mode Dynamic mode Description Operating modes Continues...

Page 18: ...on to select the operating channel The yellow wireframe area is the selected channel And CH1 or CH2 will be displayed at the top of the screen UTL8212 only 2 Press the Mode button to enter the mode selection interface select the dynamic mode with the pulse knob or direction buttons and then press Enter to enter the dynamic mode setting interface 3 Select the modified parameter with the pulse knob ...

Page 19: ... stop loading First press Shift and then press the Save button to finish saving Mode There are four options for setting the operating mode Continues Trig Con Err Trig Err Continues The load will continue the next step after executing one step until the end of the operation Trig The load will pause after executing one step and wait for the trigger signal before continuing the next step Err The test...

Page 20: ...s Enter to view different parameter options stop pressing on the selected option and then press the direction buttons or rotate the pulse knob to enter the next parameter setting When setting the mode parameters value time min max position the cursor on the parameter that needs to be set and press Enter At this time the setting xxxx at the bottom of the screen will change to a specific value which...

Page 21: ...select the battery mode with the pulse knob or direction buttons and then press Enter to enter the battery mode setting interface 3 Select the modified parameter with the pulse knob press Enter to modify and press Enter again to save the modification 4 After setting the parameters press the ON button to enter the battery test interface channel 1 ON1 channel 2 ON2 5 Press the ON button to start the...

Page 22: ...ntrol the input switch of the load by pressing the ON1 ON2 button on the front panel When the ON button indicator light is on it means it is in the loaded status and when the ON button indicator light is off it means it is in the unloaded status 4 4 Alarm Prompts 1 Overvoltage protection load input voltage is higher than the set value of overvoltage protection 2 Overcurrent protection load current...

Page 23: ...h communication cables and commands are sent on the PC to perform operations on the load through the upper computer software When the electronic load is in remote mode except for the Local Remote button other buttons on the panel will not work When the users do not need the remote function they can switch to local mode by pressing the Local Remote button The status bar at the top of the screen wil...

Page 24: ...n sound On Off Whether to enable warn sound Key sound On Off Whether to enable key sound Initial mode Default Last Default Boot into the CC mode interface Last Boot into the last test mode Restore factory setting Choose to restore factory settings The instrument will delete the current setting parameters and restore to the status of factory settings Baud rate 9600 19200 384 00 57600 115200 Set the...

Page 25: ...eter setting is used to set the operating parameters and protection parameters of the system The detailed setting range is related to the model Parameter setting Setting range Description Run time 0 99999s Set the time of each load No matter in which mode the load will stop automatically when it operates to the corresponding operating time Short time 0 1 99999ms Set the time for a single short cir...

Page 26: ...odel version number and serial number 6 Communication Communication Interfaces Communication Settings 6 1 Communication Interfaces The UTL8200 series electronic load is equipped with standard RS232 communication interface The users can use the corresponding communication cable for remote operation There is a DB9 female interface at the end of the electronic load which can be connected to the compu...

Page 27: ...can purchase the needed connecting cable to achieve remote control with the electronic load Before connecting to the upper computer please make sure to purchase the designated connection lead and set the correct communication parameters Settings steps 1 First press Shift and then press Mode to enter the system Menu setting page 2 Press System Configuration to enter the System Configuration page 3 ...

Reviews: