6
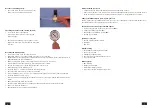
Pressure equalizing screw
•
The scored screw knob in the lower part of the
pump is used to equalize both pressures.
Checking the value of the created vacuum
•
To check the value of the negative
pressure (vacuum) created, use the supplied
pressure gauge.
•
Both scales are calibrated in mercury (Hg) column
height. The inner scale is in (mm) and the outer scale
in inches.
Bleeding the break system
•
To bleed the system follow the sequence below:
•
Main brake cylinder - if it is equipped with a socket for hose connection.
•
Break callipers in the following order; start with the wheel closest to the main brake cylinder and move on
gradually towards the most distant wheel.
•
Bleed the main brake cylinder if it is equipped with a socket for hose connection.
If you installed a new brake cylinder you must always bleed the cylinder.
•
Choose the suitable hose coupling adapter and slide it into the hose.
•
Place the adapter on the bleeding screw.
•
Press the pump 10 - 15 times to create the necessary vacuum.
•
Check the value of the vacuum on the pressure gauge.
•
Turn the bleeding screw 1/4 up to 1/2 of a turn and fill about half of the container with the break fluid.
•
Close the bleeding screw to close it.
•
Turn the pressure equalizing screw to equalize the pressure in the system with the atmospheric pressure
outside.
•
Empty the drained fluid from the container.
•
Refill the engine break fluid reservoir with new break fluid, all the way to the line marked "max."
•
Move on to bleed the next wheel.
•
Repeat the above steps until you bleed all wheels.
7
After you finish your work
•
Clean and flush the entire set with water, disassemble all parts and let it dry.
•
Remove (unscrew) the scored screw knob for pressure equalizing and apply few drops of oil inside the hole.
Screw the knob back in and press the pump handle several times to evenly distribute the oil inside.
Other possibilities where you may use your set:
There are many other possibilities where you may use your set. It all depends on the technical parameters of
the equipment and on the objective that you want to achieve.
Inspection of electronically controlled engine
•
You may check the atmospheric pressure sensor (BARO)
•
Crankcase ventilation system (PCV)
•
Exhaust gases recalculation system (EGR)
•
Vacuum sensor (MAP)
Ignition accessories
•
Vacuum regulated advanced spark
•
RCV valve
•
SDV valve
System testing
•
Air-condition and heating vehicle systems
•
Speed control system
•
Headlights positioning system
•
Fuel system and fuel tank leakage inspection
•
Door control system
Brake system
•
ABS bleeding
•
Break system bleeding
•
Brake fluid draining operations
•
Inspection of vacuum operated break booster


