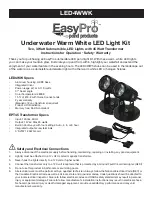
MODELS A13A11A13-10A16B, 120VAC/150W & A13A11A13-11A16B, 240VAC/150W
BALLOON
PART
DESCRIPTION
1
10001
MAIN BODY / COFFERDAM
2
10002
FRONT FLANGE
3
10003
GLASS RETAINING RING
4
10004
REFLECTOR TUBE
5
10005
REFLECTOR
6
10006
COMPRESSION RING
7
10007
LOCKING RING
8
10008
CONNECTING RING
9
10009
PROJECTOR LID
10
10010
GLASS
11
10011
GLASS GASKET
12
10012
CONNECTING RING GASKET
13
10013
REFLECTOR TUBE O-RING
14
10014
PROJECTOR LID O-RING
15
10015
FRONT FLANGE O-RING
16
10016
LAMP SOCKET
17
10034
LAMP, 150 WATT
18
10018
PORCELAIN TERMINAL BLOCK
19
10019
CABLE STRAIN RELIEF
20
10020
M6 x 1.0 x 14LG SST SHCS
21
10020
M6 x 1.0 x 14LG SST SHCS
22
10032
M4 x 0.7 x 16LG SST SHCS
23
10024
M6 x 1.0 x 25LG SST SET SCREW
24
10025
M6 x 1.0 SST HEX LOCKNUT
Installation:
To be installed by qualified personnel only at minimum 250-300mm (10-12”) below the light load water line using proper tools and materials. The
minimum hull thickness is 10mm (0.4”) and maximum (for sufficient light cooling) is 90mm (3.5”) with an access area of at least 75mm (3”) left
behind the light for lamp servicing and general ventilation.
After selecting a flat surface, cut a 100mm (4”) diameter hole through the vessel hull in the desired location. Caution! Check that no electrical
wiring, fuel lines, oil lines, water lines etc., pass near or through the intended hole location.
For light disassembly remove six nuts (24), remove Projector Lid (9), carefully disconnect ground wire, remove Connecting Ring (8), remove
Locking Ring (7) and remove Compression Ring (6) from Main Body (1).
Warning! Do not rotate Connecting Ring (8) while attached to
Projector Lid (9) or ground wire damage will occur!
Carefully coat Main Body (1), Front Flange (2) and inner surface of hull hole with 3M
5200 Marine Adhesive or equivalent. Caution! Avoid placing excess adhesive on Main Body (1) threads. Note: Exposed inner hole surface must be
properly sealed before light installation to prevent potential water intrusion into the hull proper. Holding Front Flange (2), push Main Body (1)
through hull hole, slide Compression Ring (6) over Main Body (1) and then tighten Locking Ring (7) hand tight. Note: Ensure that the tips of all six
fasteners (21) are NOT touching Compression Ring (6). After the 3M 5200 Marine Adhesive is fully cured, tighten six fasteners (21) to 9 Nm (7
ft/lbs) using a 5mm allen wrench.
Upon making proper electrical connections (see ballast manual), reverse aforementioned light disassembly procedure and tighten six nuts (24) in a
criss-cross pattern to 2 Nm (1.5 ft/lbs). Note: Apply anti-seize compound to Connecting Ring (8) internal threads. Upon completing light
installation, it is highly recommended that Front Flange (2) be coated with antifouling paint. Also, hand tighten 4mm set screw located in Locking
Ring (7), then connect wire lead from 4mm screw provided on Locking Ring (7) to the vessels grounding and cathodic protection system.
Serviceable Parts:
For Lamp replacement remove six nuts (24), remove Projector Lid (9), carefully pull Lamp (17) out of Lamp Socket (16), push new Lamp (17) into
Lamp Socket (16), install Projector Lid (9) and tighten six nuts (24) in a criss-cross pattern to 2 Nm (1.5 ft/lbs). Caution! Ensure that the new lamp
is clean and free of dust, dirt, grease, oil, water and finger prints.
For glass replacement remove six nuts (24), remove Projector Lid (9), carefully disconnect ground wire, remove Connecting Ring (8), remove
Reflector Tube (4), remove Glass Retaining Ring (3), remove six fasteners (20) and remove Glass Gasket (11). Upon thoroughly cleaning all
surfaces, reverse said procedure to assemble and tighten six nuts (24) in a criss-cross pattern to 2 Nm (1.5 ft/lbs). Note: Six fasteners (20) are
tightened in a criss-cross pattern to 9 Nm (7 ft/lbs) using a 5mm allen wrench.
SV10 Light
120VAC/150W
240VAC/150W
Underwater Lights Europe Sarl
16, rue Rouaze
06400 Cannes, France
Phone: 33-(0)-4-97-21-02-96
Fax: 33-(0)-4-97-21-10-96
Internet: www.seavision.com
Underwater Lights USA, LLC
3406 SW 26th Terrace, C-6/7
Fort Lauderdale, FL 3331
2
USA
Phone: 1-954-760-4447
Fax: 1-954-525-3261
Internet: www.seavision.com
Email: [email protected]
DOC:101205-14
Email: [email protected]