UNCOMMON CARRY DIY MINI ROBOT V2 User Manual Download Page 17

Program a variety of 

controls for the robot.
You can program the robot 

to steer, light displays, and 

play music, among other 

functions.

“Program Robot” Would Like

to Use Bluetooth

OK

Don’t Allow

12:00

Scan Device

Scaning...

1:02

Program

Bluetooth permission needs to be 

activated and kept on for smooth 

communication between the 

mobile app and the DIY Robot.

Upon launching the application, 

tap on the “Program Robot” icon
Once in the “Program Robot” interface, 

the user will be prompted to activate their 

Bluetooth if it is not turned on already.
The mobile application will start 

searching for the DIY Robot and 

attempting to establish a connection.
Once a successful connection has 

been established, the connection 

interface will close automatically.
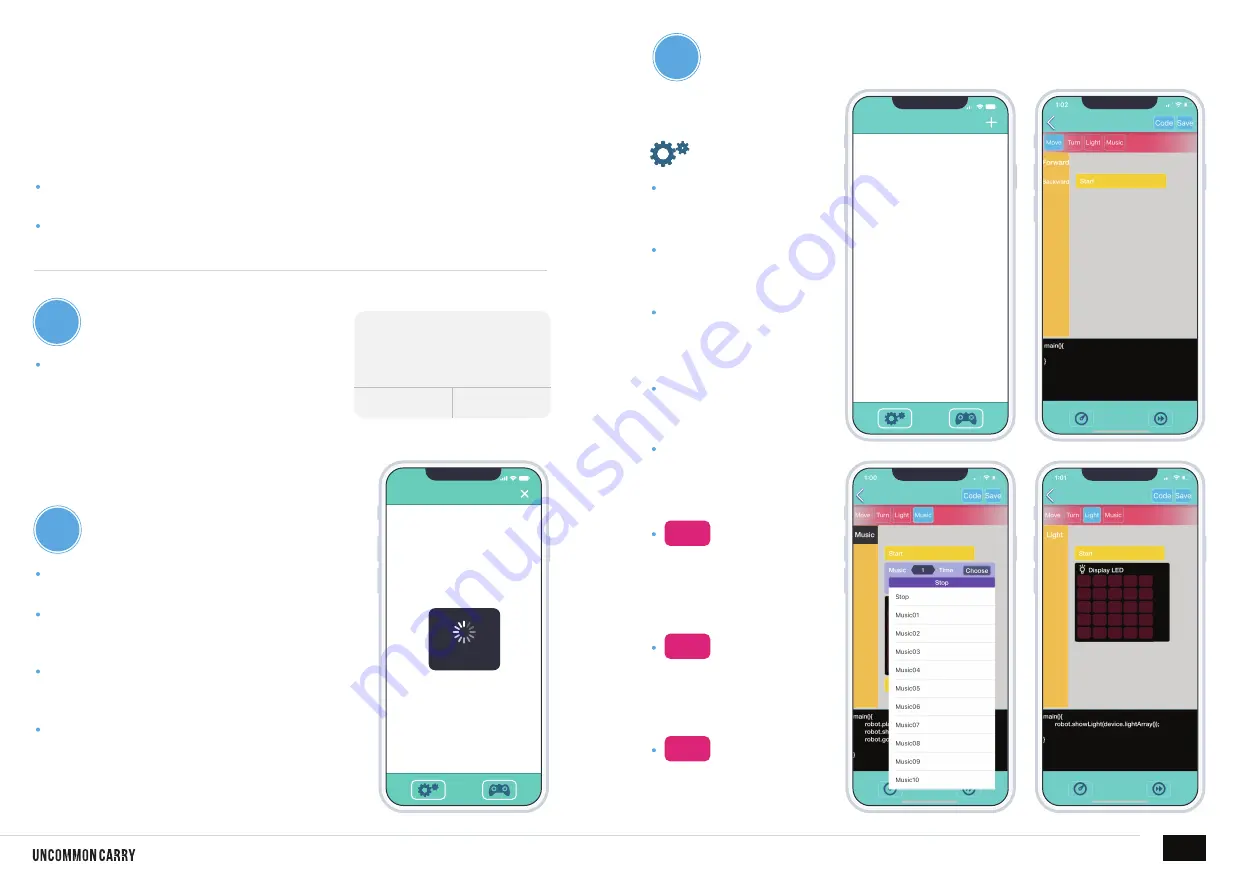
CREATING A

PROGRAM

By tapping the Gears icon 

in the bottom left corner, 

the user is transferred to 

the PROGRAM section.
By default, the application 

does not come with a 

program for the DIY 

Robot to follow.
The user must create a 

program. This is done by 

tapping the ” + ” button 

in the top-right section of 

the mobile application.
To start programming, 

tap and hold one of the 

four options presented: 

Move, Turn, Light, Music.
Once an option is added 

to the program, the user 

can adjust the details of 

each step.

instructions for use the 

mobile app with diy robot

DIY MINI ROBOT V2

15

P R O G R A M I N G

P E R M I S S I O N S

C O N N E C T  

02

03

01

The Move action 

establishes the DIY 

Robot’s forward and 

backward movement.

The Turn action directs 

the DIY Robot’s right 

or left movement.

The Light action provides 

the ability to light up pixels 

on the DIY Robot’s helmet.

3.1

Turn

Light

Move

SCAN THE QR FOR THE CORRECT MOBILE APP

     The mobile device will take you to the app store 

     and download the “stem” mobile application.
     Follow the provided instructions to set up the 

     application and connect it to the DIY Robot.

Summary of Contents for DIY MINI ROBOT V2

Page 1: ...D I S T R I B U T E D B Y Uncommon Carry 207 536 1174 www uncommoncarry com 10 W Point Ln Suite 10 215 Biddeford ME 04005 U S E R G U I D E D I Y M I N I robot v2...

Page 2: ...overheating the motor please follow the instructions carefully during assembly 02 This toy contains small parts Please keep away from children under the age of eight 8 to avoid the danger of swallowi...

Page 3: ...2 P3 P4 P5 P6 P7 P8 P9 GEAR WHITE X2 GEAR 32 10T F X1 GEAR 32T H X1 GEAR 36 14T G X1 GEAR 36 14T C X2 MECHANISM 36T E X1 GEAR 40 10T D X1 GEAR 10 T T X2 PRESSURE SCREW X21 P10 P11 P12 PRESSURE SCREW X...

Page 4: ...Plastic Accessory bODY MODULE COMPONENTS Cut plastic parts only when needed Do not cut them in advance A C B D CUT OFF THE BURRS BEFORE ASSEMBLY DIY MINI ROBOT V2 02...

Page 5: ...Make sure to screw in the P10 screws completely to the end IMPORTANT After completing the steps above remove the auxiliary tool A15 DIY MINI ROBOT V2 03...

Page 6: ...04 DIY MINI ROBOT V2...

Page 7: ...head module assembly 05 DIY MINI ROBOT V2 IMPORTANT Make sure to remove A15 before assembling step 14 MOTHERBOARD...

Page 8: ...06 DIY MINI ROBOT V2 Cut off the burrs before assembly D1...

Page 9: ...07 DIY MINI ROBOT V2...

Page 10: ...08 DIY MINI ROBOT V2 Screw the screws all the way before covering the ears D3 P9 P9 P9 D4 P9...

Page 11: ...09 DIY MINI ROBOT V2 DO NOT confuse A1 and A2 Make sure to press and hold A18 until you hear a click...

Page 12: ...10 DIY MINI ROBOT V2...

Page 13: ...DO NOT confuse A1 and A2 Make sure the direction of A19 is correct Make sure the side with A17 is facing the correct direction DIY MINI ROBOT V2 11...

Page 14: ...A12 B8 DIY MINI ROBOT V2 12 Foot and arm module assembly 01 F O O T A S S E M B L Y A R M S A S S E M B L Y 02 A7 A7...

Page 15: ...A8 B14 B11 B7 CUT OFF THE BURRS BEFORE ASSEMBLY B7 A8 B14 B12 B7 GLITCH LEFT ARM RIGHT ARM RIGHT ARM LEFT ARM REMOVE THE COVER BATTERY AAA x4 how to replace battery DIY MINI ROBOT V2 13...

Page 16: ...function Short press the switch to POWER ON The robot s eyes LED area will light up and the robot will emit sound effects The robot is in standby mode if the eyes LED area start flashing 01 App Remote...

Page 17: ...n does not come with a program for the DIY Robot to follow The user must create a program This is done by tapping the button in the top right section of the mobile application To start programming tap...

Page 18: ...up a program Instead the DIY Robot s actions will correspond to the actions performed on the mobile device Tapping the Gravity Induction button in the top right corner enables the user to control the...

Reviews: