background image

IMPORTANT NOTE. Occasionally we may release new software/firmware 

upgrades/enhancements for this television. Please check the ‘firmware 

upgrade’ section of the website regularly.


13

13

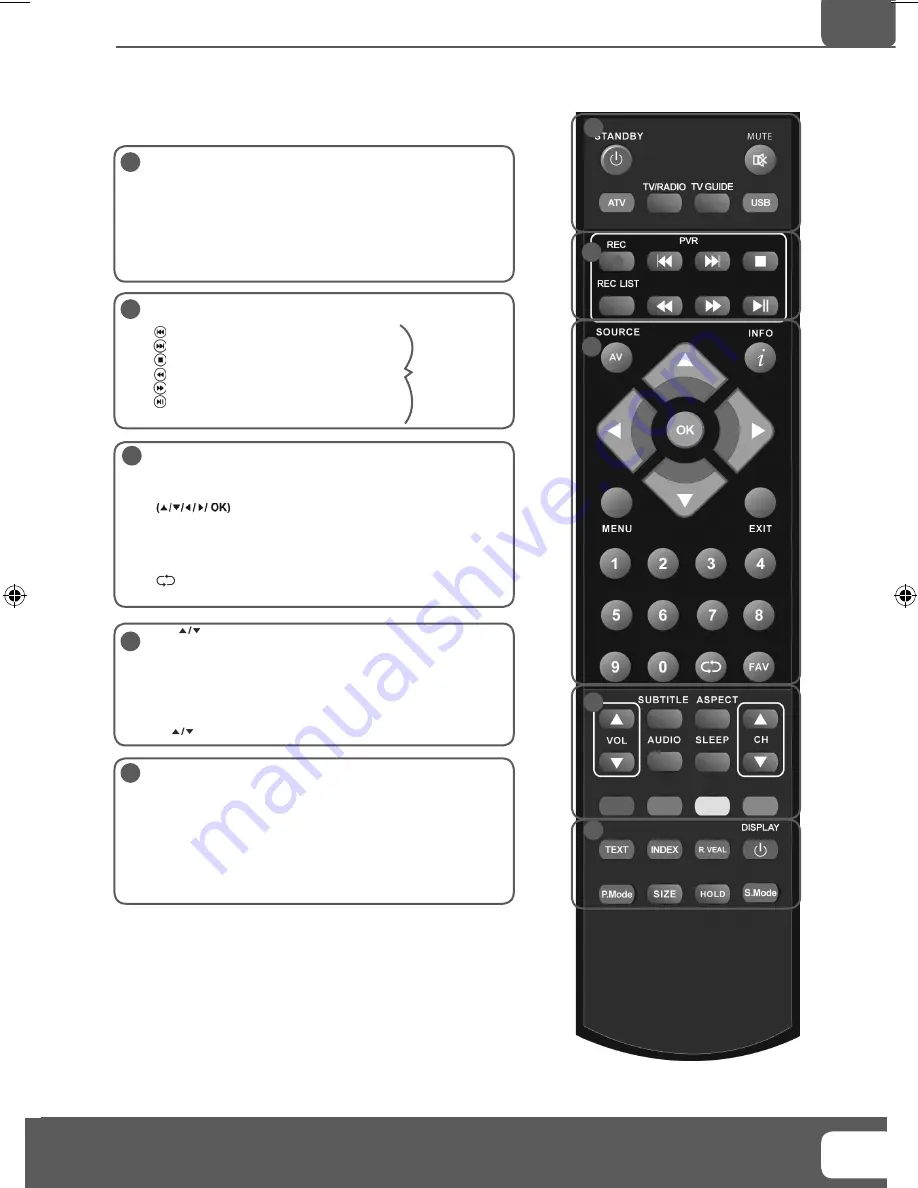
STANDBY - Switch on TV when in standby or vice versa
MUTE - Mute the sound or vice versa
TV/RADIO - Switch to Freeview and switch between TV and 
radio in Freeview mode
TV GUIDE - Opens the 7 Day TV Guide (Freeview mode)
ATV - Switch to analogue TV source
USB - Switch to USB source

REC - To record what is currently on television 
REC LIST - Opens the list of what you have previously recorded

- To restart the current chapter
- To advance forward to the next chapter
- To stop the playback 
- To play in fast rewind mode
- To play in fast forward mode
- To play/pause

SOURCE/AV - To display the input/source menu
INFO - Press once for now/next channel information
            Press twice for programme information about current  
            programme

 - Allows you to navigate the on-screen menus 

and adjust the system settings to your preference
MENU - To display OSD menu
EXIT - To exit all menus
NUMBER BUTTONS - 0 – 9 to select a TV channel directly. 

 - To return to the previous channel viewed

FAV - To display favourites menu

VOL 

 - To increase / decrease the sound level

SUBTITLE - To switch the dialogue at the bottom of the screen 
(on/off)
ASPECT - To switch the screen between the different picture 
formats
AUDIO - To change the audio language (if available)
SLEEP - Press repeatedly to cycle through the sleep options
CH 

 To increase or decrease the channel being watched

TEXT - Displays teletext 
INDEX - Goes to teletext index page
REVEAL - Reveals hidden text
DISPLAY - To switch off the screen when listening to radio
P.Mode - Cycle through different picture settings.
SIZE - Teletext mode - To change the display size in Teletext 
mode
HOLD - Teletext mode - Hold current page which is displayed
S.Mode - Cycle through different sound settings.

1

1

2

3

4

5

4

5

2

3

REMOTE CONTROL

Remote Control

Only operate when a 
USB key is inserted

E-motion Manual No.3 M-star (CR).indd   Sec1:13

E-motion Manual No.3 M-star (CR).indd   Sec1:13

9/20/2010   2:39:58 PM

9/20/2010   2:39:58 PM

Summary of Contents for X32/69G-GB-FTCUP-UK

Page 1: ...X32 69G GB FTCUP UK Full HD LCD TV with Freeview DVD USB PVR Model No User Guide...

Page 2: ...ement Never use the television if it is damaged in any way Always place the television on a at level surface avoiding anywhere which may be subject to strong vibration Ensure the television is not pla...

Page 3: ...e g Shopping channel logos and pricing displays especially if they are bright and stationary Moving or low contrast graphics are less likely to cause ageing of the screen Time Displays Teletext Do no...

Page 4: ...Up 11 TV Buttons and Input Source Menu 12 Remote Control 13 Connections 14 15 TV Menu Operation 16 20 Channel Menu 16 Picture Menu 17 Sound Menu 18 Time Menu 19 Feature Menu 20 Setup Menu 21 PC Operat...

Page 5: ...e unable to package it correctly The safest way to package your item in the event of warranty service repair is in it s original box packaging WHAT IS INCLUDED IN THE BOX Accessories Included with thi...

Page 6: ...ric wires water or gas pipes Wall mounting the TV 1 Remove the four screws highlighted below 2 The wall mount can now be easily attached to the mounting holes on the rear of the TV These holes are ind...

Page 7: ...Helpline No UK 0871 2000 463 ROI 01443 3940 Web Support www skymediauk co uk 10...

Page 8: ...u should consider connecting signal booster and re tuning the TV Fig A Fig B 4 Insert the batteries supplied into the Remote control and press the Standby button to power on the TV Tip If the TV nds s...

Page 9: ...ss or to select the input you require 3 Press OK B Using the buttons on the Television 1 Press SOURCE 2 Scroll up down using CH CH buttons to the input source you require 3 Press Vol to change input s...

Page 10: ...rent programme Allows you to navigate the on screen menus and adjust the system settings to your preference MENU To display OSD menu EXIT To exit all menus NUMBER BUTTONS 0 9 to select a TV channel di...

Page 11: ...CART OUT RF IN RF OUT DVD or VCR L N M USB USB port HDMI 1 HDMI input HDMI 2 HDMI input HDMI 3 HDMI input VGA PC VGA PC input VGA PC Audio In 3 5mm PC audio input CI CARD IN Common Interface Card Inpu...

Page 12: ...cable A HDMI cable can output both video and audio and enables you to enjoy digital quality video and audio with minimal loss of quality TVs Input Source should be set to HDMI Option 2 via Component c...

Page 13: ...ing Allows you to manually tune your digital signal Analogue Manual Tuning Allows you to manually tune your analogue signal Programme Edit Allows you to delete skip and add favourite channels To acces...

Page 14: ...nually alter all the settings Contrast Switch the balance between black and white Brightness Increase or decrease the brightness of the picture Colour Increases the colour from black and white Tint Le...

Page 15: ...Movie Provides live and full sound for movies Personal Selects your personal sound settings Sports Emphasises sound for sports Digital Output This is the digital COAX Audio output Choose from the foll...

Page 16: ...on To exit this menu at anytime press EXIT button AV Clock Set the date and time Off Time Allows you to set a speci c time for your TV to turn off On Time Allows you to set a speci c time for your TV...

Page 17: ...a smartcard The CAM can then be inserted into the COMMON INTERFACE PORT CI Card In System Lock Allows you to lock or unlock the menu You will be asked to enter a 4 digit password use the button to qui...

Page 18: ...a blue background Only available on some sources Menu Duration Lets you adjust the amount of time the On Screen Menu stays on the screen before disappearing Reset to default Reset Menu System This re...

Page 19: ...to that of the television move the slider 6 Left click on the drop down for Screen refresh rate and select 60 Hertz if you experience picture noise or ickering select 50 hertz or 70 hertz 7 Click on A...

Page 20: ...it this menu at anytime press EXIT button Auto Adjust Lets you automatically con gure the television to be used as a computer monitor H Offset Changes the horizontal position of the picture V Offset C...

Page 21: ...RED Set a reminder by pressing GREEN View a previous day by pressing YELLOW View the next day by pressing BLUE 3 Press EXIT to exit the 7 day TV Guide 7 Day TV Guide Note This TV is designed to opera...

Page 22: ...4GB 8GB and 16GB Please check the web site helpline for latest speci cations and prices Minimum Speci cation USB Memory Stick Read Speed 20 MB s Mega Byte Per Second Write Speed 6 MB s Mega Byte Per S...

Page 23: ...rent types of content that you have saved on your USB Memory Stick On switching to USB source the above menu screen will appear The content will be divided into Photo Music Movie and Text based on le...

Page 24: ...rlier you will need to purchase a new Sky Remote control in order to operate the TV s functions At the point of manufacturer of this TV the latest Revision 9 remote controls are only available to purc...

Page 25: ...ecording In addition to connecting via SCART you should connect the aerial cable from the wall socket to your VCR DVD Recorder and another aerial cable from the VCR DVD Recorder to the TV Game Console...

Page 26: ...00 1 Brightness cd m2 450 450 430 PC RGB Yes Yes Yes RF 75 ohm Antenna PAL SECAM Video Inputs 1 x SCART 1 x Video 1 x Component YPbPr 1080i Sound Inputs 1 x 3 5mm jack for PC audio input 1 x pair RCA...

Page 27: ...Helpline No UK 0871 2000 463 ROI 01443 3940 Web Support www skymediauk co uk 30 General Information...

Page 28: ...are receiving the very latest TV and radio channels that are broadcast 1 On the remote control press MENU followed by 8 8 8 8 so the number 8 button four times 2 The First Time Installation menu will...

Page 29: ...XMU MAN 0089...

Reviews: